
Imagine sitting with your family, watching moments from old Mini VHS tapes come alive in crisp digital clarity. Those birthday parties, holiday gatherings, and first steps deserve more than a dusty shelf.
This guide will show you how a mini vhs converter can help you save those memories for 2026 and beyond. We’ll walk through why digitizing matters, how the technology works, and which converters will truly protect your stories.
Ready to preserve your legacy? Let’s start your journey to making every memory last.
Why Preserving Mini VHS Memories Matters in 2026
Capturing family moments on Mini VHS was a rite of passage for many in the 1980s to early 2000s. Today, these tapes hold more than just moving pictures; they contain the laughter, voices, and milestones of loved ones. As we move further into the digital age, the importance of using a mini vhs converter to safeguard these memories grows each year.

The Irreplaceable Value of Mini VHS Footage
Mini VHS tapes are more than just physical media; they are time capsules. Each tape holds birthdays, graduations, and heartfelt moments that cannot be recreated. For many families, watching these tapes brings back a wave of nostalgia and connection across generations.
Surprisingly, over half of U.S. households still have analog tapes tucked away in drawers or boxes. According to Americans' Continued Use of Physical Media, physical tapes remain a staple in American homes, making the need for a reliable mini vhs converter more urgent than ever.
The Threats Facing Mini VHS Tapes
While Mini VHS tapes were built to last, they face serious risks as time passes. Magnetic degradation slowly erases quality, while mold and humidity threaten the tape’s integrity. Even careful storage cannot stop the inevitable wear from repeated playback.
Adding to the challenge, camcorders and VCRs compatible with Mini VHS are becoming rare. If your device fails, accessing those memories becomes nearly impossible. This is why finding a dependable mini vhs converter is crucial for anyone hoping to preserve their family’s legacy.
Digital Preservation: The Modern Solution
Digital technology offers a lifeline for aging analog media. By converting tapes to digital files, families gain peace of mind knowing their videos will not fade or warp over time. Digital copies are easy to share, edit, and back up, ensuring every laugh and milestone is safe for decades.
Unlike analog tapes, which lose up to 20 percent of their quality every decade, digital files remain crisp and clear when stored properly. With a high-quality mini vhs converter, you can transfer footage into formats like MP4, making it easy to enjoy and protect your family history.
Case Example: Family Reunion Footage
Consider a family who recently discovered a box of Mini VHS tapes from a 1992 reunion. With no working camcorder, they turned to a mini vhs converter to bring those memories back to life. The process was simple, and the results were stunning.
Now, younger family members can watch relatives they never met, and everyone can relive the laughter and joy as if it happened yesterday. Using a professional-grade converter, they ensured the footage kept its original color and sound, turning fragile tapes into lasting treasures.
The Growing Demand for Digitization Services
As more people realize the risks facing their tapes, demand for digitization services and DIY solutions is surging. The global video digitization market is set to hit $1.5 billion by 2026. This growth highlights how essential tools like the mini vhs converter have become for families, collectors, and creators.
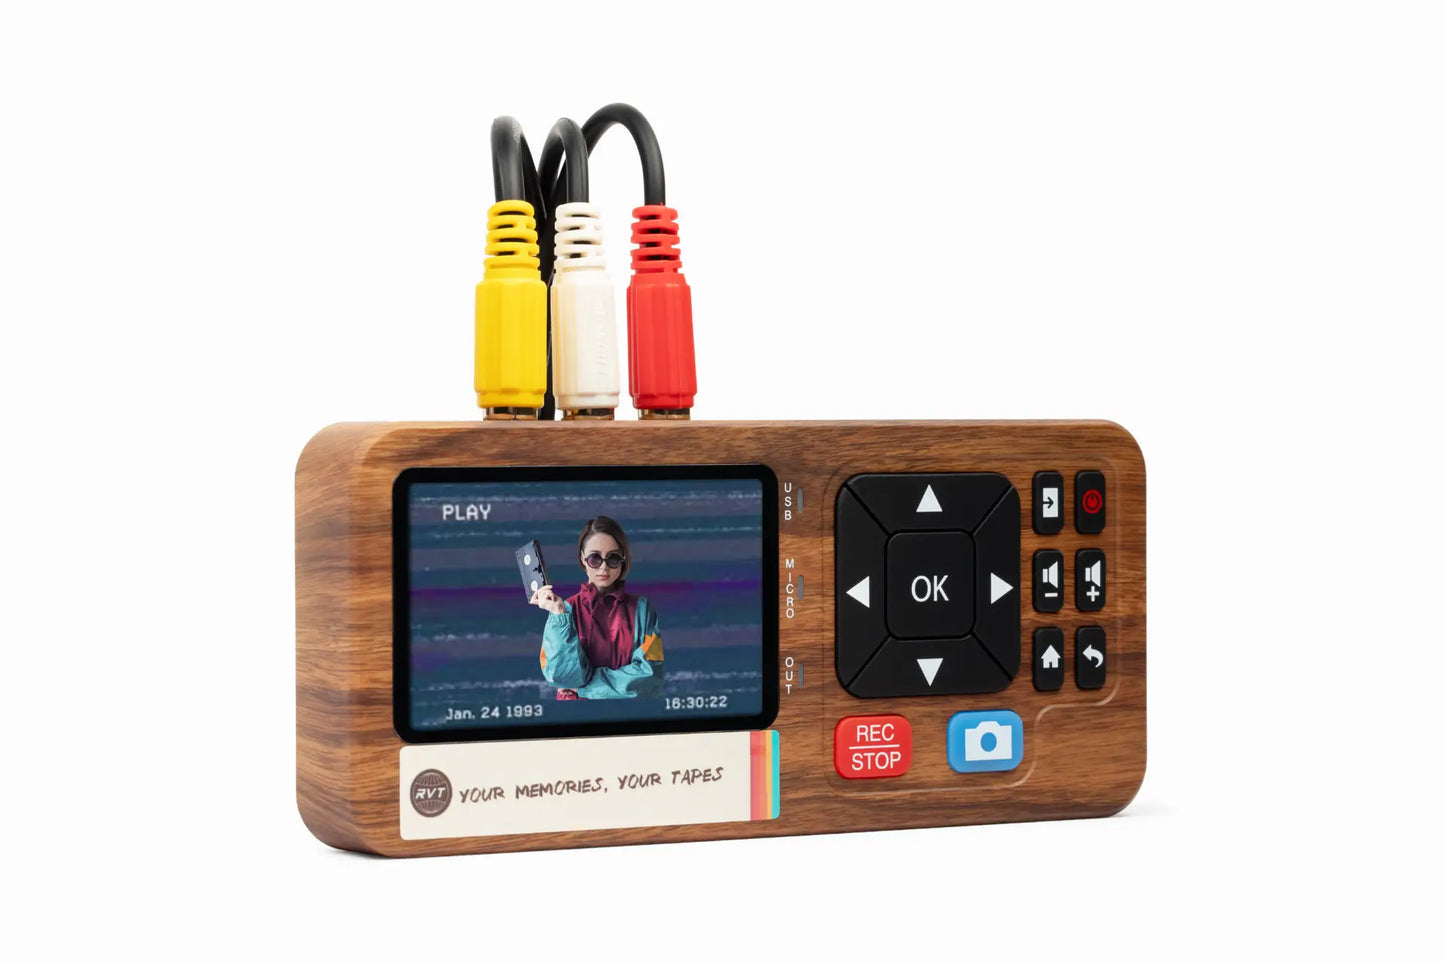
Choosing a trusted converter, such as the RVT Digitizer, means you can protect memories quickly and confidently. Why risk losing irreplaceable moments when the technology to save them is right at your fingertips?
How Mini VHS Converters Work: Technology & Process
Ever wondered how your treasured Mini VHS tapes become crisp, shareable digital files? Let’s break down exactly how a mini vhs converter transforms analog memories into digital keepsakes, using today’s best technology and the RVT Digitizer as the gold standard.
Understanding Mini VHS Format
Mini VHS tapes are smaller than standard VHS, yet pack the same analog video technology into a compact shell. They were popular for home movies in the 1980s through early 2000s. To play or convert these tapes, you’ll need a compatible camcorder or a special VHS-C adapter for standard VCRs. For a detailed breakdown of format differences and compatibility, see Mini VHS vs Standard VHS. Using the right setup ensures your mini vhs converter receives a clean signal for digitization.
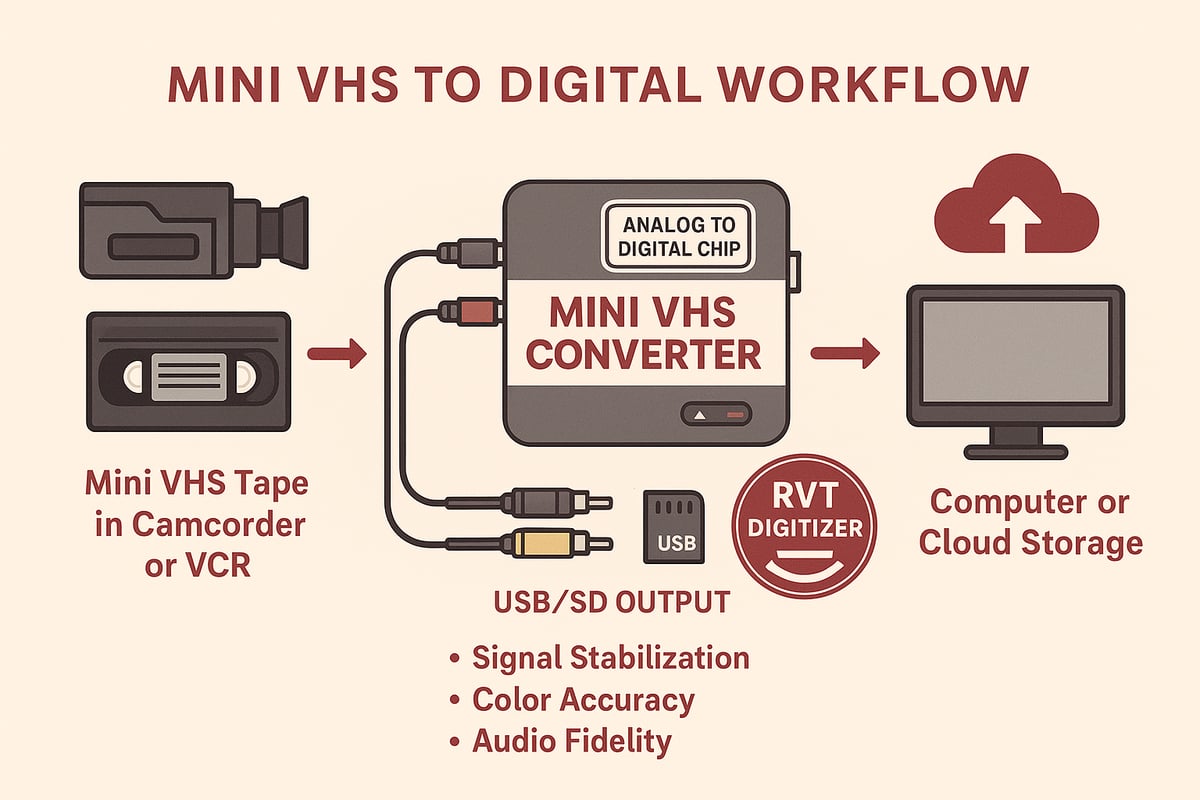
Core Components of a Mini VHS Converter
A mini vhs converter relies on several key parts to capture and convert video. The heart is an analog-to-digital encoder chip, which translates analog signals into digital files. RCA or S-Video inputs connect your camcorder or VCR, while USB or SD outputs transfer data to your computer. High-end models like the RVT Digitizer add signal stabilization and noise reduction, preserving color accuracy and audio clarity that generic converters often miss.
The Conversion Workflow
Transforming analog video starts with tape playback, either in a camcorder or VCR with adapter. The mini vhs converter captures the video signal through its inputs. Next, the device’s encoder chip digitizes the footage, typically creating MP4 files for long-term storage. Finally, you save the digital file to your computer, phone, or cloud. The RVT Digitizer streamlines this process with plug-and-play ease, letting you monitor quality in real time.
Output Quality Considerations
The quality of your digital files depends on the mini vhs converter’s ability to maintain signal clarity. Look for converters that minimize dropped frames, color bleeding, and audio sync problems. The RVT Digitizer’s advanced circuitry ensures stable color, sharp details, and true-to-life sound. Cheaper models may struggle with static or faded colors, risking loss of precious moments. Always test with a short clip before converting your entire tape.
Comparing Conversion Technologies
Not all converters are created equal. Standalone mini vhs converter units offer hassle-free setup, while computer-based capture cards require extra software and technical know-how. Professional-grade devices like the RVT Digitizer feature robust build quality and advanced chips, outclassing generic consumer models. Here’s a quick comparison:
| Feature | RVT Digitizer | Generic Converter |
|---|---|---|
| Picture Clarity | Superior | Variable |
| Transfer Speed | Fast | Moderate |
| Plug-and-Play | Yes | Sometimes |
| Signal Stabilization | Advanced | Basic |
| Warranty & Support | U.S.-based, 2 years | Limited |
Example: How a High-Fidelity Converter Preserves Detail
Imagine a family converting old birthday tapes. Using a budget converter, colors appear dull and voices sound tinny. With the RVT Digitizer, every laugh and smile shines with vibrant color and rich audio. Collectors and creators alike trust it for archiving rare footage, thanks to its professional-grade build and decades of reliable performance.
Step-by-Step Guide: Converting Mini VHS Tapes to Digital in 2026
Preserving your family’s memories starts with the right process. Whether you are dusting off a box of tapes or seeking the best mini vhs converter, this step-by-step guide will walk you through every detail. Ready to bring those moments back to life?

Preparing Your Mini VHS Tapes
Start by gathering your tapes and examining each one. Check for visible damage, sticky residue, or mold—these can affect playback and the digital result. Carefully clean the tape housing with a soft cloth. If you see mold or heavy debris, consult a professional before proceeding.
Rewind each tape fully. This helps spot any issues and ensures smoother playback. Having your tapes ready and in good condition prevents unnecessary hiccups later.
Next, assemble your gear. You will need:
- A Mini VHS camcorder or a VCR with a Mini VHS adapter.
- The mini vhs converter of your choice, ideally the RVT Digitizer for best results.
- RCA or S-Video cables for clear connections.
- A computer or external storage device with enough space.
For a more visual walkthrough, check out this Step-by-step VHS to Digital Guide for extra preparation tips.
Setting Up the Conversion Station
Find a well-lit, clutter-free workspace. Place your camcorder or VCR near your computer to keep cable runs short and organized.
Connect your camcorder or VCR’s output (RCA or S-Video) to the mini vhs converter’s input. If you are using the RVT Digitizer, this step is simple with its color-coded ports.
Plug the converter into your computer’s USB port or your preferred storage device. Secure all connections to avoid interruptions during transfer.
Ensure your power sources are stable. Sudden outages can disrupt the process and risk data loss. Take a moment to double-check everything before moving on.
Configuring Converter Settings
Turn on your devices and open the converter’s software or interface. The mini vhs converter should offer easy-to-navigate menus, especially on the RVT Digitizer.
Set your output format to MP4. This format is widely supported and preserves quality for decades. Choose the highest resolution available for your device—typically 720x480 for Mini VHS.
Adjust color and audio settings if your converter supports it. The RVT Digitizer’s advanced chip ensures vibrant color and crisp sound with minimal tweaking, but small adjustments can help if your tapes are faded or muffled.
Preview a few seconds of playback. Look for clear picture, accurate color, and synchronized audio before starting the full transfer.
Running the Conversion Process
Start playback on your camcorder or VCR. Hit record or capture on your mini vhs converter’s software. The transfer happens in real time, so set aside enough time for each tape.
Monitor the video and audio as the transfer progresses. Watch for dropped frames, color shifts, or audio sync issues. If you notice problems, pause the process and check your cables and settings.
Troubleshooting tips:
- If the video flickers, try adjusting the tracking on your camcorder or VCR.
- For static or buzzing audio, check cable connections.
- If using the RVT Digitizer, its signal stabilization helps prevent common issues found in cheaper converters.
Patience pays off here. A careful transfer means fewer headaches later and the best possible digital copy.
Saving and Backing Up Your Digital Files
Once your tape finishes transferring, save the file with a clear, descriptive name. Include details like event, date, or location for easy retrieval.
Organize your files into folders by year, event, or family member. This makes future browsing simple.
Backup is critical. Follow the 3-2-1 rule: keep three copies, on two different types of storage, with one copy offsite or in the cloud.
| Backup Location | Example Device | Benefit |
|---|---|---|
| Local Drive | External HDD/SSD | Fast access |
| Cloud Storage | Google Drive, iCloud | Remote protection |
| Offsite Copy | USB in safe deposit | Disaster recovery |
The mini vhs converter process is not complete until your files are safe in at least two places. This step protects your memories for the next generation.
Example Workflow: Family Digitizes Vacation Tapes
The Johnson family wanted to relive their 1998 beach vacation. They found their old Mini VHS tapes and used a mini vhs converter to preserve every splash and laugh.
First, they checked each tape for dust and damage. With their RVT Digitizer, setup was fast—simple cables, easy software, and clear instructions.
They played each tape, watching as childhood moments appeared on their computer screen in crisp digital clarity. Any hiccups—like a brief audio buzz—were quickly fixed with a cable check. The RVT Digitizer’s professional-grade build meant every color and sound was faithfully preserved.
After conversion, the Johnsons named each file by year and location, then saved backups to an external drive and their family’s cloud account. They shared highlight reels at their next reunion, sparking laughter and new stories.
Choosing a top-tier mini vhs converter like the RVT Digitizer made the process simple and stress-free. Their memories are now safe, vibrant, and ready to be enjoyed for decades.
Top Mini VHS Converter Options for 2026
Choosing the right mini vhs converter makes all the difference when preserving your memories. With so many options in 2026, it pays to know what truly matters before you invest in your family’s legacy.
Key Features to Look For
When comparing mini vhs converter options, certain features are essential for quality, ease, and long-term results:
- Compatibility: Make sure your converter supports Mini VHS, S-VHS-C, and camcorder inputs.
- Output Formats: Look for MP4, MOV, or AVI support for maximum flexibility.
- Signal Processing: Noise reduction, color correction, and stabilization keep your footage sharp.
- Ease of Use: Plug-and-play devices with minimal setup save you time and hassle.
- Warranty and Support: U.S.-based help and solid warranties offer peace of mind.
Choosing a mini vhs converter with these features ensures your memories are transferred with care and clarity.
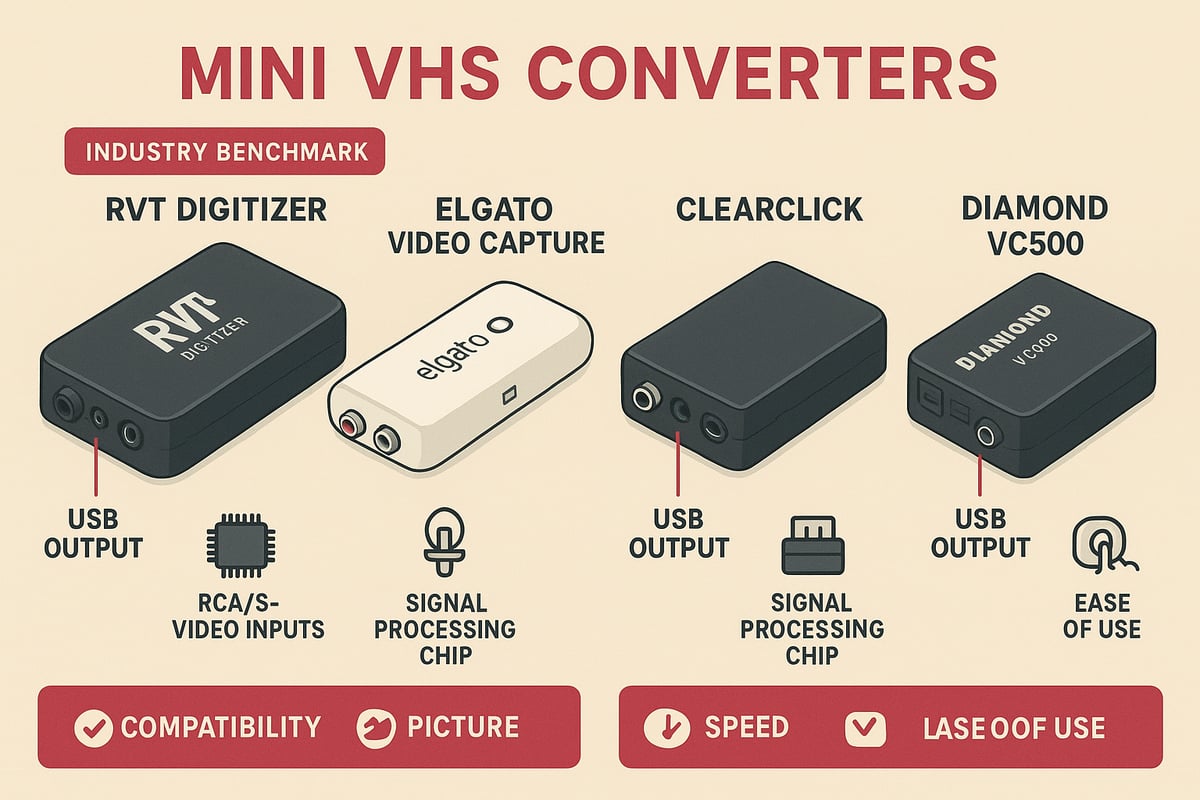
2026’s Leading Mini VHS Converter Models
Not all converters are created equal. The RVT Digitizer stands at the top for its unmatched picture clarity, fast transfer speed, and professional-grade build. Its advanced encoding chip preserves color accuracy and sound fidelity, delivering digital stability for decades.
Here’s a quick comparison of the top models:
| Model | Picture Clarity | Speed | Ease of Use | Warranty | Avg. Rating |
|---|---|---|---|---|---|
| RVT Digitizer | ⭐⭐⭐⭐⭐ | Fast | Plug & Play | 2 years, US | 4.8/5 |
| Elgato Video Capture | ⭐⭐⭐⭐ | Moderate | Easy | 1 year | 4.3/5 |
| ClearClick | ⭐⭐⭐⭐ | Moderate | Plug & Play | 1 year | 4.1/5 |
| Diamond VC500 | ⭐⭐⭐ | Moderate | Software | 1 year | 3.9/5 |
The RVT Digitizer outperforms generic converters in clarity and reliability. For a detailed breakdown of the best options, see Choosing the Best VHS Converter.
User Reviews and Satisfaction Data
Premium mini vhs converter models receive consistently high praise from families, creators, and archivists. On average, converters like the RVT Digitizer earn 4.8 out of 5 stars, with users highlighting easy setup, sharp video, and lasting results.
In contrast, budget converters often struggle with color fading, audio sync issues, and lack of support. According to BestBuy’s 2025 data, premium converters average 4.8/5, while generic models lag behind at just 3.2/5.
Families appreciate the reliability and picture quality of a top-tier mini vhs converter, especially when digitizing once-in-a-lifetime events.
Example: Creator’s Experience with Different Converters
Consider a YouTuber tasked with archiving a large collection of Mini VHS tapes. After trying a budget mini vhs converter, the results were disappointing—blurry images and audio glitches threatened to erase treasured moments.
Switching to the RVT Digitizer, the creator saw a dramatic improvement. The advanced chip captured every detail, colors popped, and the process was seamless. With U.S.-based support and a solid warranty, the creator felt confident their work would endure.
Which mini vhs converter will you trust with your memories? Take the time to compare your options, and choose the one that guarantees lasting quality.
Expert Tips for Achieving the Best Digital Transfers
Preserving memories with a mini vhs converter is more than just pressing record. It’s about getting every detail right so your family videos look and sound their best, now and for decades to come. Let’s explore how you can ensure professional results from your conversion project, whether you are digitizing one tape or an entire collection.
Maximizing Video and Audio Quality
To get the best results from your mini vhs converter, start with the basics. Use high-quality RCA or S-Video cables for a clean connection. Always power your devices from stable outlets to prevent glitches or interruptions. Before you even press play, clean your tape heads and inspect tapes for dust or mold.
- Clean and align tape heads for crisp playback.
- Rewind, fast-forward, and test tapes to spot any sticking or damage.
- Use the tracking feature on your camcorder or VCR to correct any wavy lines.
Choosing a professional-grade mini vhs converter like the RVT Digitizer ensures you capture every frame with true color and clear sound. Unlike generic models, the RVT Digitizer’s advanced encoding chip and noise reduction minimize static and color bleeding, giving your memories the clarity they deserve.
Avoiding Common Conversion Pitfalls
Transferring analog to digital can come with a few challenges. Dropped frames, audio sync issues, and digital artifacts can sneak in if you are not careful. To avoid these, monitor the transfer in real time. Watch the screen and listen for audio hiccups as the tape plays.
- Pause and adjust tracking if you see static or hear pops.
- Stop the process if you notice major glitches, then try cleaning the tape or heads.
- Handle old or brittle tapes gently, using gloves if necessary.
If you want more expert tips on a smooth transfer, check out Analog Video to Digital Conversion Tips for practical advice on troubleshooting common issues and optimizing your setup.
Editing and Enhancing Your Digital Files
Once your footage is digital, you can make it shine. Use simple video editing software to trim unwanted sections, correct colors, and reduce background noise. Even beginners can boost video quality with a few clicks.
- Try free programs like Shotcut or iMovie, or go pro with DaVinci Resolve.
- Adjust color balance to restore faded scenes.
- Add metadata, titles, and tags for easy searching later.
The right mini vhs converter gives you a solid foundation, but thoughtful editing brings your memories to life. With RVT Digitizer’s faithful color reproduction, you will spend less time fixing flaws and more time enjoying your videos.
Sharing and Enjoying Your Memories
Now that your tapes are digital, it is time to share. Create highlight reels for birthdays, or upload full videos to cloud storage for safe keeping. Print still frames for photo books, or send clips to loved ones on social media.
- Organize files by date, event, or person for quick access.
- Make backup copies to external drives and the cloud.
- Create digital albums or slideshows for family gatherings.
One archivist digitized decades of family tapes using a mini vhs converter, then built a searchable digital library for future generations. With the RVT Digitizer, you can trust that every cherished moment is preserved, easy to find, and ready to share whenever you want.
Long-Term Storage and Preservation of Digital Memories
Preserving your digitized memories is just as important as converting them. After using a mini vhs converter to safeguard your family moments, you need a reliable plan for long-term storage. With smart choices and a few simple habits, you can ensure your digital files remain safe and accessible for generations.
Choosing the Right Storage Solutions
Once your memories are digitized with a mini vhs converter, where should you keep them? The best approach is to use a mix of storage solutions. External hard drives and SSDs are reliable, affordable, and easy to use. Cloud storage adds another layer of protection and lets you access files from anywhere.
Follow the 3-2-1 backup rule: keep three copies of every important video, store them on at least two different types of media, and make sure one copy is offsite. This way, even if one device fails, your memories are still safe. Families who use the RVT Digitizer often back up their files on both physical drives and the cloud for peace of mind.
File Formats for Longevity
Choosing the right file format after using your mini vhs converter is crucial for long-term preservation. MP4 is the gold standard today because it is widely supported, efficient, and less likely to become obsolete. Avoid saving your videos in rare or proprietary formats, as these might not play on future devices.
If you use a high-quality converter like the RVT Digitizer, your files will be in a format that is easy to edit, share, and store. MP4 files also make it simple to create highlight reels or share special moments with family. Sticking with standard formats ensures your memories remain accessible for decades to come.
Maintaining File Integrity Over Time
Even the best mini vhs converter cannot protect against digital file decay if you forget about your archive. Check your files regularly to make sure they still play correctly. Every five to ten years, migrate your videos to new drives or cloud accounts so you are not caught by surprise if technology changes.
Protect your collection from accidental deletion and hardware failures. Many experts recommend a quick annual checkup for your digital archive. For more tips on preserving media, see the 2020 Survey on Media Storage and Digitization, which highlights the importance of proactive management to prevent loss.
Organizing and Cataloging Your Digital Archive
After transferring your tapes with a mini vhs converter, take time to organize your files. Use clear file names with dates and events, such as 1992_FamilyReunion.mp4. Tag your videos with keywords or family member names for easy searching.
Consider creating a spreadsheet or digital photo book to track what you have archived. Some families use folders by year or occasion to keep things tidy. With the RVT Digitizer, you can quickly sort high-quality files and add descriptions, making future searches a breeze.
Example: Family Digital Archive Success Story
One family used a mini vhs converter to digitize three decades of home movies. They stored copies on two SSDs and a cloud account, following the 3-2-1 rule. With everything labeled and backed up, they created a digital video library that their kids and grandkids can enjoy anytime.
Using the RVT Digitizer, they noticed the files were clearer and more vibrant than expected. They even edited highlight reels for birthdays and holidays. As digital storage prices continue to fall (see Video Converter Market Growth Projections), building a lasting family archive is easier and more affordable than ever.
You’ve seen how easily old Mini VHS tapes can fade or get lost in the shuffle of busy lives. But imagine gathering your family or sharing a priceless childhood video with friends—no static, no worry, just crisp digital memories ready to enjoy for decades. Whether you’re a parent, a collector, or a creator, now’s the time to protect those moments with the same care you’d give a family heirloom. Why wait until the footage is gone for good? If you’re ready to rescue your favorite tapes and relive them anytime, let’s make it happen—Digitize my tapes today.