

Nostalgia is priceless, yet those precious memories captured on VHS, Hi8, and camcorder tapes are vanishing as analogue formats disappear. If you want to safeguard your family moments, creative projects, or rare footage, now is the time to convert analogue video to digital and protect them for the future.
This essential 2026 guide walks you through why digitization matters, the equipment you need, and every key step to get it right. Discover how to choose the best converter, preserve picture clarity, and store your digital memories safely. Start today and ensure your stories last for generations.
Why Convert Analogue Video to Digital in 2026?
Preserving your memories is more urgent than ever. Analog tapes are fading, and every year, more families discover that irreplaceable moments are lost forever. If you want to convert analogue video to digital, understanding the risks and rewards is the first step.
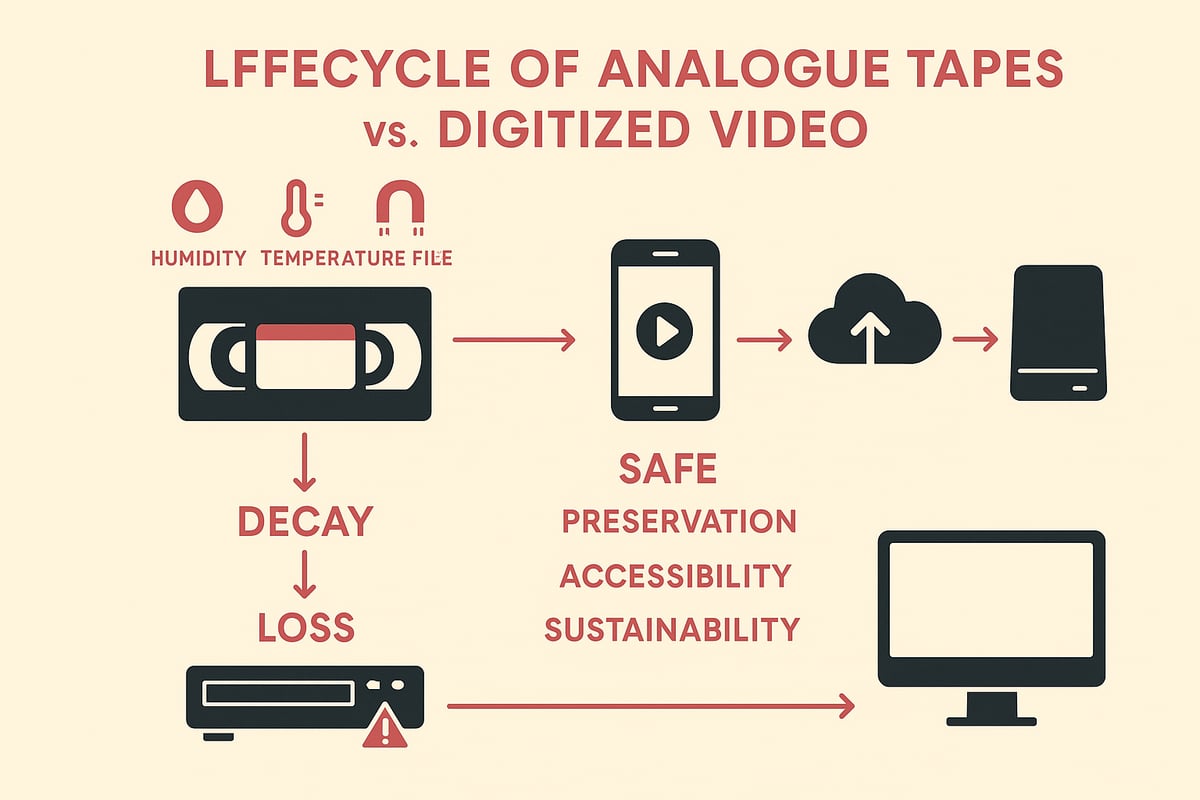
The Risks of Analog Decay
If you wait too long to convert analogue video to digital, you risk losing cherished moments. VHS, Hi8, and other tapes deteriorate with time. Humidity, heat, and even nearby magnets can damage your tapes.
- Over 50 percent of home videotapes show signs of decay after 20 years.
- Mold, warping, and sticky cases are common, making playback impossible.
- Example: A family discovers their wedding video ruined by mold, with no backup.
Playback devices like VCRs are getting harder to find, and old tapes rarely work with modern screens. Don’t let your stories disappear.
Benefits of Digital Conversion
When you convert analogue video to digital, you stop the clock on degradation. Digital files last indefinitely, can be copied without loss, and are easy to share with loved ones.
- Play videos on your phone, tablet, or TV anytime.
- Edit, enhance, or restore old footage for future generations.
- Back up to the cloud and protect against disasters.
Imagine archiving school plays or family vacations so your kids and grandkids can enjoy them. For more tips on preserving and enhancing your memories, see this Digitizing Old Videos Guide.
Growing Demand and Trends in 2026
The push to convert analogue video to digital is booming. More people are sharing retro footage on social media, and creators are repurposing vintage videos for new projects.
- DIY digitization tools and professional services are on the rise.
- Global video digitization market is projected to grow rapidly by 2026.
- Families and collectors want to declutter and future-proof their memories.
A content creator digitizes a rare concert tape with a premium converter, bringing history to a new audience. Are you ready to join the trend?
Legal and Ethical Considerations
When you convert analogue video to digital, think about rights and privacy. Only digitize commercial tapes for personal use, and always get consent before sharing family videos online.
- Respect copyright laws and avoid distributing copyrighted material.
- Add credits or notes if sharing archival footage.
- Donate digitized local history tapes to museums or libraries for community benefit.
A neighbor digitizes old town events and gifts them to the local library, preserving history for everyone.
Environmental Impact
Choosing to convert analogue video to digital is also a green decision. Recycling tapes and players reduces electronic waste. Digital files have a lower carbon footprint compared to storing stacks of tapes.
- Organize a family project to digitize and responsibly recycle old tapes.
- Encourage friends to adopt sustainable media habits in 2026.
- Protect the planet while saving your memories.
A family digitizes their collection, then recycles the old tapes, leaving a lighter footprint for future generations.
Essential Equipment and Tools for Analogue-to-Digital Conversion
Ready to convert analogue video to digital and future-proof your memories? The right equipment makes all the difference, whether you are saving old family movies or archiving creative work. Let us break down what you need, what works best, and how to get the job done with confidence.
Types of Analog Sources and Formats
Before you convert analogue video to digital, it is crucial to identify your media types. Common analog formats include:
- VHS, VHS-C, S-VHS, Betamax
- Hi8, Video8, MiniDV
- LaserDisc, camcorder tapes
- Audio sources: cassettes, vinyl, reel-to-reel
Sorting through a box of 1980s and 1990s tapes? Make a checklist of what you have, then match each to its compatible playback device. This step ensures you are ready to connect everything smoothly.
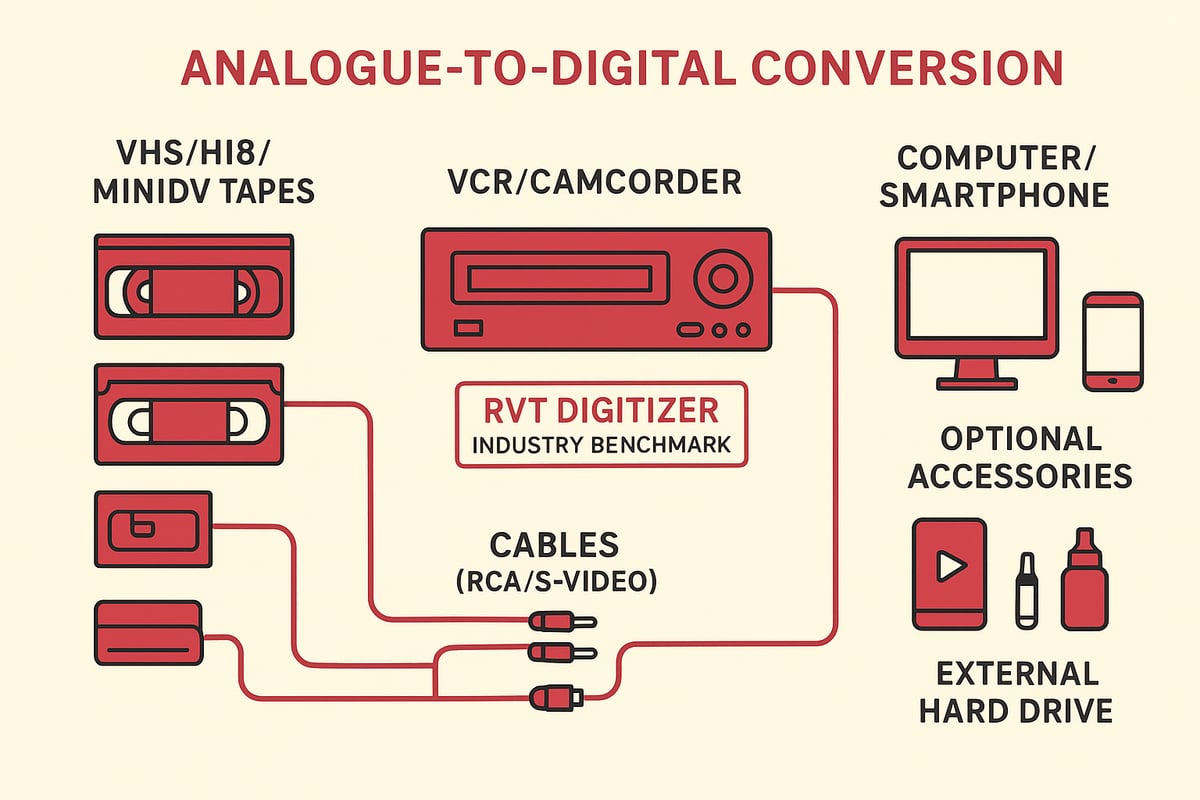
Key Components Needed
To convert analogue video to digital, gather these essentials:
- Playback device: a working VCR, camcorder, or tape deck
- Analog-to-digital converter: capture card, USB dongle, or dedicated hardware
- Cables: RCA, S-Video, SCART, or proprietary connectors
- Computer, smartphone, or storage device for digital files
- Cleaning supplies for tapes and playback heads
A clean setup prevents playback issues and preserves the original quality. Even a simple cleaning kit can revive tapes that are sticky or dusty.
Choosing the Right Converter: What to Look For
When you convert analogue video to digital, the converter you choose shapes your results. Look for:
- Compatibility with your tape format (NTSC/PAL, input types)
- Support for high resolutions and smooth frame rates
- Audio input options for clear sound
- Plug-and-play simplicity versus software-dependent devices
- Portability and sturdy build for multiple projects
Not sure which device fits your needs? See this guide on Choosing the Best VHS to Digital Converter for side-by-side comparisons and tips. The right converter means less hassle and higher quality, whether you are digitizing a single tape or an entire collection.
The RVT Digitizer: Industry Benchmark for VHS to Digital Conversion
If you want to convert analogue video to digital with top-tier results, the RVT Digitizer stands out. It offers:
- Superior picture clarity and accurate color reproduction
- Plug-and-play setup with no software required
- Direct recording to your phone or computer
- Support for VHS, Hi8, MiniDV, retro gaming consoles, and more
- Advanced encoding chip for artifact-free, stable transfers
- U.S.-based support and a 2-year warranty
Families, content creators, and collectors trust the RVT Digitizer for its professional build and consistent results. Imagine digitizing a rare concert tape for a documentary, knowing your memories are safe and sharp for years to come.
Software and Accessories to Enhance Results
Once you convert analogue video to digital, take your project further with a few extras:
- Video capture and editing software for trimming, color correction, and noise reduction
- External hard drives or cloud storage for backup and sharing
- Cleaning kits for tape and head maintenance
For example, editing software can restore faded colors or remove static, bringing old footage back to life. With the right tools, your digital archive will not only last but shine.
Step-by-Step Guide: How to Convert Analogue Video to Digital
Preserving your memories starts with a clear plan. This step-by-step guide will help you convert analogue video to digital with ease and confidence. Whether you are saving family events, creative projects, or rare footage, follow these steps for reliable results and peace of mind.
Step 1: Gather and Inspect Your Analog Media
Begin by collecting all your tapes, camcorder cassettes, and playback devices. Carefully sort through each item to identify formats like VHS, Hi8, or MiniDV. This helps you match the right player for each tape.
Take a close look for any signs of damage. Mold, sticky residue, or broken cases can cause playback issues. Clean tapes and heads gently with a soft cloth or a dedicated cleaning kit for best results.
If you want to convert analogue video to digital safely, address any damage before starting. For example, a family once found their prized birthday tape stuck together but saved it with careful cleaning.
Step 2: Set Up Your Conversion Workspace
Choose a spot with plenty of room and minimal dust, like a home office or spare table. Position your VCR or camcorder near your computer or storage device. This keeps everything within easy reach.
Plug your playback device into a surge protector to avoid power issues. Gather all necessary cables, like RCA or S-Video, and lay them out for quick access. Set up your RVT Digitizer front and center, since its plug-and-play design makes it the simplest way to convert analogue video to digital.
A tidy, organized workspace helps prevent mistakes and keeps your memories safe.
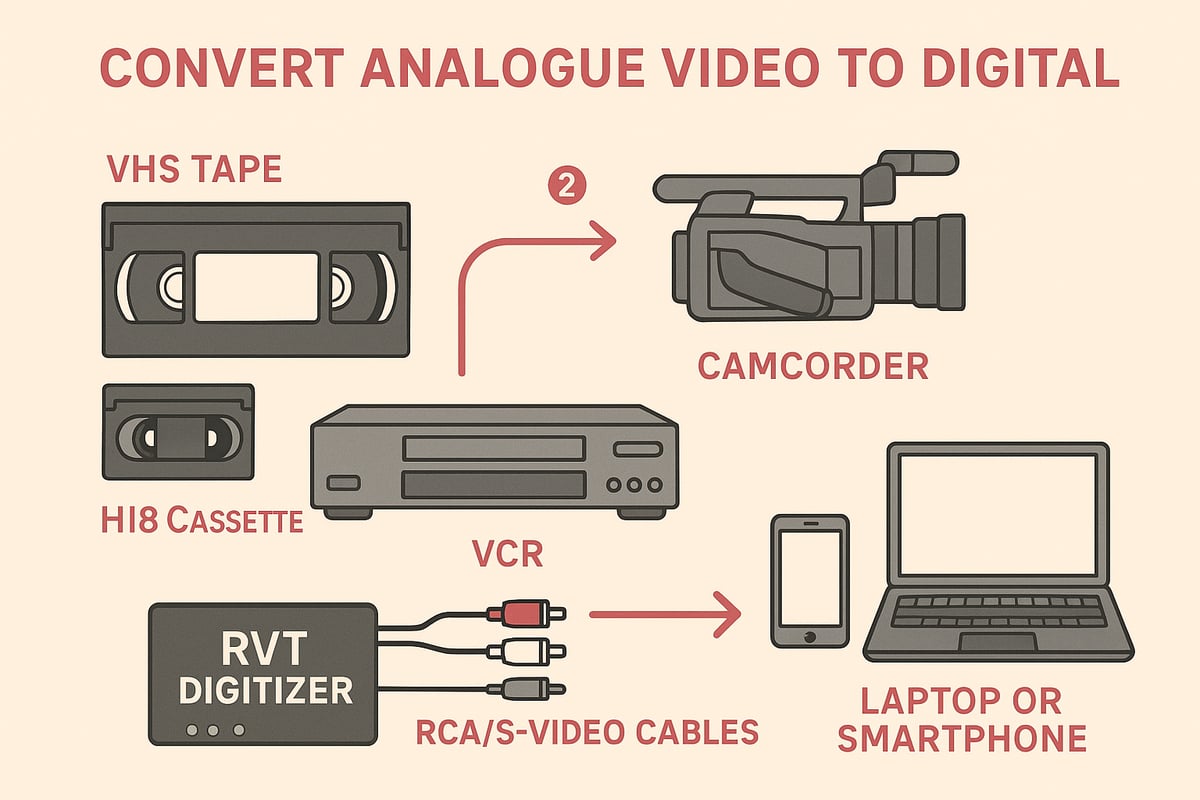
Step 3: Connect and Configure Your Converter
Connect the playback device to the RVT Digitizer using the correct cables. For most tapes, RCA or S-Video works best. Plug the digitizer into your computer, phone, or storage device.
If you are using the RVT Digitizer, setup is quick. There is no software to install, and devices are recognized instantly. For other converters, you may need to install drivers or extra programs.
Test your setup by playing a short clip. Adjust input settings as needed. The right configuration ensures you convert analogue video to digital with top-notch quality and minimal hassle.
Step 4: Preview and Adjust Playback Quality
Before you start recording, play a small section of your tape. Watch for video clarity, color accuracy, and sound quality. Adjust the tracking, brightness, and contrast settings on your playback device.
The RVT Digitizer stands out here, delivering sharper images and richer color than generic converters. Its advanced encoding chip reduces static and keeps motion smooth.
If you notice static lines or faded colors, tweak the settings until the picture looks right. It is worth taking a few moments to get things perfect before you convert analogue video to digital.
Step 5: Start the Digitization Process
Now you are ready to begin. Start playback on your VCR or camcorder and hit record on your computer or phone. The RVT Digitizer captures every frame and sound with professional-grade fidelity.
Monitor the process as your tape plays. If you need to change tapes or fix an issue, simply pause and resume. Real-time digitization preserves every second, ensuring you convert analogue video to digital without missing a moment.
A creator recently digitized a rare concert tape and was amazed at the clarity and stability of the digital file.
Step 6: Save, Edit, and Enhance Your Digital Files
Once your recording is complete, save the file in a widely supported format like MP4, AVI, or MOV. These formats work on most devices and make sharing easy.
Use editing software to trim unwanted sections, fix color, or boost audio. Many families add titles, dates, or tags to help organize their new digital library.
To get the most out of your effort to convert analogue video to digital, consider restoring faded footage or removing static for a polished final product.
Step 7: Store and Back Up Your Digital Videos
Organize your digital files into clearly labeled folders. Use names like "1998 Family Reunion" or "High School Graduation" for easy searching. Save copies to an external hard drive and a reliable cloud service for backup.
The 3-2-1 rule is a great way to protect your collection: three copies, two locations, one offsite. This approach ensures your efforts to convert analogue video to digital are never lost.
Share your digitized memories with family or friends. Several families have created shared cloud folders, making it simple to relive moments together.
Troubleshooting Common Issues
Sometimes things do not go as planned. You might run into audio sync problems, color distortion, or dropped frames. If a tape jams or you see a blue screen, check cables and connections first.
The RVT Digitizer is designed to minimize these issues, but if you need extra help, visit Troubleshooting Video Tape Conversion Issues for practical solutions and expert tips.
Remember, patience and careful setup are key to successfully convert analogue video to digital. Most problems are easy to fix and the results are worth the effort.
Comparing Analogue-to-Digital Converters: What Matters Most in 2026
Choosing the right device to convert analogue video to digital is crucial for preserving your memories with clarity and color. Not all converters deliver the same results, and the market has grown rapidly as more families and creators want to safeguard their tapes. In fact, industry reports like the Digital Video Market Analysis show a major shift toward digital media, making the right converter choice more important than ever.
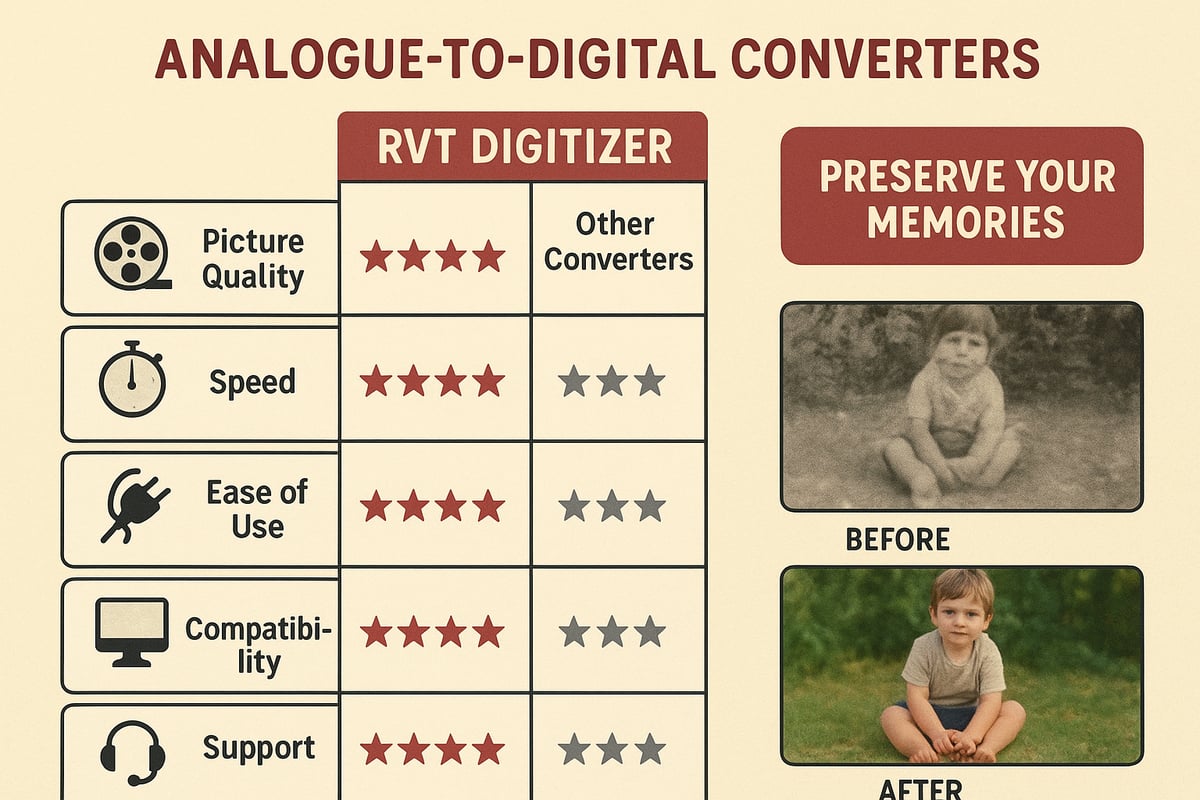
Picture Quality and Color Accuracy
When you convert analogue video to digital, picture quality should come first. Generic converters often introduce static, color bleed, or dull tones. In contrast, the RVT Digitizer stands out with its advanced encoding chip, keeping every detail crisp and colors true to the original. Imagine watching your childhood birthday party in vibrant color, with no blurring or faded faces. Families and documentary filmmakers alike trust the RVT Digitizer for preserving irreplaceable moments with professional-grade clarity.
| Feature | Generic Converter | RVT Digitizer |
|---|---|---|
| Picture Sharpness | Low–Medium | High |
| Color Accuracy | Often Distorted | True to Tape |
| Sound Fidelity | Inconsistent | Crystal Clear |
Transfer Speed and Workflow Efficiency
Speed matters when you convert analogue video to digital, especially for large collections. Many budget converters lag or drop frames, risking loss of important footage. The RVT Digitizer uses a dedicated encoding chip for fast, stable transfers, so you can digitize hours of tapes without interruption. One creator recounted digitizing an entire wedding archive in a single weekend, thanks to the RVT’s reliable workflow. You save time and gain peace of mind knowing every memory is captured in full.
Ease of Use and Setup
A simple setup can make all the difference when you convert analogue video to digital at home. The RVT Digitizer offers true plug-and-play operation—no drivers, no complicated menus, just connect and start recording. Grandparents, parents, and teens alike have shared stories of digitizing tapes with zero technical frustration. Unlike converters that require extra software or confusing steps, the RVT streamlines the process, making it accessible for everyone.
Compatibility and Versatility
Versatility is key as you convert analogue video to digital, since most families have a mix of VHS, Hi8, and MiniDV tapes. The RVT Digitizer supports a wide range of analog formats and connects to Windows, Mac, and mobile devices. Collectors and gamers also use it for retro game capture, making it a future-proof investment. Its universal compatibility means you can handle any media you find in your attic, now or years from now.
Customer Support, Warranty, and Reliability
Support and reliability matter when you convert analogue video to digital, especially if issues arise. The RVT Digitizer is backed by U.S.-based support and a two-year warranty, giving users confidence in every transfer. Customers appreciate quick responses and helpful troubleshooting, often resolving questions in minutes. With precision engineering and a reputation for durability, the RVT Digitizer stands apart from no-name brands, ensuring your memories are safe for decades.
Best Practices for Preserving and Sharing Your Digital Memories
Preserving your memories for the future means more than just running a quick transfer. To truly protect and enjoy the results when you convert analogue video to digital, follow these best practices. Each step ensures your home movies, creative projects, and rare finds are safe, organized, and ready to share.
Optimal File Formats and Compression
Choosing the right format is crucial when you convert analogue video to digital. The best options for long-term storage are MP4 (H.264 or H.265), AVI, and MOV. These formats provide excellent quality and universal compatibility across devices.
Avoid older or proprietary formats that may become obsolete. MP4 is especially reliable for playback on phones, computers, and smart TVs. For more tips on best practices and file types, check out this How to Convert VHS Tapes to Digital guide.
- Use MP4 for everyday sharing and archiving.
- Select high bitrate settings for important footage.
- Test your files on multiple devices before deleting originals.
The RVT Digitizer outputs high-quality, stable digital files, making archiving seamless and future-proof.
Organizing and Tagging Your Digital Archive
Once you convert analogue video to digital, strong organization will save you hours in the future. Start by creating folders by year, event, or type. Use clear naming conventions, such as “1996_Graduation.mp4” or “Family_Vacation_1989.mov.”
Add metadata to your files, including date, location, and names of people in the video. Many editing programs let you embed this information for easy search later.
- Keep a digital index or spreadsheet to track your archive.
- Tag files with keywords for faster retrieval.
- Back up your archive structure along with the videos.
A well-organized digital library means you can instantly find and share special moments.
Backing Up and Disaster-Proofing Your Collection
Backing up is non-negotiable when you convert analogue video to digital. The 3-2-1 rule works best: make three copies, use two different storage types, and keep one copy offsite or in the cloud.
- Store videos on an external hard drive, a cloud platform, and a USB stick.
- Encrypt sensitive or private videos for extra protection.
- Test your backups regularly to ensure files are not corrupted.
The RVT Digitizer’s reliable transfers make it easier to create perfect backup copies without worrying about glitches or lost frames. Protect your legacy by planning for the unexpected.
Sharing and Streaming Digitized Videos
After you convert analogue video to digital, it is simple to share memories with family or a wider audience. Use platforms like Google Drive, Dropbox, or private YouTube links for secure sharing. Social media is great for highlights or short clips, while live streaming lets you relive events with friends in real time.
- Share family history projects with relatives worldwide.
- Host virtual reunions by streaming digitized school plays or weddings.
- Use privacy settings to control who can view your videos.
Modern converters like the RVT Digitizer deliver files ready for instant upload, making sharing effortless and professional.
Ethical and Legal Sharing Guidelines
Before you convert analogue video to digital and share it, consider copyright and privacy. Only share commercial content if you have the rights to do so. Get consent from everyone who appears in personal videos, especially before posting publicly.
- When donating videos to museums or archives, follow their submission guidelines.
- Respect copyright when sharing old TV shows, movies, or music performances.
- Credit creators and participants when possible.
Responsible sharing protects you and honors the people in your videos. Ready to preserve your memories the right way?
Ready to make sure your family movies and retro treasures last for generations? We’ve talked about how quickly tapes fade and how easy it is now to save those memories in crystal clear digital. With the right tools, you can preserve every laugh, milestone, or epic gaming session—no tech wizardry required. Imagine sharing a childhood clip at the next family get-together or archiving rare footage for your next creative project. Why risk losing it all to time or a faulty old player? Let’s make your memories future proof—Digitize my tapes today.


