

Have you ever wondered what will happen to your old family videos as technology keeps moving forward? In 2025, fading tapes and outdated equipment mean your memories are at real risk of disappearing. This guide is here to help, showing you how digitizing old videos can save your most precious moments for years to come. You’ll discover why protecting these memories matters, compare the best tools and techniques, follow a step-by-step process, and learn smart ways to organize and share your new digital archive. Ready to preserve your story before it’s too late? Let’s get started.
Why Digitize Old Videos in 2025?
Preserving your memories has never been more crucial. As we step into 2025, many families, creators, and collectors face a ticking clock. Analog tapes are quietly losing their magic, and the risk is real. Digitizing old videos is the best way to ensure your precious moments last for generations.
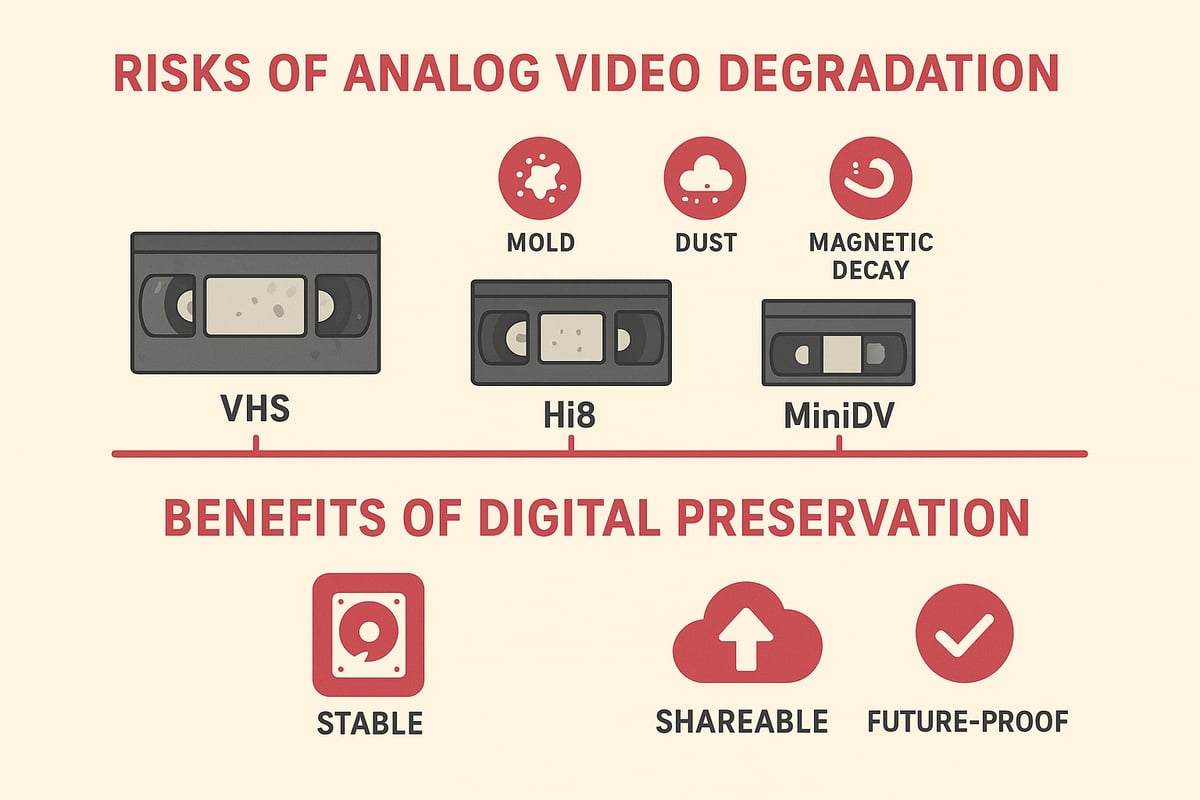
The Risks of Analog Video Degradation
Analog tapes like VHS, Hi8, and MiniDV face a silent enemy: time. Every decade, they can lose up to 10–20% of their original quality due to magnetic decay. Humidity, mold, heat, and dust only speed up this decline.
Remember the last time you played a family tape from the 1990s? Maybe you saw dull colors or heard static. Tracking lines and audio dropouts are now common. According to VHS tapes degrade 10-20% over 10-25 years, this loss is inevitable. Digitizing old videos is the only way to stop further fading.
Benefits of Digital Preservation
Once you convert tapes, digital files stay crisp and clear. There is no more worry about wear or age. You can make endless copies, edit, and share your memories without losing quality.
Digitizing old videos also means you can use the RVT Digitizer, known for its picture clarity and sound fidelity. Unlike generic converters, the RVT Digitizer gives you professional-grade results every time. Why risk your memories on anything less?
Accessibility and Sharing in the Modern Age
Imagine sending a birthday video to your cousin across the country in seconds. With digitizing old videos, you can stream, email, or post clips instantly.
Your children and grandchildren will be able to watch family stories on any device, anytime. No more digging through dusty boxes or hunting for a working VCR.
Future-Proofing Against Obsolescence
VHS players and camcorders are nearly extinct. By 2025, fewer than 5% of U.S. households have a working VCR. Digitizing old videos ensures you never struggle with outdated tech again.
The RVT Digitizer makes this transition smooth, thanks to its plug-and-play setup and advanced encoding chip. Your memories will always be accessible and secure.
Emotional and Cultural Value
Weddings, birthdays, and cultural celebrations hold deep meaning. Digitizing old videos lets you capture these moments forever.
Picture a family gathering where everyone laughs at childhood clips, all restored to their original color and sound. Digital archives help keep stories alive and support community history for years to come.
Cost and Space Savings
Storing dozens of tapes takes up space and creates clutter. With digitizing old videos, hundreds of hours fit on a single drive in a neat folder.
No more keeping bulky VCRs or camcorders. The RVT Digitizer offers a cost-effective, reliable solution that saves both money and space while guaranteeing top-tier quality.
Legal and Compliance Considerations
For creators and archivists, digital formats simplify copyright management. Digitizing old videos makes it easy to track, share, or license content as needed.
You gain control over who can access your files, keeping your legacy safe and compliant.
Choosing the Best Digitization Method in 2025
Choosing how to approach digitizing old videos begins with understanding your options. Should you take the DIY route, or is it better to trust a professional service? The right choice can make the difference between preserved memories and lost moments. Let’s break down your options and guide you to the best path for your family’s archive.
DIY vs. Professional Services
When digitizing old videos, you face a key decision: do it yourself or hire a professional. DIY methods cost less and give you complete control. You’ll need time, patience, and the right gear. Professional services cost more, but you benefit from specialized equipment and faster results.
Here’s a simple comparison:
| Aspect | DIY Approach | Professional Service |
|---|---|---|
| Cost | Lower (equipment investment) | Higher (per tape fee) |
| Time | Several hours per tape | Quick turnaround |
| Control | Full oversight | Limited, but expert care |
| Quality | Varies by equipment | Consistent, high quality |
If you enjoy hands-on projects and want to learn, DIY may suit you. If your tapes are fragile or time is short, a trusted service might be better.
Home Digitization Equipment Options
To start digitizing old videos at home, you’ll need a playback device, a digitizer, and a computer. Equipment options include USB capture cards, standalone converters, and all-in-one devices.
Key features to look for:
- High resolution support (480p or higher)
- Stable frame rate and audio sync
- Compatibility with your video formats
For families wanting the best results, the RVT Digitizer stands out. It’s engineered for true-to-life color, crisp sound, and easy plug-and-play use. Want to compare more options? Check out the Best VHS Converter for Old Family Videos for expert picks.
Evaluating Conversion Quality
Quality matters when digitizing old videos. Cheap converters can cause dropped frames, poor color, or audio lag. Watch for these issues as you transfer footage:
- Washed-out colors
- Audio out of sync
- Video flicker or static
The RVT Digitizer uses advanced encoding to prevent these problems. It captures every frame with precision, preserving the richness and detail of your memories.
File Formats and Compatibility
Choosing the right file format is crucial for digitizing old videos. MP4 (H.264) and MOV are widely accepted and work on most devices. These formats are easy to edit, share, and will remain usable for years.
If you plan to edit or archive, stick with formats that balance quality and file size. Avoid obscure file types that could become obsolete. This helps you future-proof your digital archive.
Cost Comparison and Time Investment
Budget and time are real factors when digitizing old videos. Here’s a quick breakdown:
- DIY: Equipment costs $50–$300 or more, with each tape taking 1–2 hours to convert.
- Professional: $20–$40 per tape, finished in a few days, often with bulk discounts.
DIY saves money for large collections, but expect the process to take weeks. Professionals are efficient, but the price adds up for many tapes.
Case Example: Family Archive Project
Imagine a family with 30 VHS tapes. They consider digitizing old videos themselves, investing in reliable gear and spending weekends on the project. It’s rewarding, but takes time.
Instead, they try a professional service. In days, their tapes are returned as high-quality files, ready to share. Both routes have benefits, so weigh your priorities: cost, time, and quality.
Environmental and Ethical Factors
Digitizing old videos is eco-friendly. You can recycle tapes and playback devices afterward, reducing e-waste. Digital files also make it easier to control who can access your family footage, keeping private moments safe.
Be mindful of recycling electronics responsibly and securing your files with strong passwords or encryption. This helps protect your memories and the environment.
Why Choose the RVT Digitizer for VHS to Digital Conversion?
The RVT Digitizer is trusted by families and archivists for digitizing old videos. Its advanced chip preserves every detail, delivering vivid color and precise sound. The plug-and-play design means anyone can use it, no tech skills needed.
Unlike generic converters, the RVT Digitizer offers reliable performance and professional-grade stability. U.S.-based support and quality engineering give peace of mind for big projects. Customers love the results, noting how easy it is to turn priceless tapes into lasting digital files.
Ready to preserve your memories? The RVT Digitizer makes the process safe, simple, and dependable.
Step-by-Step Process: How to Digitize Old Videos in 2025
Preserving your cherished memories starts with a clear, organized approach. Use this step-by-step guide to make digitizing old videos practical, stress-free, and effective. Whether you are saving family milestones or archiving creative work, these steps empower you to protect your legacy for generations.
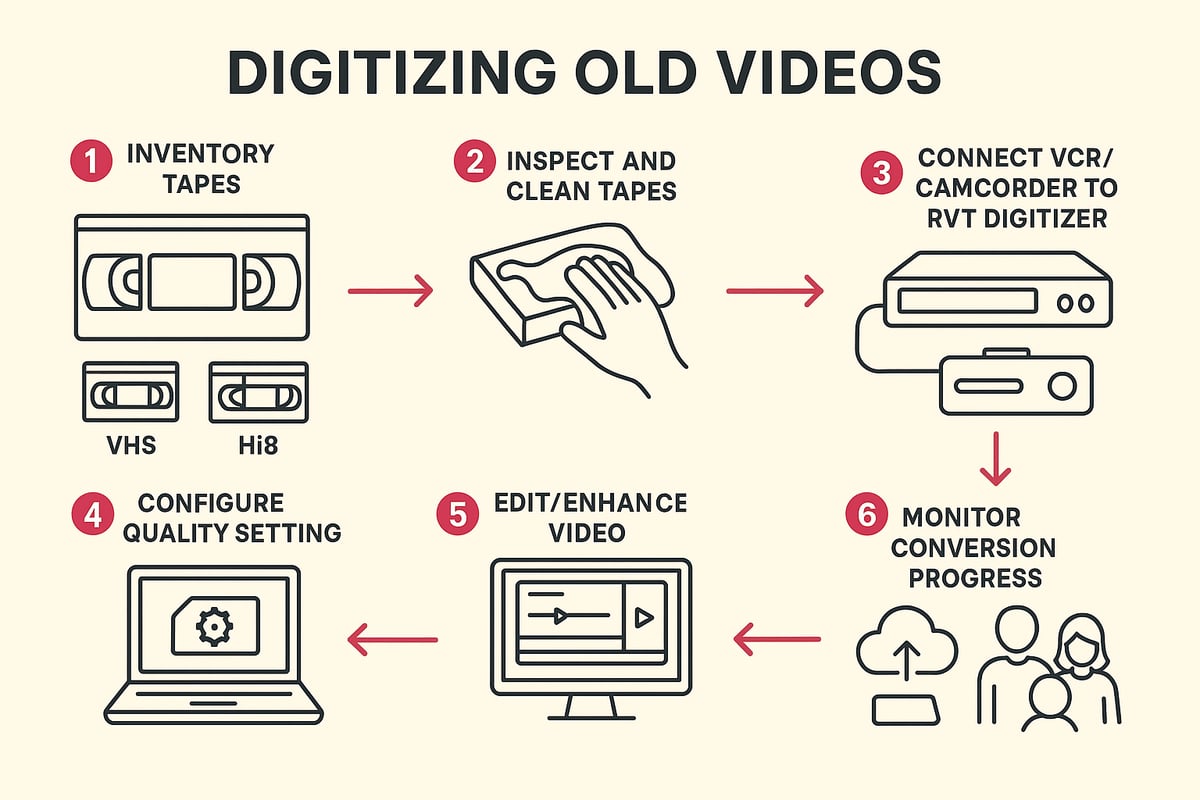
Step 1: Inventory and Organize Your Tapes
Start by gathering every tape you want to digitize. This includes VHS, Hi8, MiniDV, camcorder cassettes, and any other analog formats you have at home. Lay them out on a clean surface for easy sorting.
Create a list or spreadsheet to log details like tape format, event, and year. Label each tape with a sticky note or marker. This makes tracking progress simple and ensures you don’t miss any important memories during digitizing old videos.
Prioritize tapes with special significance or those showing signs of wear. A little organization now saves hours later and helps your project flow smoothly.
Step 2: Inspect and Prepare Media
Before digitizing old videos, check each tape for physical damage. Look for signs of mold, broken cases, or sticky residue. Gently wipe dust from casings with a soft, dry cloth.
If you spot mold or sticky-shed syndrome, consult online guides or professionals for safe cleaning. Repair minor issues like loose reels or cracked cases before playback. This preparation prevents jams and protects both your tapes and your digitizer.
Remember, careful inspection reduces the risk of losing footage during the transfer process.
Step 3: Set Up Your Digitization Equipment
Now it’s time to connect your playback device to your digitizer. Plug your VCR or camcorder into the RVT Digitizer using the correct cables (RCA, S-Video, or FireWire). The RVT Digitizer stands out for its plug-and-play setup, letting families and creators get started in minutes.
Unlike generic converters, the RVT offers unmatched picture clarity, vibrant color, and reliable sound. Its advanced encoding chip captures every frame with professional-grade stability. Many families share how the RVT Digitizer brought their wedding and childhood tapes back to life with crisp, true-to-source results.
For a detailed walkthrough, you can follow the How to Convert VHS Tapes to Digital guide.
Step 4: Configure Settings for Optimal Quality
Open your chosen capture software and select the highest resolution supported by your equipment—typically 480p for VHS, up to 1080p for some digital tapes. Set the correct aspect ratio, usually 4:3 for older tapes.
Choose MP4 (H.264) for broad compatibility and future-proofing. The RVT Digitizer preserves color accuracy and sound fidelity, ensuring your digitizing old videos project delivers results you’ll be proud to share.
Preview your setup by playing a few seconds of video and listening for clear audio. Adjust settings if needed before you begin full conversion.
Step 5: Begin Conversion and Monitor Process
Press play on your tape and start recording in your software. Monitor the process closely, watching for dropped frames, audio sync issues, or playback glitches. The RVT Digitizer’s stability ensures minimal errors, even with aging tapes.
Digitizing old videos happens in real time—so set aside enough time for each tape. If you notice problems, pause and troubleshoot before continuing. Staying attentive during this step protects your memories from loss or distortion.
Celebrate small wins as each tape completes. You’re building a digital archive, one moment at a time.
Step 6: Edit and Enhance Digital Files
Once your footage is captured, use basic editing tools to trim unwanted sections and improve quality. Many families use iMovie or Windows Video Editor for simple edits. Remove static, blank screens, or background noise.
Color correction and noise reduction can revive faded or muffled clips. Add metadata like dates, names, or event tags to make searching easier. Digitizing old videos is not just about transfer—it’s also about improving and organizing your memories for the future.
Think about creating highlight reels or themed compilations for special occasions.
Step 7: Save, Backup, and Verify Files
Always save your digitized files to your primary computer, then immediately back up to an external drive or cloud service. Test playback on several devices to ensure everything transferred correctly.
Follow the 3-2-1 backup rule: three copies, two different storage types, and one offsite. This ensures your digitizing old videos effort is protected from accidental loss, hardware failure, or disasters.
Regularly check your backups and migrate files as storage technology evolves.
Step 8: Organize and Share Digitized Videos
Create folders by year, event, or family member. Use consistent naming conventions, like “1997_Birthday_Jane.mp4,” for easy searching.
Share digital files with family through cloud links, private social media groups, or custom DVDs. Digitizing old videos makes it simple to bring everyone together around shared memories, no matter where they live.
Consider making a digital photo/video book or a family highlight reel for special occasions.
Tips for Troubleshooting Common Issues
If you notice audio and video out of sync, try re-capturing with updated drivers or check your cables. For corrupted files, use repair software or restore from your backup. Playback errors may point to dirty heads in your VCR or camcorder—clean them gently before retrying.
If you hit a roadblock, consult manufacturer support or online forums. Remember, digitizing old videos is a learning journey. Each challenge you overcome brings you closer to a complete, lasting archive of your most precious moments.
Best Practices for Storing and Backing Up Digitized Videos
Preserving your memories is not just about digitizing old videos, it’s about keeping those digital files safe for the long haul. How can you ensure your family’s story remains accessible, secure, and ready to share for decades? Let’s break down the best practices for storing, backing up, and organizing your precious video archives.
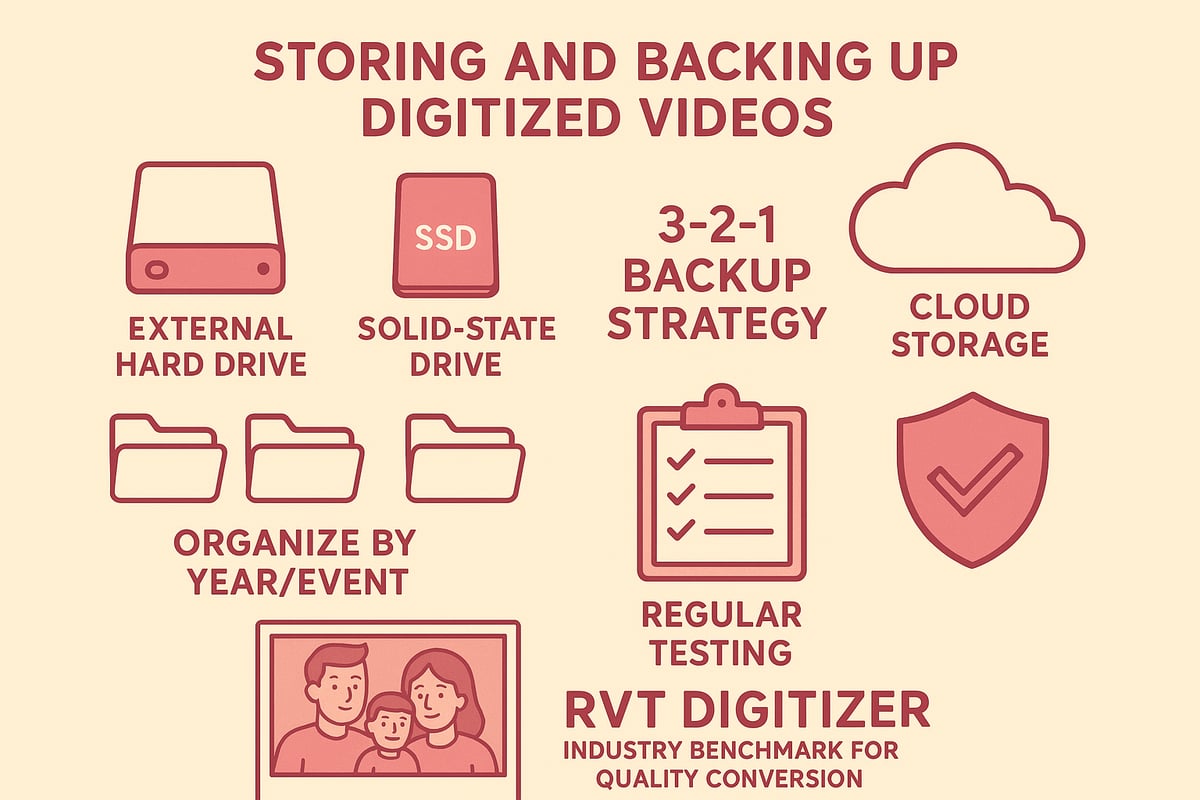
Choosing Reliable Storage Solutions
When digitizing old videos, your first decision is where to store those files. Local options like external hard drives and SSDs offer fast access and large capacities, perfect for home archives. Choose drives with solid reputation and store them in a cool, dry place to avoid damage.
Cloud storage, such as Google Drive or iCloud, adds an extra layer of safety and makes sharing simple. For more insights on keeping analog memories safe after conversion, check out this Guide to Preserving VHS Tapes. Reliable storage is the foundation of every successful digital archive.
Redundancy and Backup Strategies
Never rely on a single copy when digitizing old videos. Follow the 3-2-1 rule: keep three copies, on two different types of media, with one stored offsite.
| Copy Location | Media Type | Example |
|---|---|---|
| Primary | Local Hard Drive | Home computer |
| Secondary | External Drive | SSD in safe place |
| Offsite | Cloud Storage | Google Drive |
Test backups regularly and replace drives every 5–7 years. This strategy protects you from accidental deletions, hardware failures, or disasters.
Organizing Your Digital Archive
A tidy archive makes digitizing old videos worthwhile. Create folder structures by year, event, or family member. Use clear names and add metadata like dates and people in the video.
Tagging files helps you quickly find birthdays, graduations, or special trips. With good organization, your digital memories become easy to browse and share.
Protecting Against Data Loss
Protect your digitizing old videos archive by testing backups on different devices. Use surge protectors to guard against power spikes and keep antivirus software up to date.
If a drive starts showing errors, transfer your files right away. Consistent checks and protective steps help ensure your memories are never lost to technical mishaps.
Long-Term Format Considerations
As technology changes, so do file formats and storage devices. When digitizing old videos, plan to migrate files every few years to newer formats or drives.
Watch for file corruption or signs of obsolescence. Staying proactive means your digital videos will remain viewable and safe as technology evolves.
Secure Sharing and Privacy
Sharing digitizing old videos with family is rewarding, but privacy matters. Set permissions carefully for cloud folders, and use password protection or encryption for sensitive footage.
Always double-check who has access before sending links. Safe sharing keeps your family’s stories in the right hands for generations.
Editing, Enhancing, and Sharing Digitized Videos
Preserving your memories does not end with digitizing old videos. The next steps are editing, enhancing, and sharing those precious moments. With the right tools and a thoughtful approach, you can bring new life to your family archives and ensure they are ready to enjoy for decades.
Editing Tools and Software
After digitizing old videos, choose editing software that matches your comfort level. For beginners, iMovie and Windows Video Editor offer user-friendly interfaces. If you want more control, DaVinci Resolve and Adobe Premiere Pro provide advanced features for color grading and audio balance.
The RVT Digitizer makes importing footage easy, thanks to its plug-and-play setup and reliable transfer speed. Unlike generic converters, you will not waste time fixing dropped frames or out-of-sync audio. For those considering professional help, this VHS to Digital Converter Service Overview explains the benefits of expert editing and transfer.
Editing lets you trim unwanted sections, remove static, and keep only the best scenes. Do you want to make a highlight reel of family vacations or birthdays? Most editors let you drag and drop clips, add transitions, and save your project in formats that are easy to share.
Enhancing Video and Audio Quality
When digitizing old videos, you might notice faded colors or background noise. Luckily, modern editing tools include options for color correction and noise reduction. The RVT Digitizer sets the standard here, preserving color accuracy and sound fidelity from the start, so your enhancements are subtle and true to the original.
For those interested in advanced restoration, reference-based restoration of digitized analog videotapes offers insight into how AI can further improve quality. Features such as upscaling, frame stabilization, and audio cleanup can make old footage look and sound fresh.
Start with automatic filters, then fine-tune brightness, contrast, or audio levels as needed. Save your enhancements in a new file, so the original stays untouched. This approach ensures your digitizing old videos project remains flexible for future edits.
Adding Titles, Captions, and Metadata
Adding titles and captions brings context to digitizing old videos. Label each clip with names, dates, or locations. Metadata, like tags and descriptions, makes finding specific moments easy later on.
Use your editing software’s text tool to insert on-screen titles at the beginning of each event. Add captions for important dialogue or to introduce family members. Consistent labeling keeps your digital archive organized and searchable.
Think of metadata as the table of contents for your video library. With careful tagging, you will find birthdays, weddings, and reunions in seconds, even years from now.
Sharing Across Platforms
Once you finish digitizing old videos, it is time to share the results. Export your edited files in MP4 format for universal compatibility. Thanks to the RVT Digitizer’s high transfer speed and stable files, uploading is quick and painless.
Share your videos on YouTube, Vimeo, or a private family website. For secure sharing, use cloud services like Google Drive or Dropbox. You can also create digital photo books or slideshows for special occasions.
Want to reach distant relatives? Send a private link by email or upload a highlight reel to your family group chat. Sharing makes your memories accessible to everyone who matters.
Legal and Ethical Sharing
When digitizing old videos, always consider legal and ethical issues. Respect copyright if your videos include music, TV, or performances. Get permission before posting footage of others, especially in public or community projects.
Use privacy settings on social media and cloud platforms to control who can see your videos. For sensitive moments, enable password protection or encryption. These steps protect your family’s stories and honor everyone’s wishes.
Sharing responsibly means your memories can be enjoyed without worry, now and for future generations.
Example: Family Reunion Digital Archive
Imagine a family using the RVT Digitizer to convert decades of home movies into a single digital archive. With editing, they create a highlight reel spanning childhood, graduations, and holidays. Titles identify each event, while captions add personal touches.
They enhance color and audio, then share the finished video at a family reunion. Relatives watch together, laughing and reminiscing. Later, everyone receives a secure cloud link, making these memories available anytime.
Digitizing old videos turns scattered, fading tapes into a living family history, ready to enjoy and share for life.
Future Trends in Video Digitization and Preservation
Video preservation is entering a new era. If you are thinking about digitizing old videos, staying ahead of future trends is essential. Let us explore what is coming next and how the right tools, like the RVT Digitizer, can help you keep precious memories safe and accessible for generations.
Advances in AI Restoration and Enhancement
AI is transforming how we approach digitizing old videos. Modern tools can upscale grainy VHS footage, restore faded colors, and even correct missing frames. With the RVT Digitizer, families have reported sharper images and richer sound compared to generic converters. Imagine seeing a 1980s birthday party in near-HD clarity. AI enhancement means your digital videos look better than ever, preserving the emotions behind each moment.
Changing Storage Technologies
Storage options are evolving rapidly. High-capacity SSDs and affordable cloud services make saving and sharing digitized old videos simple and secure. The RVT Digitizer creates files compatible with these solutions, so you can access memories from anywhere. Choosing reliable storage today means your archives will be ready for tomorrow’s devices and platforms.
Evolving File Formats and Standards
File formats are not standing still. New codecs like H.265 offer better compression and quality, ensuring your digitized old videos take up less space without sacrificing detail. The RVT Digitizer supports future-proof formats, making it easy to edit, share, and archive your footage as technology changes. Staying current with file standards prevents your videos from becoming obsolete.
Integration with Smart Home and Media Devices
Smart homes are changing how we enjoy digitized old videos. With seamless playback on smart TVs, tablets, and even VR headsets, your family history can be relived in exciting new ways. The RVT Digitizer’s plug-and-play design means your videos are ready for today’s and tomorrow’s devices, making sharing as simple as a voice command or a tap on your screen.
Community and Collaborative Archiving
Preserving family and community history is easier than ever. Libraries, museums, and local groups are digitizing old videos to create shared archives. With professional-grade tools like the RVT Digitizer, contributors can ensure their footage meets high standards for clarity and longevity. Imagine your childhood recital or a community parade preserved for future generations to enjoy and study.
Sustainability and Environmental Impact
Digitizing old videos is not just about memories, it is about the planet too. By transferring footage before tapes degrade, you reduce e-waste and make responsible choices. Issues like sticky-shed syndrome in magnetic tapes highlight why timely digitization matters. The RVT Digitizer’s efficient process helps families and archivists convert large collections quickly, minimizing environmental impact.
The Importance of Ongoing Education
Staying updated is key. As technology shifts, learning about best practices for digitizing old videos ensures your efforts are not wasted. Resources like best practices for digitizing analog moving images offer step-by-step advice for quality results. Whether you are a beginner or a seasoned archivist, ongoing learning keeps your digital archives safe and accessible.
You’ve seen how quickly those old tapes can fade and how easy it is to lose the sights and sounds that matter most. Imagine sharing your childhood birthdays or classic family holidays in brilliant digital clarity—without the worry of broken VCRs or missing footage. With trusted tools like the RVT Digitizer, you can protect every laugh and milestone for generations to come. Why wait until memories slip further away? Let’s make sure your history is safe, simple to access, and easy to share. Ready to start preserving your story? Digitize my tapes today


