
Don’t let precious memories trapped on old tapes disappear with time. If you want to convert video to digital, now is the perfect moment, before those irreplaceable moments fade away.
Modern technology in 2026 makes saving your family’s history easy, fast, and reliable. Imagine watching your childhood birthdays or sharing a classic home movie with relatives across the world.
This guide will walk you step-by-step through everything you need: from understanding formats and prepping your collection, to choosing the best equipment, converting, storing, and sharing your videos. Ready to preserve your story for generations?
Understanding Video Formats and Why Digitize in 2026
Preserving family memories starts with understanding the tapes and formats sitting in your attic or closet. Today, let’s explore why you should convert video to digital in 2026, what formats you might have, and what makes now the perfect time to act.
The Most Common Analog Video Formats
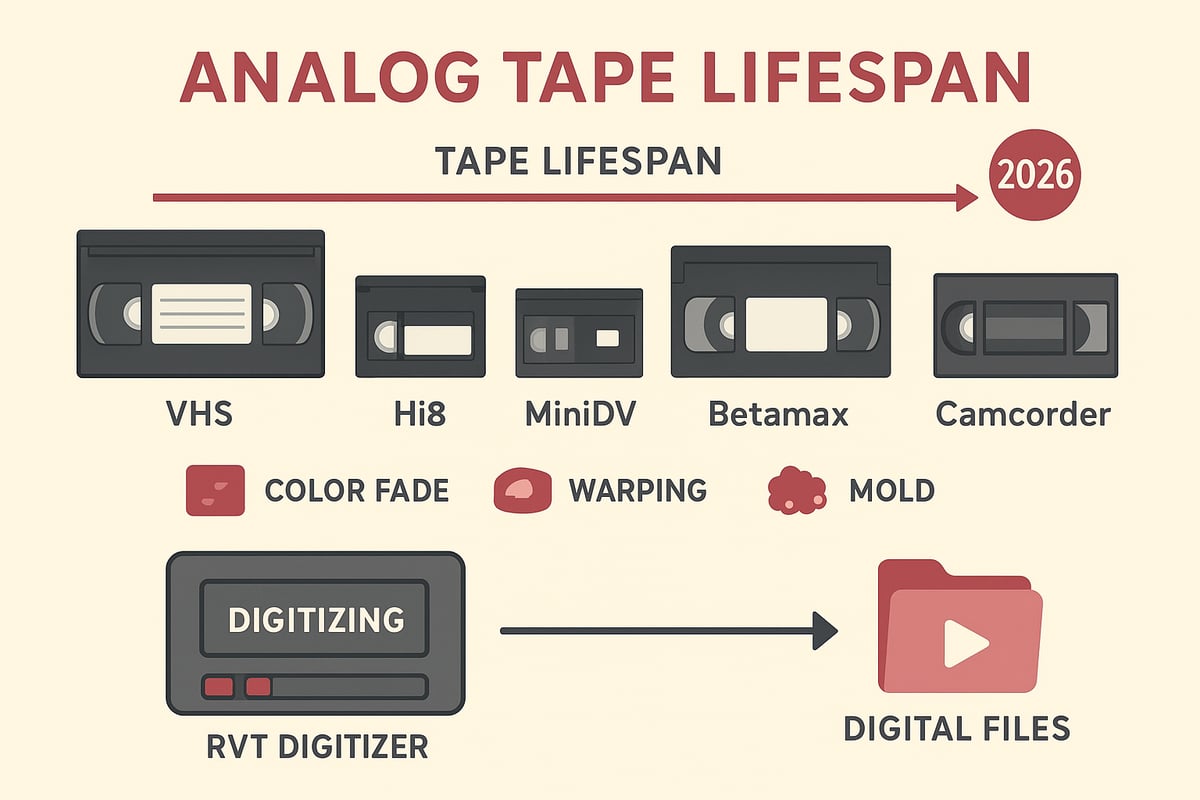
Analog tapes come in many shapes and sizes. You might recognize VHS, VHS-C, Hi8, MiniDV, Betamax, and several camcorder-specific tapes. Each format records memories in its own way, with differences in video quality, sound clarity, and compatibility.
A typical family might find a mix of tape types from birthdays, vacations, and school plays. According to preservation experts, VHS tapes can lose 10-20 percent of their quality every decade. Want to learn more about the diversity of analog formats and how to convert video to digital? Check out this Convert Analogue Video to Digital guide for a deeper look.
Risks of Waiting: Degradation and Obsolescence
Every year, analog tapes lose a bit more of their magic. Magnetic tape can fade, with colors dulling, audio crackling, or even physical damage like warping. Old VCRs and camcorders are becoming rare too, with an estimated 90 percent no longer working by 2026.
If you wait to convert video to digital, you risk losing irreplaceable moments forever. Imagine unboxing a tape only to find it silent or unplayable—family history, gone. That’s why acting now matters.
Benefits of Digital Conversion
Choosing to convert video to digital means protecting your memories for good. Digital files won’t fade or crackle over time. You can edit, share, and store them on any device—from smartphones to smart TVs.
It’s more than just backup. A digitized wedding video, for example, can be sent to relatives worldwide, bringing generations together. Digital files make it simple to create highlight reels or even restore old footage.
Digital File Types and Quality Expectations
Most people who convert video to digital use MP4 files with H.264 encoding. Expect standard quality at 640x480 pixels, or upscaled for modern screens. Each hour of footage typically takes 1-2 GB of space.
With the right converter, you won’t lose any more quality in the transfer. Tools like the RVT Digitizer ensure color accuracy and sound fidelity, so your videos look as vibrant as the day they were filmed.
Overview of the 2026 Conversion Landscape
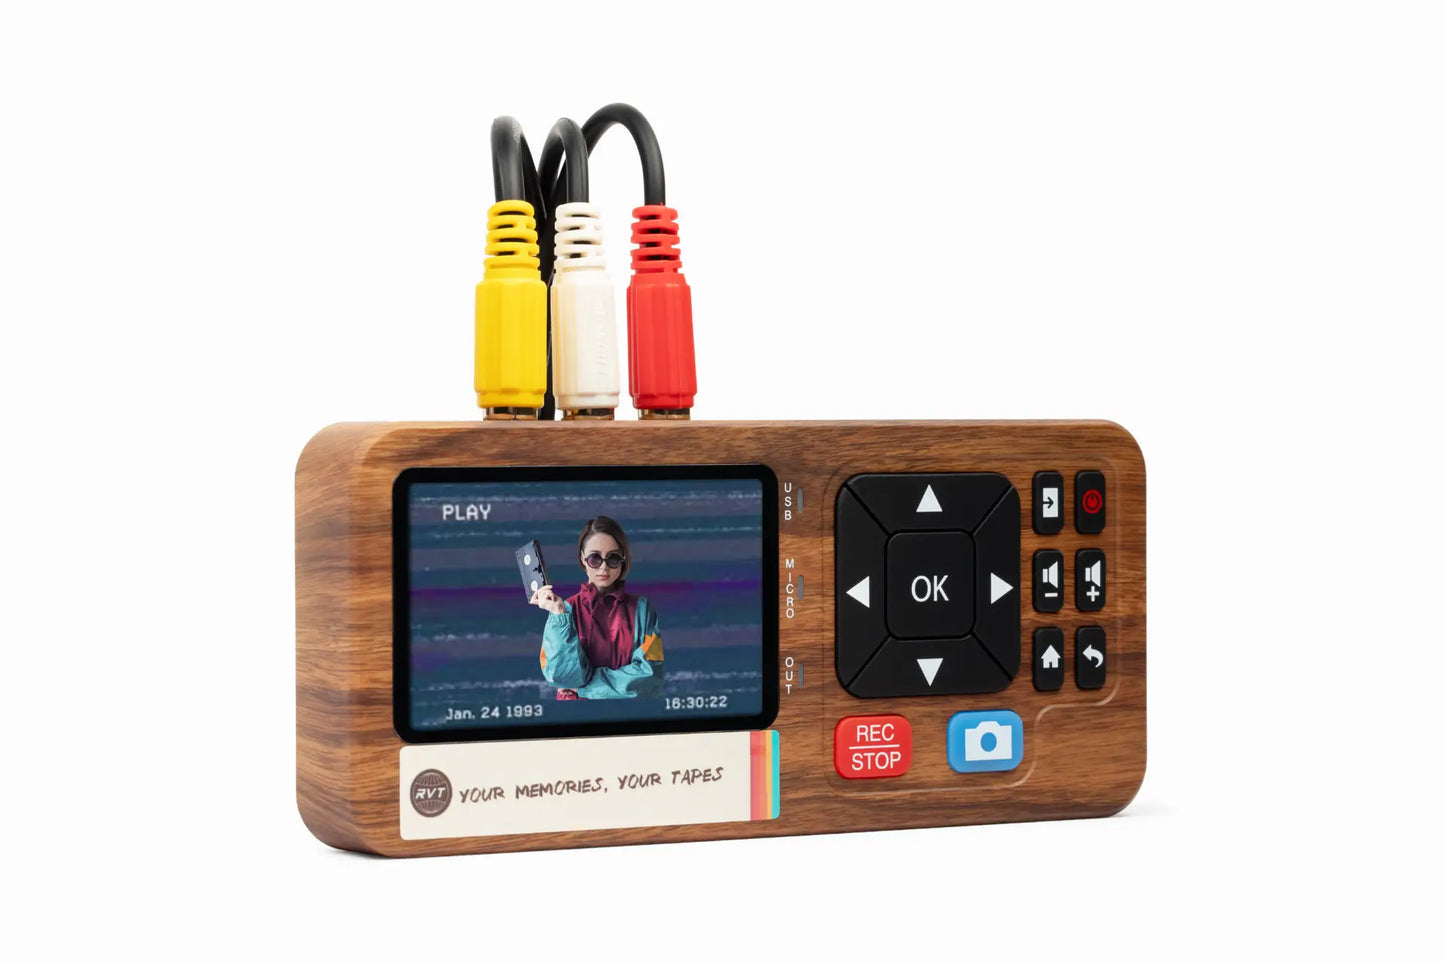
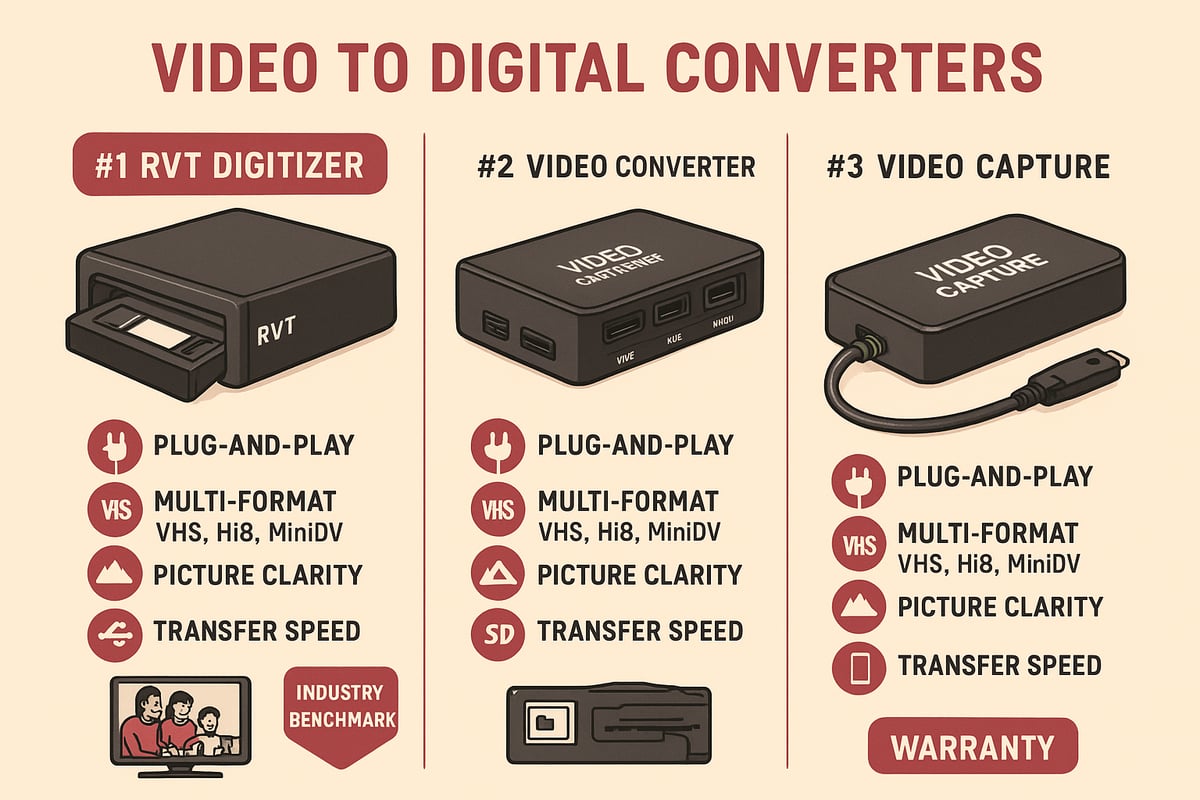
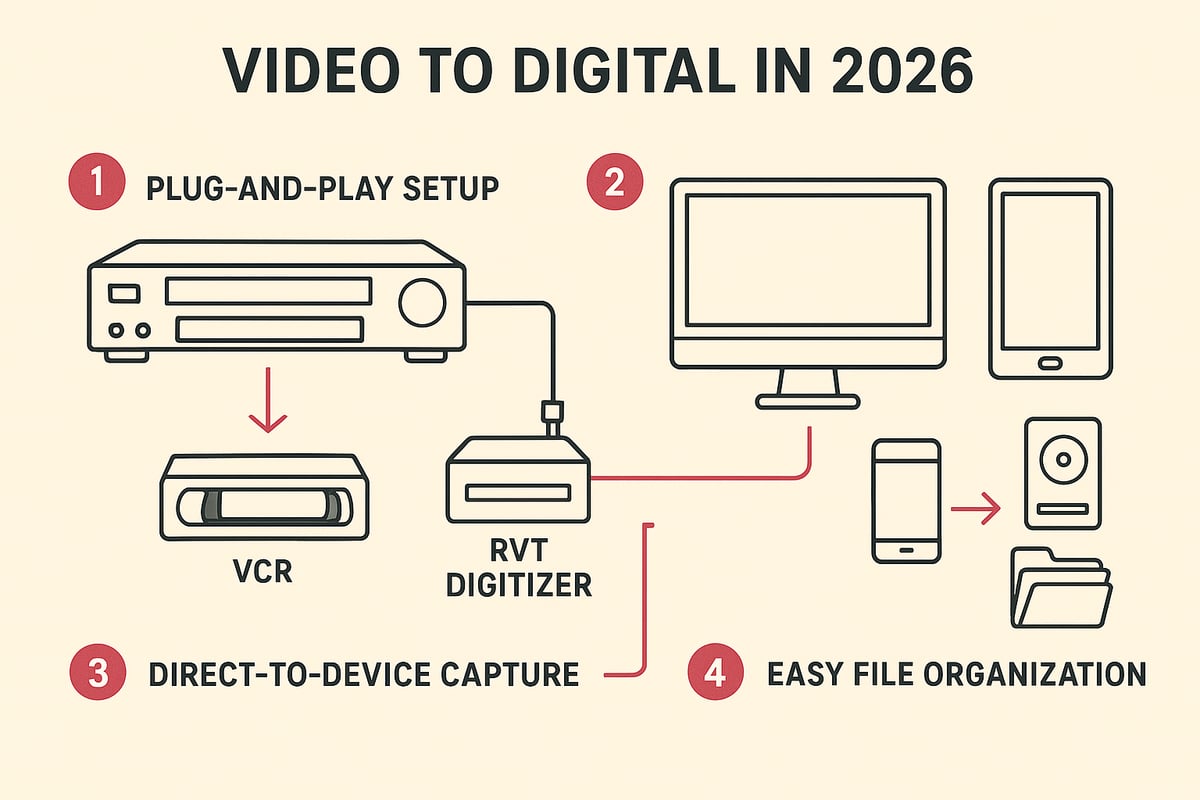
In 2026, technology has made it easier than ever to convert video to digital. The RVT Digitizer sets the industry standard with unmatched clarity, fast transfer speeds, and a true plug-and-play setup. Unlike generic converters, it preserves every detail, thanks to an advanced encoding chip and professional-grade build.
Whether you choose a DIY approach or a professional service, there are options for every budget and need. Market demand is growing, and with fewer analog devices left, now is the time to protect your legacy.
Preparing Your Videos for Conversion
Before you begin to convert video to digital, take a moment to get organized. This preparation step ensures the process goes smoothly and your memories stay safe. Let’s break down what you need to do.
Organizing and Assessing Your Collection
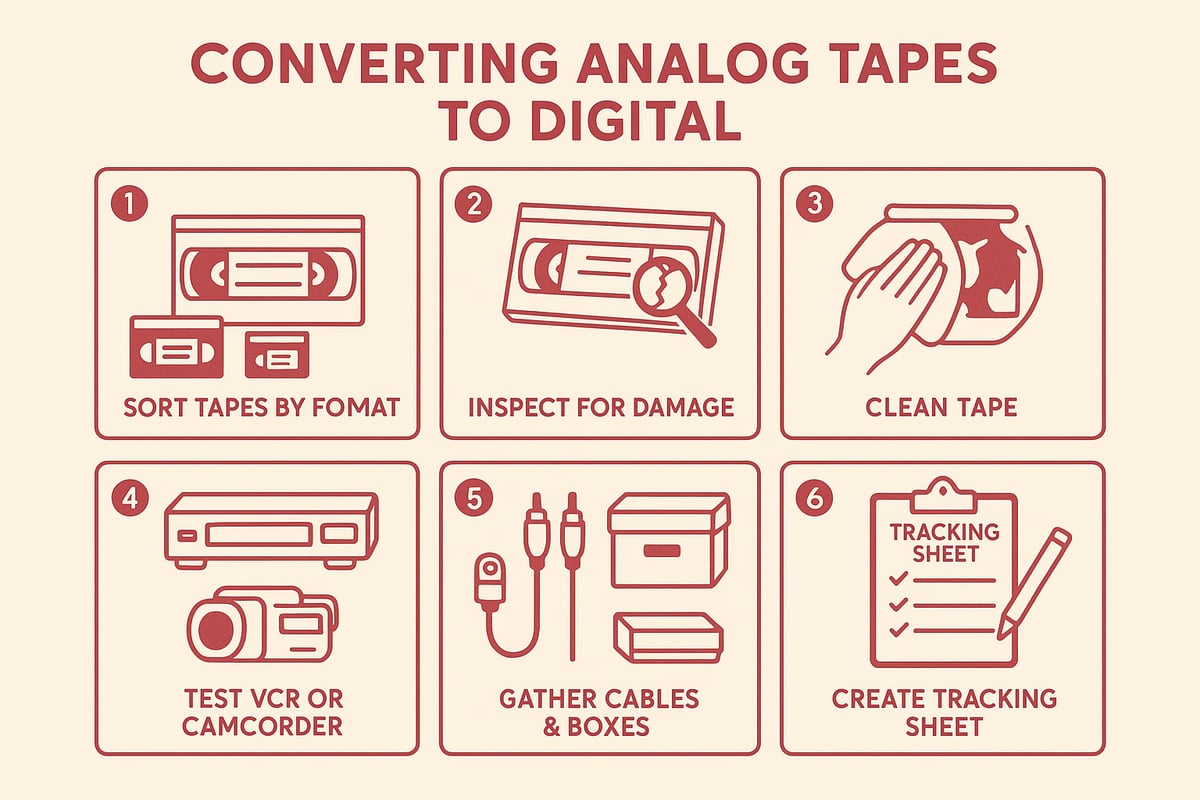
Start by gathering every tape you want to convert. Make an inventory, labeling each one with its format, date, and what’s on it. This step makes it much easier to track progress as you convert video to digital and avoids missing anything important.
Check the condition of each tape. Look for cracks, mold, or sticky residue. Prioritize tapes that hold sentimental value or are starting to show age. Want to make sure you’re not missing key prep advice? Check out some Digitizing Old Videos Tips for extra help.
Cleaning and Maintenance Tips
Dust and dirt can affect playback quality when you convert video to digital. Use a soft, lint-free cloth to gently wipe tapes. If you spot mold or sticky spots, set those aside for professional cleaning. Never try to play a tape that feels sticky or smells musty—it could harm your player.
If you discover a tape from, say, 1989 covered in dust, a gentle clean can make all the difference. But if there’s severe warping or heavy mold, let an expert handle it.
Ensuring Playback Equipment Works
You’ll need a working VCR, camcorder, or playback device for each tape type. Test your equipment with a tape you don’t mind losing. This is a crucial step before you convert video to digital, since most converters—including the RVT Digitizer—need a reliable playback source.
If your hardware is missing or broken, look for trusted sources online or consider rentals. Remember, the RVT Digitizer stands out for its plug-and-play setup and professional-grade reliability, making it easier to get started.
Gathering Essential Accessories
Collect all the cables and adapters you’ll need. Most setups require RCA or S-Video cables, power adapters, and sometimes cleaning kits. Prepare storage containers to keep both your tapes and your new digital files organized.
A tidy workspace means fewer interruptions and lost items during the conversion process. This is a small step that pays off big in peace of mind.
Backing Up and Documenting Before You Begin
Before you convert video to digital, create a tracking sheet. Jot down each tape’s name, format, and conversion status. Take photos or scans of tape labels—these visuals are invaluable for digital archiving.
Ready to start? Careful prep today means your treasured memories will be easier to find, share, and enjoy for years to come.
Choosing the Right Video to Digital Converter in 2026
Preserving your memories starts with the right tool. The market to convert video to digital is more advanced than ever in 2026. Choosing wisely means you can protect your footage, avoid frustration, and enjoy those moments for decades.
Key Features to Look for in a Converter
To convert video to digital successfully, start by checking format compatibility. A good converter should handle VHS, Hi8, MiniDV, and camcorder tapes. Look for true-to-original color capture, sound clarity, and 1:1 frame accuracy. Plug-and-play design saves hassle—no complicated software or drivers.
Speed also matters. The best devices offer direct recording to USB, SD card, or even smartphones. This keeps your workflow simple and reduces errors. For a deeper dive on must-have features, check out this Video to Digital Converter Guide.
- Multi-format support
- Stable, high-quality capture
- Easy setup and operation
- Direct-to-device options
Think about your goal: do you want speed, quality, or both? The right choice makes it easy to convert video to digital and relive your memories.
Comparing Top Conversion Devices and Services
In 2026, you have two main options to convert video to digital: DIY hardware or professional mail-in services. Here’s a quick comparison:
| Feature | DIY Device (e.g., RVT Digitizer) | Mail-in Service |
|---|---|---|
| Cost | One-time purchase | Per-tape fee |
| Turnaround | Instant | 4-6 weeks |
| Control | Full | Limited |
| Quality | High with top device | Professional |
| Risk | Minimal (home use) | Shipping, delay |
DIY devices like the RVT Digitizer offer instant results and full control. Mail-in services handle all the work, but you wait longer and pay more per tape. Decide what works for your needs. Many families and creators prefer the DIY route for privacy and speed when they convert video to digital.
The Benchmark: RVT Digitizer by Retrovision Technologies
The RVT Digitizer stands out as the industry benchmark for anyone aiming to convert video to digital. Its advanced encoding chip preserves color accuracy and sound fidelity, delivering picture clarity that matches the original tape. Fast transfer speed means a two-hour tape is digitized in less than two hours.
Setup is effortless—just plug in and go. No drivers or software are needed, and it supports all major operating systems. Multi-format compatibility lets you save VHS, Hi8, MiniDV, or even retro gaming footage.
Families, creators, and professionals trust the RVT Digitizer for archival projects. U.S.-based support and a two-year warranty give peace of mind. One documentary filmmaker used it to archive rare interviews, achieving flawless results and preserving history for the future.
Avoiding Common Pitfalls with Generic Converters
Generic converters may seem like a bargain, but they can introduce issues. Common problems include poor color accuracy, dropped frames, and audio that drifts out of sync. Without reliable support or warranty, you risk losing precious footage.
Some cheap models require extra software, adding hidden costs. Hardware failures are frequent, especially with large projects. If you want to convert video to digital with confidence, invest in a trusted device designed for stability and archival-grade results.
Evaluating Professional Conversion Services
Professional services can be a smart choice if you want experts to convert video to digital for you. Pros include hands-off handling and minor restoration. Cons are higher costs, shipping risks, and longer turnaround times (expect 4-6 weeks).
Services typically deliver 1-2 GB digital files per tape. Originals are returned safely, but shipping irreplaceable tapes always carries some risk. For rare, damaged, or moldy tapes, professional help is often the safest path.
Making the Right Choice for Your Needs
How do you decide which path to take to convert video to digital? Start with your collection size, budget, and comfort level. A high-quality DIY device like the RVT Digitizer is perfect for large family archives, offering control and speed. For rare or fragile tapes, professionals bring expertise and restoration skills.
Picture a family with dozens of tapes—DIY saves time and money. But a single, damaged heirloom might need special care. Think about what matters most: speed, quality, or peace of mind.
Step-by-Step Guide: Converting Video to Digital
Preserving your memories is easier than ever in 2026. With the right approach, you can convert video to digital and secure your family’s history for decades. Let’s walk through each stage, using the RVT Digitizer as the gold standard for clarity, speed, and simplicity.
Step 1: Setting Up Your Workspace
Begin by choosing a clean, static-free surface with enough room for all your gear. Gather your tapes, playback device (VCR or camcorder), RVT Digitizer, cables, and storage media.
Organize everything neatly. Plug in your devices and make sure outlets are easily accessible. A tidy setup makes it less likely you’ll misplace a tape or cable as you convert video to digital.
Label each tape and keep a tracking sheet nearby. A little prep now saves time and confusion later. Are you ready to start preserving those irreplaceable moments?
Step 2: Connecting Your Equipment
Connect your playback device to the RVT Digitizer using RCA or S-Video cables. The RVT Digitizer’s plug-and-play design means no complicated software or drivers.
Next, connect the RVT Digitizer to your computer, smartphone, or an external USB/SD card. This direct-to-device feature is a game changer, letting you convert video to digital with minimal hassle.
Double-check each cable and input. A secure connection ensures you capture every frame and sound with the same fidelity as the original.
Step 3: Configuring Video Capture Settings
Turn on your playback device and the RVT Digitizer. Open the capture interface on your computer or mobile device. Select the output format—MP4 (H.264) is the standard choice for most uses.
Set your resolution for optimal quality. The RVT Digitizer’s advanced encoding chip preserves true-to-original color and sound. Run a short test recording to confirm everything looks and sounds right before you convert video to digital.
If you see issues, adjust brightness, contrast, or input settings. Keep your file sizes efficient, but don’t compromise quality.
Step 4: Playing and Recording the Video
Insert your first tape and cue it to the starting point. Press play on your VCR or camcorder, then hit record on your capture device.
Monitor the process in real time. Watch for glitches or dropped frames. The RVT Digitizer’s fast transfer speed means a two-hour tape can be digitized in less than two hours.
Want more detailed steps? Check out this Copying VHS to Digital Steps guide for extra tips as you convert video to digital.
Step 5: Saving and Naming Digital Files
Once the transfer is complete, save your file with a clear, descriptive name like “1998_Graduation_Party.mp4.” Organize your files by year, event, or family member.
Create folders for each category. Digital organization makes it easy to find, share, or edit your videos in the future. Each time you convert video to digital, add the filename to your tracking sheet.
This step is where your memories become future-proof and easily accessible for everyone.
Step 6: Quality Checking and Basic Editing
Review each digital file as soon as it’s saved. Play back the video from start to finish to confirm there are no missing sections or sync issues.
Trim unwanted footage and adjust color or brightness if needed. Basic editing tools are often included with the RVT Digitizer, but free software options are available too.
By checking every file, you ensure that every time you convert video to digital, you preserve the best possible version of your cherished moments.
Step 7: Troubleshooting Common Issues
If you see “no signal” errors, recheck cable connections and input selection. Audio out of sync? Try pausing, re-syncing, or switching playback devices.
For visual glitches, clean tape heads or test another tape. Severe issues may need professional attention, but most problems are easy to solve when you convert video to digital with reliable equipment.
Keep a troubleshooting checklist handy. The RVT Digitizer’s U.S.-based support team can assist if you hit a snag.
Step 8: Cleaning Up and Storing Originals
After digitizing, store your tapes in cool, dry, dust-free containers. Mark each as “digitized” to avoid duplicate work.
Keep your originals as backup. Organized storage means you can always revisit or re-convert if technology improves. Each time you convert video to digital, you’re building an archive that lasts for generations.
Storing, Backing Up, and Sharing Your Digital Videos
Preserving your memories does not end the moment you convert video to digital. The next steps are just as important. Proper storage, thoughtful organization, and smart sharing keep your videos safe, accessible, and ready for any occasion.
Best Practices for Digital Storage
After you convert video to digital, choosing the right storage makes all the difference. Always keep at least two copies of your videos. Store one on a reliable external hard drive or SSD, and another in a trusted cloud service.
Local storage options like SSDs or RAID drives offer speed and stability. Cloud platforms, such as Google Drive or Dropbox, give you off-site backup and easy access. Avoid using old or low-quality flash drives, since they can fail unexpectedly.
Label each storage device clearly. Set a reminder to check your files once a year. This habit protects your collection and ensures your digital memories last for decades.
Organizing and Cataloging Your Digital Library
Once you convert video to digital, organization is key. Start by naming each file with clear details, like the year and event. For example, use names like 1995_Graduation.mp4 or Family_Trip_2001.mp4.
Create folders for each year or occasion. Some families use spreadsheets or simple media management apps to track what is in their library. This system makes searching for a specific moment quick and frustration free.
If you are working with a large collection, consider color-coded folders or digital tags. Tagging videos by decade, event, or family member adds another layer of searchability.
Sharing with Family and Friends
Sharing becomes a joy after you convert video to digital. Upload your favorite clips to private YouTube or Vimeo channels, or use shared cloud folders for easy access. Digital albums and playlists are perfect for birthdays, reunions, or anniversaries.
Imagine streaming a childhood birthday video on your smart TV during a family gathering. With digital files, distance is no barrier. Relatives across the globe can enjoy the same memories instantly and securely.
Personalize the sharing experience. Create highlight reels or themed collections to make each moment feel special.
Preparing for Long-Term Preservation
Long-term stability is crucial after you convert video to digital. Check your files every year for errors or corruption. As technology changes, migrate your collection to new storage devices and formats.
For historically significant or irreplaceable footage, consider consulting experts. Professional archival services can help maintain your collection for generations. Following recognized guidelines for media preservation challenges and practices ensures your efforts are future-proof.
Make a habit of updating your backup plan as your collection grows. This keeps your digital library resilient against loss or obsolescence.
Security and Privacy Considerations
Security matters when you convert video to digital. Password-protect sensitive videos stored online. If you use cloud services, enable two-factor authentication for extra safety.
Teach family members how to access and share files responsibly. Remind them not to post private videos publicly unless everyone agrees. Use private links or invite-only folders to control who sees your memories.
By taking a few simple steps, you protect your family’s history for years to come.
Advanced Tips: Enhancing, Restoring, and Repurposing Digitized Videos
Preserving memories does not stop when you convert video to digital. In 2026, new tools make it easier than ever to enhance, restore, and repurpose your footage. Whether you want to fix faded colors, create highlight reels, or share special clips with family, these advanced tips will help you make the most of your digital archive.
Basic Restoration Techniques
Start with simple fixes to bring your videos back to life. Use video software to adjust colors, reduce noise, and sharpen images. If your tapes look washed out or the sound is muffled, tools like brightness and contrast sliders or audio equalizers can help.
The RVT Digitizer ensures you capture the best possible quality when you convert video to digital, so your restoration work starts with a strong foundation. Many families notice a dramatic difference in clarity just from using RVT's advanced encoding chip. For tougher issues, explore new AI-powered platforms that offer automated enhancements. Learn more about these advancements in video processing platforms that make restoration more accessible than ever.
Advanced Editing and Creative Uses
Transform your digitized footage into something new. Create highlight reels for birthdays, combine old home movies with current events, or build a family documentary. Editing suites in 2026 are user-friendly, and RVT Digitizer files work with all popular editors.
Many creators use the convert video to digital process as a launchpad for creative projects. Imagine mixing 1990s camcorder clips with today’s smartphone videos, telling a story across generations. A little editing can turn raw footage into keepsakes your family will cherish.
Adding Metadata and Context
Give your videos lasting value by adding details. Embed dates, locations, and names directly into file properties. You can also annotate footage or build digital scrapbooks for your collection.
When you convert video to digital, take photos or scans of original tape labels and attach them to your digital files. This makes it easy for future generations to understand the story behind each clip. Consistent metadata helps you keep your library organized and searchable.
Converting for Multiple Devices and Platforms
Make your videos easy to enjoy anywhere. Export files to formats like MP4, which works on phones, tablets, computers, and smart TVs. For family who prefer physical copies, burn DVDs or Blu-ray discs from your digital masters.
The RVT Digitizer outputs universal file types, so you never have to worry about compatibility. When you convert video to digital using RVT, sharing across platforms is seamless. Always keep backups in more than one format to ensure long-term access.
Preserving and Sharing on Social Media
Share your favorite moments with friends and family online. Platforms like Instagram, Facebook, and TikTok support short video clips, so you can post highlights or create private albums. Always review privacy settings to control who can see your content.
Copyright matters, especially for rare or historic footage. Before sharing publicly, check for sensitive content or family preferences. Social media makes it simple to celebrate milestones and connect generations.
When to Seek Professional Restoration
Some tapes need extra care. If you discover severe damage, mold, or sticky residue, professional restoration is the safest option. Experts have the tools to repair and digitize rare or valuable footage without risk.
Museums and collectors often choose RVT Digitizer for its archival-grade results, but for irreplaceable originals, a specialist’s touch may be required. If you are unsure about a tape’s condition, consult a pro before attempting to convert video to digital yourself.
Frequently Asked Questions About Video to Digital Conversion
Looking for quick answers as you prepare to convert video to digital? Here are the most common questions families and creators ask in 2026, with clear, actionable advice to help you get the best results.
What formats can I convert in 2026?
You can convert video to digital from nearly every legacy format. This includes VHS, Hi8, MiniDV, Betamax, VHS-C, and most camcorder tapes. Leading converters like the RVT Digitizer support all these, so you can build a complete digital archive no matter your collection's mix.
How long does the conversion process take?
Transferring tapes is a real-time process. One hour of footage takes one hour to digitize using a device like the RVT Digitizer. Professional services may take 4 to 6 weeks to process and return your tapes. Remember, old tapes degrade over time, with VHS tapes deteriorating 10-20 percent in quality over 10-25 years. The sooner you convert video to digital, the more you save your memories.
What quality can I expect from my digital files?
Most digital files are delivered in MP4 format, typically at 640x480 resolution and 1-2 GB per hour of video. The RVT Digitizer stands out for its advanced encoding chip, preserving color, sound, and sharpness so your digital copies look true to the original. Quality also depends on the condition of your tapes and the converter you choose.
Will my originals be returned if I use a service?
Yes, reputable services always return your original tapes along with the digital files. If your tapes are rare or irreplaceable, DIY solutions like the RVT Digitizer give you complete control and peace of mind throughout the process.
Can I edit or restore my digitized videos?
Absolutely. After you convert video to digital, you can use basic or advanced editing software to trim, enhance, or restore your footage. The RVT Digitizer produces files compatible with most editing tools, making it easy to improve brightness, fix color, or remove noise.
Is it safe to mail tapes to a conversion service?
Most services offer tracking, insurance, and secure packaging. However, mailing tapes always carries some risk, especially for fragile or valuable collections. If your tapes show signs of issues like sticky-shed syndrome, consider using a trusted DIY converter or seeking professional restoration.
How do I ensure my digital files last for decades?
To keep your memories safe, store at least two digital copies in different places, such as an external drive and the cloud. Check files once a year and migrate to new storage tech as needed. The RVT Digitizer creates stable, archival-quality files designed for lasting preservation.
You’ve seen how easy it is to bring your VHS, Hi8, or MiniDV tapes into the digital age—no tech headaches, no quality loss, just pure nostalgia preserved for the future. Imagine surprising your family with a crisp digital copy of that long-lost birthday party or sharing classic footage with friends across the world. The best part? You don’t need to wait or worry about shipping your priceless originals. Ready to protect your memories and enjoy them anytime, anywhere? Why not take the next step and Digitize my tapes today.