
Best Camcorder to Digital Converter
Looking for the best camcorder to digital converter to rescue those boxes of Hi8, MiniDV, and VHS-C tapes before they're gone forever? Here's the truth nobody wants to say out loud: those precious moments—your kids' first steps, that wedding from '94, the vacation you'll never take again—are literally disintegrating in your closet right now. Every day you wait, you're gambling with irreplaceable memories.
The RVT Digitizer 3.0 doesn't just convert camcorder tapes—it resurrects them. No computer. No complicated software. No PhD in technology required. Plug in your old camcorder, hit record, and watch thirty years of analog magic transform into crystal-clear MP4 files you can share with anyone, anywhere. This is how you save what matters most—before time makes that decision for you.

RVT Digitizer 3.0
The RVT Digitizer is a plug-and-play VHS-to-digital converter built for people who want to preserve old memories without the hassle.
View full details


Why Your Camcorder Tapes Can't Wait Another Year
Let's cut through the noise. You've had those camcorder tapes sitting in storage for how long now? Five years? Ten? Twenty? And here's what's happening while you "get around to it": magnetic tape degrades. The colors fade. The audio warps. That crisp footage of your daughter's first birthday party becomes unwatchable static, and no amount of professional restoration can bring it back once it's gone.
The best camcorder to digital converter isn't the one with the flashiest features—it's the one you'll actually use. The RVT Digitizer 3.0 was engineered for real people who don't have time to figure out confusing capture cards, finicky software, or adapters that require an engineering degree. This is plug-and-play preservation at its most powerful.
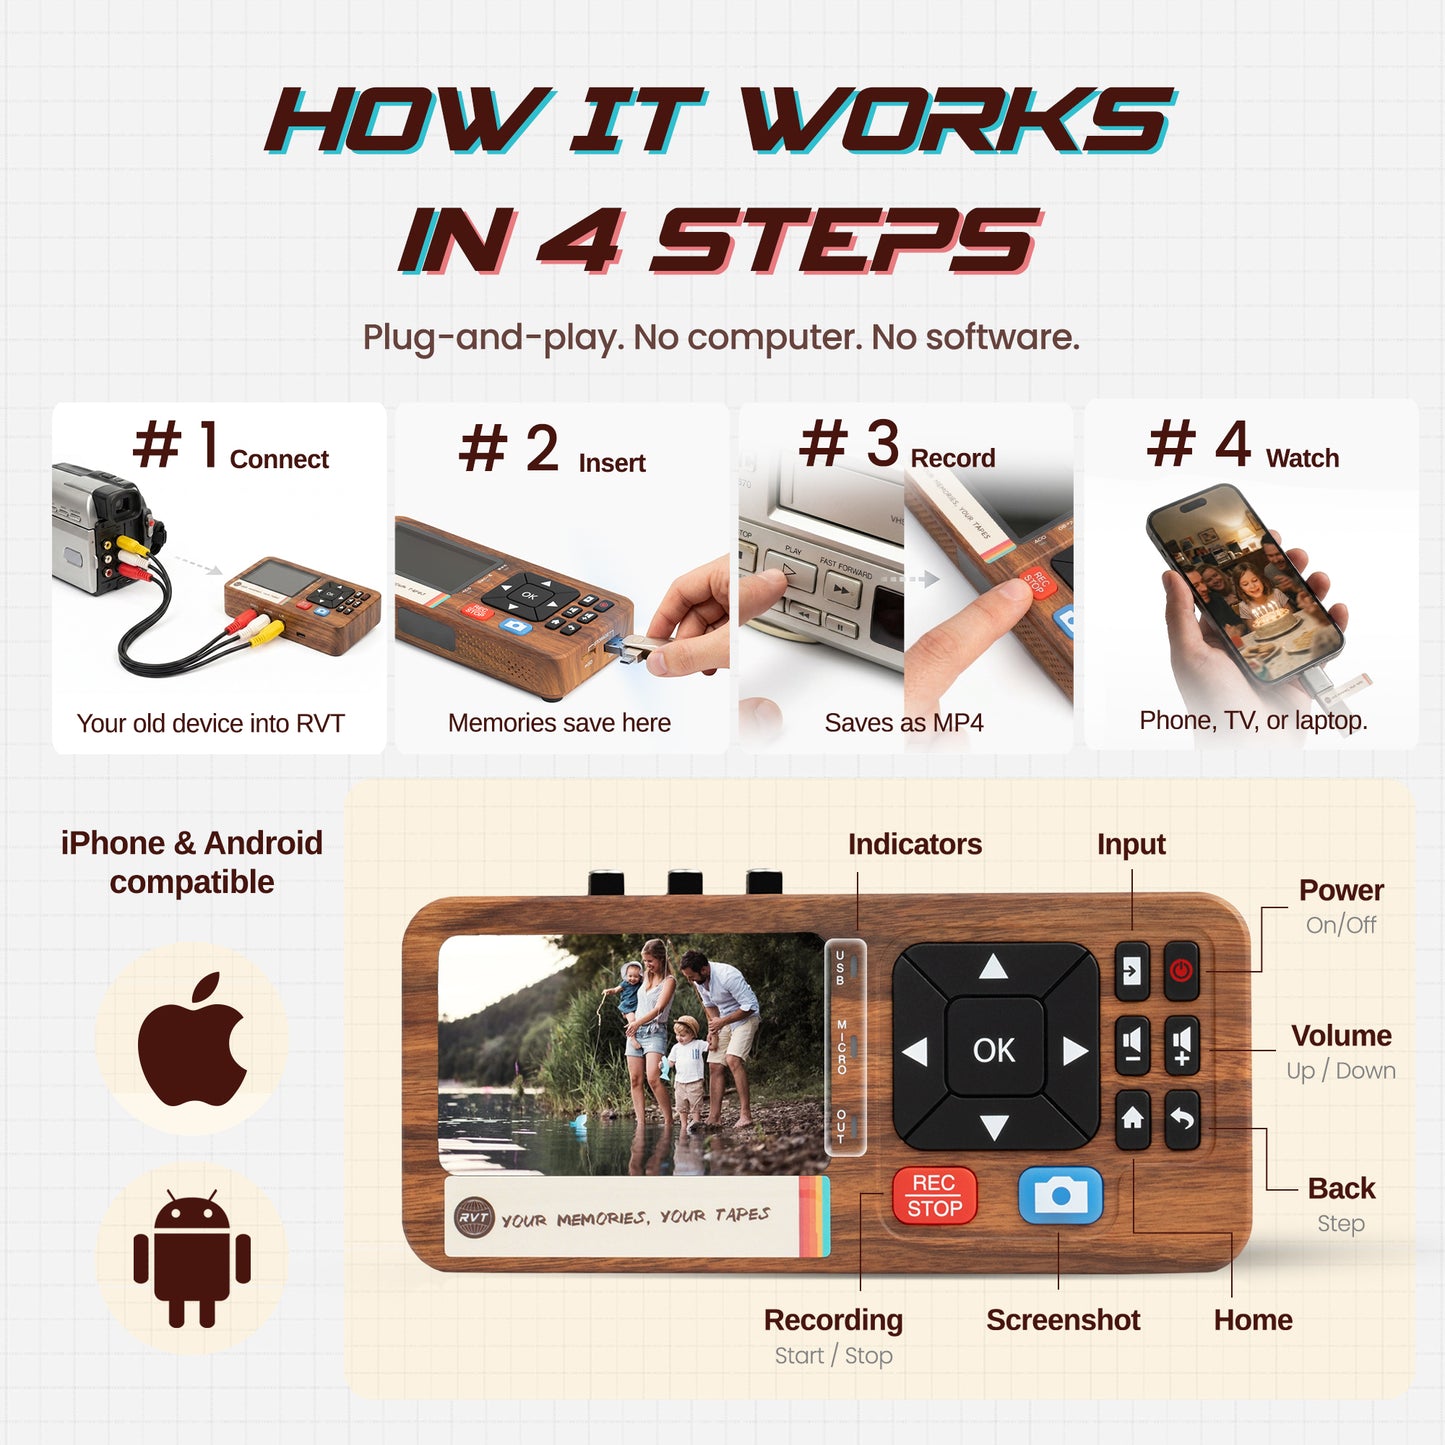
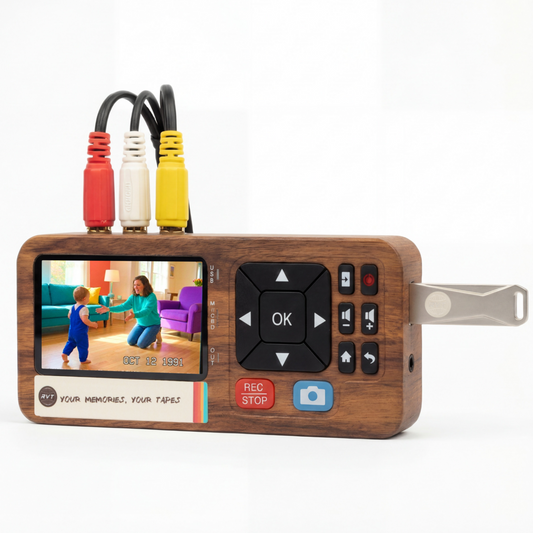
What makes this the best converter for camcorder tapes? Three things: speed, quality, and zero friction. Connect your old Hi8, Digital8, MiniDV, or VHS-C camcorder using the included RCA cables. Pop in a USB drive. Press record. That's it. The built-in 3.5" preview screen lets you watch your memories resurface in real-time, ensuring every frame captures exactly as it should. No guessing. No hoping it worked. You see it, you know it's saved.
And here's where most converters fail you: compatibility. The RVT Digitizer 3.0 works with every major camcorder format from the 80s and 90s—the Golden Age of home videos. Whether your footage lives on Hi8 tapes from that Sony Handycam, MiniDV from your Canon ZR-series, or VHS-C from your old RCA camcorder, this device speaks their language fluently. Wall-powered reliability means no mid-conversion failures like those cheap USB-powered units that die halfway through your most important tape.
Once converted to MP4, your videos work everywhere—iPhone, Android, smart TV, laptop, cloud storage. Share that anniversary video with your mom. Upload childhood memories to your family group chat. Finally watch those vacation tapes from 1997 on your 65-inch 4K screen. Your analog past deserves a digital future, and this is your weapon of choice.
The Complete Guide to Camcorder to Digital Converters: Formats, Methods & Why the RVT Digitizer 3.0 Outperforms the Competition
Understanding Your Camcorder Tape Format: What You're Actually Dealing With
Before you can save your memories, you need to know what you're working with. Camcorder technology evolved rapidly through the 80s and 90s, spawning multiple tape formats—each with its own quirks, advantages, and conversion challenges. Let's decode what's probably collecting dust in your basement right now.
VHS-C (Compact VHS): The chunky cousin of full-size VHS tapes, VHS-C cartridges were popular in the late 80s and throughout the 90s because they balanced decent video quality with portability. These palm-sized tapes technically fit inside a full-size VHS adapter for playback, but good luck finding one of those adapters that still works. Most have degraded plastic components or worn mechanisms that damage your tapes. The RVT Digitizer 3.0 bypasses this entirely—connect your VHS-C camcorder directly and digitize without risking your irreplaceable footage to a failing adapter.
Hi8 and Digital8: Sony's answer to VHS-C domination, 8mm formats offered superior video quality in an even more compact package. Hi8 (High-band Video8) was the analog champion of the 90s, delivering crisp images that made VHS look washed out by comparison. Digital8 came later, recording digital video onto Hi8-compatible tape stock—giving you near-DVD quality in a tape that fits in your palm. The catch? These camcorders are becoming extinct. Working Hi8 and Digital8 camcorders command premium prices on eBay, and mechanical failures are common. If yours still plays, convert those tapes now before the camcorder dies and takes your memories with it.
MiniDV: The professional-grade darling of the early 2000s, MiniDV offered true digital recording with exceptional image quality. Wedding videographers, indie filmmakers, and serious hobbyists swore by MiniDV because it delivered broadcast-quality footage in a cassette smaller than a deck of cards. But here's the problem: MiniDV tapes have notoriously fragile tape mechanisms. The tape is thinner than Hi8, and playback heads can easily damage old tapes that have become brittle or sticky with age. Every time you play a MiniDV tape, you risk destroying it. The best camcorder to digital converter for MiniDV isn't just convenient—it's essential insurance.
Video8: The original 8mm format that started it all in 1985. Video8 quality falls somewhere between VHS and Hi8, but these are also the oldest consumer camcorder tapes still in circulation. If you've got Video8 tapes from the mid-to-late 80s, they're ticking time bombs. The magnetic coating deteriorates faster on older tape stock, and many Video8 tapes exhibit "sticky shed syndrome"—where the binding agent breaks down and the oxide layer literally sheds off the tape base. Professional restoration exists for severely degraded tapes, but prevention beats intervention. Convert while the footage is still watchable.
Why DIY Camcorder Conversion Usually Fails (And Why Most People Give Up)
The internet is littered with tutorials promising easy DIY camcorder digitization. Connect a capture card. Install the drivers. Download the software. Troubleshoot the audio sync issues. Redo the whole tape because the colors looked wrong. Spend three hours Googling why your computer won't recognize the device. Sound familiar?
DIY conversion fails for predictable reasons:
Technical complexity overwhelms average users. Most capture devices assume you understand video codecs, frame rates, interlaced vs. progressive scan, audio sample rates, and USB bandwidth limitations. If those terms sound like gibberish, you're already behind the learning curve—and that's by design. These products cater to tech enthusiasts, not normal people trying to save their kids' soccer games.
Cheap USB converters deliver cheap results. That $30 USB capture stick on Amazon? It's USB-powered, which means inconsistent voltage delivery and frequent dropouts mid-recording. You'll lose frames, experience audio drift, and end up with corrupted files that won't play on half your devices. USB power simply cannot sustain reliable, uninterrupted recording for 1-2 hour tapes. Professional-grade converters—like the RVT Digitizer 3.0—use dedicated wall power adapters for rock-solid performance.
Software compatibility nightmares waste hours of your life. Mac won't recognize the Windows-only drivers. Windows 11 broke compatibility with the legacy software. The capture program crashes randomly. Your computer doesn't have enough processing power to handle real-time encoding. Suddenly a "simple" project becomes a part-time job, and those tapes go back on the shelf for "when you have more time."
You need a working camcorder or VCR. This seems obvious, but it's the dealbreaker most people discover too late. Your old camcorder's battery died years ago and replacement batteries are impossible to find. The playback heads are clogged with oxide buildup. The rubber belts inside have turned to goo. You spend $150 on a "working" camcorder from eBay only to discover it eats tapes or has tracking issues. The best camcorder to digital converter in the world can't help if you don't have functional playback equipment.
What Makes the RVT Digitizer 3.0 the Best Camcorder to Digital Converter
Let's be direct: not all converters are created equal. The market is flooded with rebranded devices that make bold promises and deliver mediocre results. Here's why the RVT Digitizer 3.0 earns the title of best camcorder to digital converter:
Zero computer dependency. This is the game-changer. No software to install. No drivers to update. No RAM requirements or operating system compatibility concerns. The RVT Digitizer 3.0 is a standalone recording device with embedded firmware that handles all the encoding internally. You're interacting with a physical device, not juggling software windows. For anyone who isn't a computer expert—which is most people—this alone justifies the investment.
Wall-powered reliability prevents conversion disasters. Every professional video engineer will tell you the same thing: consistent power delivery is non-negotiable for quality video capture. USB power fluctuates. Wall power doesn't. The RVT Digitizer 3.0 uses a dedicated 110-240V power adapter that ensures stable, uninterrupted recording from start to finish. Convert a 2-hour wedding video at 3am while your laptop sleeps—this device doesn't care. It just works.
Built-in 3.5" preview screen provides real-time monitoring. Here's a feature competitors skip to cut costs: a quality LCD screen. Why does this matter? Because you need to see what you're recording. Is the tracking correct? Are the colors accurate? Is the audio syncing properly? With the RVT Digitizer 3.0, you watch your memories resurface frame by frame, catching problems immediately rather than discovering corrupted footage hours later. The screen isn't just a convenience—it's quality control built into the workflow.
Universal MP4 output for modern device compatibility. The converter records directly to MP4 (H.264 codec, the gold standard for digital video). This means your converted files play on everything—iPhones, iPads, Android phones, Windows PCs, Macs, smart TVs, streaming sticks, web browsers, and cloud storage platforms. No additional conversion needed. No proprietary formats that lock you into specific software. True plug-and-play compatibility across every device you own.
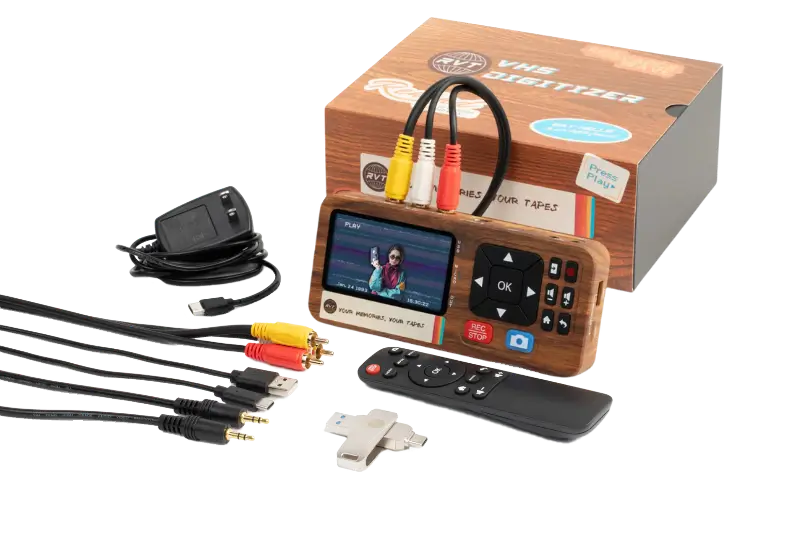
Professional-grade cables and accessories included. Most converters cheap out on cables, including flimsy RCA connections that introduce noise and degrade signal quality. The RVT Digitizer 3.0 ships with premium RCA and S-Video cables designed for maximum signal integrity from vintage equipment. You also get a 32GB USB drive (pre-formatted and ready to record), a USB-C adapter for direct connection to modern phones, and a remote control for convenient operation. Everything you need arrives in one box—no hunting for compatible accessories or spending extra money on cables.
Texas-based support and 2-year warranty. When something goes wrong—and with DIY projects, something always goes wrong—you need help from humans who understand the technology and actually care about solving your problem. The RVT Digitizer 3.0 includes access to U.S.-based customer service via phone and QR code video tutorials. Every unit is backed by a 2-year warranty and 30-day money-back guarantee. Your memories are too important to trust to faceless overseas support that disappears after the sale.
Step-by-Step: How to Convert Your Camcorder Tapes with the RVT Digitizer 3.0
The process is refreshingly simple—exactly as it should be for a device designed for real people, not engineers:
Step 1: Gather Your Equipment
- Your old camcorder (Hi8, Digital8, MiniDV, VHS-C, or Video8)
- The RVT Digitizer 3.0
- The included RCA or S-Video cables
- A USB drive or SD card (32GB drive included)
- Power adapter for both the digitizer and your camcorder
Step 2: Connect Your Camcorder
Locate the AV OUT or VIDEO OUT ports on your camcorder—usually hidden under a rubber flap on the side or back. These are typically color-coded: yellow for video, red and white for stereo audio. Connect these to the corresponding INPUT jacks on the RVT Digitizer 3.0 using the included cables. If your camcorder has S-Video output, use that instead for superior image quality (remember to connect the red/white audio cables separately, as S-Video only carries the video signal).
Step 3: Power Up and Insert Your Storage
Plug in both devices. Insert your USB drive or SD card into the RVT Digitizer 3.0. The device will recognize the storage automatically. Make sure you're using a drive formatted to FAT32 or exFAT (the included USB drive is pre-formatted).
Step 4: Cue Up Your Tape
Load your tape into the camcorder and fast-forward or rewind to the beginning of the content you want to digitize. Press play on your camcorder. You should see the video appear on the RVT Digitizer 3.0's built-in screen. If you see "No Signal," check your cable connections and ensure you're plugged into the OUT ports on your camcorder, not the IN ports (a common mistake).
Step 5: Start Recording
Once your video displays clearly on the screen, press the RECORD button on the RVT Digitizer 3.0. The device captures everything in real-time, so a 90-minute tape takes 90 minutes to convert. You can use the Auto Stop feature to automatically end recording after 60, 90, 120, or 150 minutes—perfect for full-length tapes you want to walk away from.
Step 6: Stop Recording Properly
This is critical: when the tape ends, press the RECORD button again to stop recording. Do NOT remove the USB drive or SD card until you properly stop the recording. Ejecting storage mid-recording will corrupt your file, rendering hours of work useless. The device will finalize the file and make it safe to remove.
Step 7: Transfer to Your Devices
Remove the USB drive and plug it into your computer, phone, or tablet. Your converted video appears as a standard MP4 file, ready to view, edit, or share. Copy it to your hard drive for backup. Upload it to Google Photos or iCloud. Share it with family via text or email. The world is yours.
Comparing Camcorder to Digital Conversion Methods: DIY vs. Professional Services vs. The RVT Digitizer 3.0
Professional Conversion Services charge $15-$40 per tape, with turnaround times ranging from 2-8 weeks. For a modest collection of 20 tapes, you're looking at $300-$800 and a lot of waiting. Pros: zero effort on your part, professional equipment handles damaged tapes better. Cons: expensive, slow, you lose physical control of irreplaceable family heirlooms, privacy concerns (you're trusting strangers with intimate family moments), and if the service goes out of business or loses your tapes, you have limited recourse.
DIY with Computer-Based Capture Cards costs $50-$300 for equipment plus endless troubleshooting time. You maintain control and avoid shipping risks, but compatibility issues, software crashes, and technical complexity make this route frustrating for average users. Only recommended if you're already comfortable with video editing software, have a powerful computer, and possess the patience of a saint.
The RVT Digitizer 3.0 hits the sweet spot: professional-quality results with DIY control and zero technical headaches. At $179 (regular price $220), you break even after converting just 6-12 tapes compared to professional services. Beyond cost savings, you gain immediate gratification—no shipping delays, no waiting weeks—and complete privacy. Your family videos never leave your home.
Common Problems When Converting Camcorder Tapes (And How to Solve Them)
Problem: "No Signal" or Blank Screen
Solution: Verify you're connected to the OUT ports on your camcorder, not the IN ports. Ensure your camcorder is powered on and in playback mode, not camera mode. Check that the tape is actually playing. Try cleaning your camcorder's playback heads with a head-cleaning tape if available.
Problem: Video Looks Fuzzy or Colors Are Wrong
Solution: Try using S-Video cables instead of composite RCA if your camcorder supports it—S-Video delivers significantly better image quality. Check that the VIDEO SOURCE setting in the digitizer's menu matches your cable type (AV or S-Video). Some older tapes naturally have degraded image quality; this isn't the converter's fault—it's capturing what the tape currently contains.
Problem: Audio and Video Out of Sync
Solution: Ensure both the red and white audio cables are firmly connected. Some older camcorders have separate audio and video outputs that must both be connected. The RVT Digitizer 3.0 includes improved audio/video sync protection, but severe tape degradation can still cause sync issues that require editing software to fix.
Problem: Recording Stops Unexpectedly
Solution: Check your USB drive capacity—a full drive will obviously stop recording. Ensure you're using USB 2.0 or 3.0 drives up to 256GB, formatted to FAT32 or exFAT. Using outdated USB 1.0 drives or incorrectly formatted storage will cause failures. The included 32GB drive is pre-tested and ready to go—use that first to eliminate storage as the problem.
Problem: Converted File Won't Play on My Device
Solution: The RVT Digitizer 3.0 outputs standard MP4 files that play on virtually all modern devices. If your file won't play, it's likely corrupted because recording wasn't properly stopped before removing the USB drive. Always press the RECORD button to stop recording first. If the file is genuinely corrupted and you can't re-record the tape, video repair software like VLC or Wondershare Repairit can sometimes salvage footage.
Why Convert Now: The Ticking Clock on Magnetic Media
Magnetic tape wasn't designed for archival storage. Unlike acid-free paper or stone tablets, magnetic media has a finite lifespan. Hi8 and MiniDV tapes from the 90s are entering their third decade of existence—well beyond their intended "shelf life" of 10-15 years under ideal conditions. And let's be honest: your storage conditions probably aren't ideal.
Tapes stored in attics suffer temperature extremes. Basements introduce humidity and potential flooding. Garages expose them to dust, mold, and dramatic seasonal changes. Every year, the magnetic oxide coating weakens. The binder that holds the coating to the plastic base deteriorates. Colors fade. Audio develops warble. Eventually, the tape becomes unplayable—not because of physical damage, but because the magnetic data itself has degraded beyond recovery.
Professional tape restoration services exist, but they're expensive ($100-$500 per tape) and can't always succeed. Prevention is infinitely cheaper and more effective than restoration. If you can still see recognizable images when you play your tapes, convert them now. Next year, that option may no longer exist.
The Bottom Line: Your Memories Deserve Better Than "Someday"
You've been meaning to do this for years. The tapes sit there, silently decomposing, while you tell yourself you'll get to it eventually. But "eventually" has a nasty habit of becoming "never," and once those tapes are gone, they're gone forever. No second chances. No do-overs.
The RVT Digitizer 3.0 is your permission slip to finally preserve what matters most. It's the best camcorder to digital converter not because it has the most features, but because it removes every excuse. No technical knowledge required. No expensive professional services. No computer hassles. No waiting. Just plug in, press record, and watch three decades of analog memories transform into digital files that will outlive us all.
Your kids' first words. Your parents' wedding. That family reunion before everyone scattered. The vacation that changed everything. These moments exist only on fragile magnetic tape that won't last another decade. But with the right converter, they can live forever—shared, cherished, and passed down to generations who'll never know the magic of rewinding tapes or the frustration of tracking issues.
Stop waiting for the perfect time. This is the perfect time. Your memories are calling.
Related Resources:
Explore More Ways to Preserve Your Analog Legacy:
- The Hidden Risks of Shipping Your VHS Tapes – And Why RVT Is the Smarter Choice
- Unlock Your Analog Archive: The RVT Digitizer's Guide to Preserving VHS Tapes & More
- RetroVision Technology Launches RVT Digitizer 3.0: A Smarter, Reliable Solution to VHS to Digital Conversion
- Best VHS to Digital Converter Collection
FAQS
Q: What camcorder formats does the RVT Digitizer 3.0 support?
A: The RVT Digitizer 3.0 works with virtually all analog camcorder formats from the 1980s-2000s, including VHS-C, Hi8, Digital8, Video8, MiniDV, and standard VHS. If your camcorder has RCA (red/white/yellow) or S-Video outputs, it's compatible. Note: You need a working camcorder or playback device—the digitizer doesn't play tapes by itself.
Q: Do I need a computer to convert my camcorder tapes?
A: No. The RVT Digitizer 3.0 is a standalone device that requires zero computer interaction. It records directly to a USB drive or SD card. You only need a computer afterward if you want to edit, backup, or upload your converted files—but viewing, sharing, and storing them works perfectly fine without one.
Q: How long does it take to convert a camcorder tape to digital?
A: Conversion happens in real-time, meaning a 60-minute tape takes 60 minutes to convert, a 90-minute tape takes 90 minutes, etc. The RVT Digitizer 3.0 includes an Auto Stop feature that automatically ends recording after preset durations (60/90/120/150 minutes), so you can start the conversion and walk away.
Q: Will the RVT Digitizer 3.0 improve the quality of my old camcorder footage?
A: The digitizer captures your tapes exactly as they currently exist—it doesn't degrade quality, but it also can't restore footage that's already deteriorated. What it does do is prevent further degradation by creating a stable digital copy that won't degrade over time. If your tapes currently look good, the converted files will preserve that quality. If your tapes show age (faded colors, tracking issues), the digital copy will reflect that too.
Q: Can I connect the converted files directly to my iPhone or Android phone?
A: Yes! The RVT Digitizer 3.0 includes a USB-C adapter specifically for this purpose. After converting your tape to a USB drive, connect the drive to your iPhone 15+ or any USB-C Android device using the included adapter. Your converted MP4 videos are instantly accessible and can be transferred to your phone's camera roll, uploaded to iCloud/Google Photos, or shared via text and social media.
Q: What's the difference between the RVT Digitizer 3.0 and cheaper USB converters?
A: Three major differences: power delivery, build quality, and reliability. Cheap USB converters are USB-powered, which causes voltage fluctuations and mid-recording dropouts. The RVT Digitizer 3.0 uses dedicated wall power for rock-solid stability. It also includes a built-in preview screen (most USB converters don't), premium cables (not flimsy knockoffs), and U.S.-based customer support with a 2-year warranty. You get what you pay for—and with irreplaceable memories, cutting corners isn't worth the risk.
People Also Ask
How do I convert old camcorder tapes to digital?
Connect your camcorder to a video capture device like the RVT Digitizer 3.0 using RCA or S-Video cables. Insert a USB drive into the digitizer, press record, and let the tape play through. The device converts the analog signal to an MP4 file saved directly to your USB drive—no computer or software required.
What is the best device to convert camcorder tapes to digital?
The RVT Digitizer 3.0 is widely regarded as the best camcorder to digital converter for home users because it requires no computer, includes wall-powered reliability, features a built-in preview screen, and outputs universal MP4 files compatible with all modern devices. Professional services cost more but may better handle severely damaged tapes.
Can I convert MiniDV tapes without a MiniDV camcorder?
You need a working MiniDV camcorder or deck to play the tape—the RVT Digitizer 3.0 captures the video signal from your camcorder but cannot play tapes by itself. If your MiniDV camcorder is broken, finding a working unit on eBay or borrowing one from a friend is your best option before the tapes degrade further.
How much does it cost to convert camcorder tapes to digital?
DIY conversion with the RVT Digitizer 3.0 costs $220 upfront and handles unlimited tapes afterward. Professional services charge $15-$40 per tape with 2-8 week turnaround times. For collections of 10+ tapes, DIY conversion is significantly more cost-effective and provides immediate results.
Why are my camcorder tapes degrading?
Magnetic tape degrades naturally over time as the oxide coating breaks down, the binder deteriorates, and environmental factors (heat, humidity, light exposure) accelerate deterioration. Most consumer camcorder tapes were designed for 10-15 years of storage under ideal conditions—tapes from the 1990s are now well past their expected lifespan and must be converted before permanent data loss occurs.
Do camcorder tapes work after 20 years?
Many do, but playback quality diminishes with age. Colors fade, audio develops noise, and sticky shed syndrome can cause playback failures. Tapes stored in climate-controlled environments fare better than those in attics or basements. If your tapes still play, convert them immediately—every playback risks further damage, and next year they may not work at all.
Collection: Best Camcorder to Digital Converter
Best Camcorder to Digital Converter: Rescue Your Memories
Preserve your old memories with ease using the best Camcorder to Digital Converter on the market. If you have boxes of 8mm, Hi8, and MiniDV tapes, this solution is for you. These tapes hold priceless family moments, but they are at risk of fading forever. Delaying conversion means risking the loss of videos that can never be replaced.
Why Choose the RVT Digitizer 3.0?
The RVT Digitizer 3.0 is a simple, reliable Camcorder to Digital Converter. It is compatible with many analog formats, including 8mm, Hi8, and MiniDV. It is designed for easy, plug-and-play setup, so you do not need technical knowledge. The device requires no driver installation, making it accessible for everyone.
To use it, connect your camcorder’s AV output to the converter. You can use RCA or S-Video cables, which are included. The RVT Digitizer 3.0 also comes with a USB-C adapter, making it suitable for both Mac and PC users.
How to Use a Camcorder as a Playback Device
You do not need special equipment to play back your tapes. Most 8mm, Hi8, and MiniDV camcorders work with the RVT Digitizer 3.0. Simply connect your old camcorder’s AV output to the converter’s input.
Always ensure your camcorder is functioning well before conversion. Test your tapes by playing them briefly to confirm smooth playback. This helps prevent interruptions during the transfer process.
Connections and Compatibility
For best results, use quality RCA or S-Video cables when connecting your camcorder to the converter. The RVT Digitizer 3.0 supports both connections for maximum flexibility. You might need a USB-C adapter, especially if using Apple Silicon Macs.
No driver installation is necessary. You can record videos directly to a USB drive in MP4 format. This format is compatible with Windows, macOS, and all modern devices.
Understanding Video Quality Differences
Not all converters are created equal. The quality of your converted video depends on the converter’s signal processing and compression methods. Some budget models may introduce quality loss or audio sync issues.
RVT Digitizer 3.0 captures video in full digital quality. It maintains the original sync between audio and video, providing excellent preservation of your memories.
Standalone vs. Computer-Based Converters
Standalone Camcorder to Digital Converter devices simplify the conversion process. The RVT Digitizer 3.0 requires no computer or complicated setup steps. Just plug in, press record, and let the device do the work.
Computer-based converters offer more customization. However, they often require specific drivers, advanced software, and technical skills. For most users, standalone units are faster, more reliable, and far easier to operate.
DIY Versus Professional Conversion Services
A DIY Camcorder to Digital Converter gives you control over your precious tapes. This allows you to preserve videos at home without sending them away. Devices like the RVT Digitizer 3.0 are user-friendly and require no advanced setup.
If you have damaged or moldy tapes, professional conversion services might be needed. These companies have specialized equipment for challenging situations.
Best Format for Converted Videos
Saving your converted camcorder videos in the MP4 format is recommended. MP4 provides a balance of high quality, small file size, and universal compatibility. The RVT Digitizer 3.0 saves your footage directly in MP4, eliminating the need for further conversion.
This format is easily playable on Mac, PC, and most modern digital devices. It also makes sharing with family or archiving your footage much simpler.
Preserving and Cleaning Old Camcorder Tapes
Before transferring your videos, always inspect your tapes. Clean the exterior gently with a dry cloth, and never use liquids. Do not attempt to play tapes with visible mold or sticky reels.
Severely damaged tapes should be treated by a restoration professional for best results. This protects both your memories and playback equipment.
Choosing the Right Camcorder to Digital Converter
Devices that deliver preservation-quality output are vital for your memories. Choose a converter that does not compromise on compression or signal integrity. The RVT Digitizer 3.0 captures high-quality, synced audio and video for faithful digital copies.
For Apple Silicon users, the RVT Digitizer 3.0 ensures full compatibility without any special drivers. Its USB-C functionality works perfectly with modern Macs.
-
 Sale
SaleRVT Digitizer 3.0
Regular price $279.00Regular priceUnit price / per$369.00Sale price $279.00Sale
