

Don’t let your precious VHS memories fade away—2025 is the perfect year to bring them back to life in digital clarity. As tapes degrade and VCRs vanish, the time to turn vhs into digital file is now if you want to preserve your family’s most treasured moments.
This guide gives you a step-by-step, expert-backed roadmap for success. We’ll cover the best methods, hardware, and software, plus troubleshooting and pro tips to help you achieve professional results. Ready to protect your memories for generations? Let’s get started.
Why Digitize Your VHS Tapes in 2025?
Remember the excitement of popping a VHS tape into the VCR and reliving family memories? Those tapes are quietly aging, and 2025 might be your last true window to save them. If you want to turn vhs into digital file, now is the time to act before years of birthday parties, weddings, or childhood milestones are lost for good.
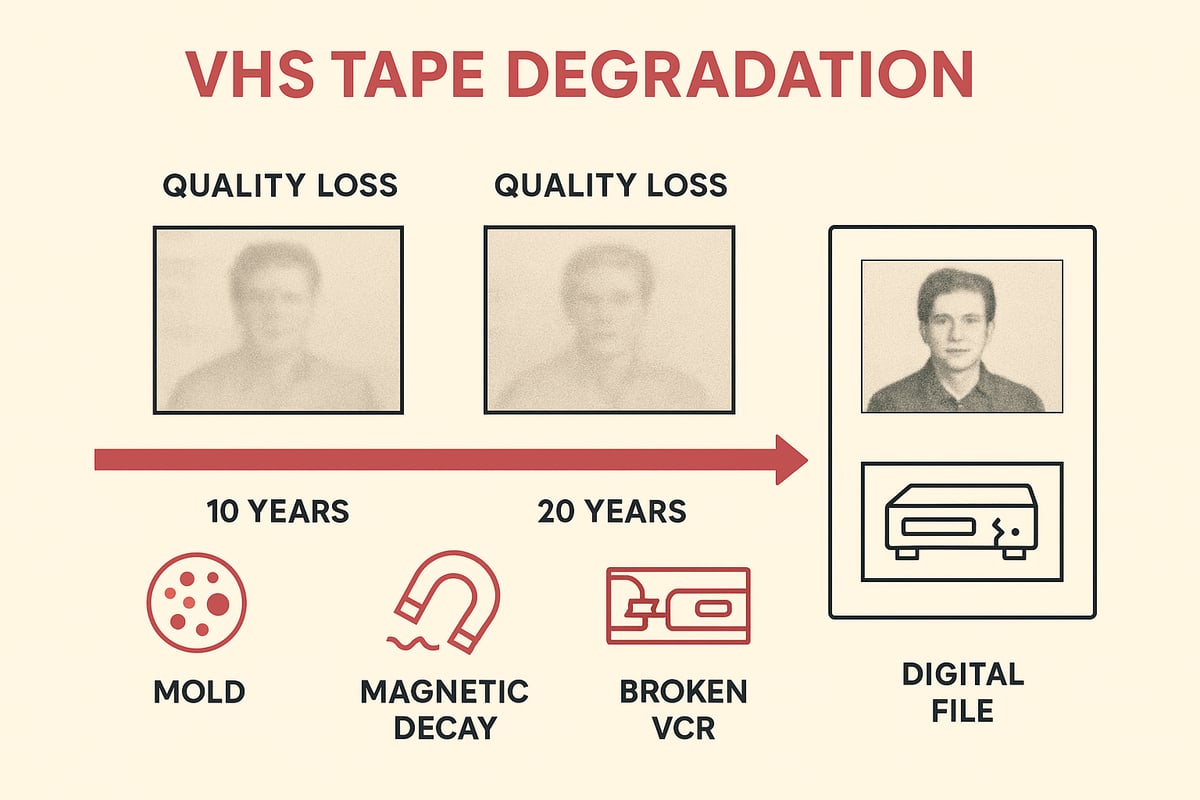
VHS tapes were never meant to last forever. In fact, magnetic tape can lose up to 20% of its quality every decade or two. Environmental factors like humidity, heat, and dust only speed up the process. According to VHS tape degradation over time, mold and magnetic decay can creep in, causing permanent loss of picture and sound. Even the best-stored tapes are subject to this slow fade, making it critical to turn vhs into digital file before the damage is done.
Finding a working VCR in 2025 is also becoming a real challenge. Manufacturers stopped producing them years ago, and functioning units are disappearing from shelves and online shops. As VCRs vanish, your ability to turn vhs into digital file becomes more limited. Without the right hardware, those memories risk being trapped forever.
Digital files bring a world of convenience. Once you turn vhs into digital file, sharing a childhood recital or editing a highlight reel for a family reunion is just a few clicks away. Digital formats are easy to back up, organize, and future-proof, so you never have to worry about tapes breaking or being lost in a move.
The numbers are staggering. Over 10 billion VHS tapes are estimated to exist worldwide, yet less than 10% have been digitized. Families have already lost precious footage due to tape deterioration, and some never even realize the damage until it is too late. Imagine discovering that your only copy of a wedding or graduation is now unplayable.
Waiting longer comes with real risks. Tapes can develop mold, suffer from magnetic decay, or even experience mechanical failure inside aging VCRs. Every year, more tapes become unsalvageable. Taking action to turn vhs into digital file protects your memories from these threats.
Digitizing at home also gives you complete control and privacy. Unlike sending tapes to a third party, you avoid the risk of shipping damage or lost packages. You can ensure your family’s moments stay secure and never leave your possession.
Finally, the appetite for retro content is booming. Collectors, creators, and historians are all searching for rare footage and unique moments from the VHS era. Preserving your collection by choosing to turn vhs into digital file not only safeguards your memories but also contributes to the growing digital archive of history.
So, are you ready to keep your memories safe for decades to come? The best time to start is now.
Choosing the Right Equipment for Conversion
Preserving memories starts with the right tools. If you want to turn vhs into digital file with clarity and confidence, your equipment choices matter. A reliable setup ensures that your family videos, creative projects, or rare finds look and sound their best—today and for years to come.
Understanding VHS Players and Their Role
The first step to turn vhs into digital file is a functioning VCR. Not all VCRs are created equal. A clean, well-maintained VCR plays tapes smoothly and preserves detail, while a worn unit can introduce static, color issues, or even damage tapes.
Finding a trustworthy VCR in 2025 means checking online marketplaces, specialty retro shops, or local estate sales. Inspect for clean heads and smooth tape loading. A high-quality VCR can mean the difference between a sharp, vibrant digital file and a dull, distorted copy.
Consider this: A family recently tried to convert childhood tapes using an old, dusty VCR. The result was muffled sound and rolling lines. With a cleaned, serviced unit, playback was crisp and true to the original.
Analog-to-Digital Converters: What Matters Most
Once your VCR is ready, the next step to turn vhs into digital file is choosing an analog-to-digital converter. There are several types: USB capture cards, standalone digitizers, and premium capture devices. Key features include signal stability, high resolution, and broad compatibility with your computer.
Low-quality converters may drop frames, lose color, or cause audio to go out of sync. Professional-grade models use advanced chips to keep every frame and sound in place. For a side-by-side comparison of top-rated options, visit Choosing the best VHS converter.
When you invest in a quality converter, you protect your memories from digital glitches. Why risk losing a precious moment to a cheap device?
RVT Digitizer: The Industry Benchmark
When you want to turn vhs into digital file with unmatched results, the RVT Digitizer stands above the rest. It uses an advanced encoding chip to capture every detail, preserving color accuracy and sound fidelity that generic converters simply cannot match.
Families and professionals love the RVT Digitizer for its fast transfer speeds and intuitive plug-and-play setup. There is no complex installation—just connect and start digitizing. One family reported digitizing decades of home movies and noticing dramatic improvements in clarity and stability compared to budget options.
The RVT Digitizer supports VHS, Hi8, MiniDV, and camcorder tapes, making it versatile for any collection. Built with professional-grade construction and supported by a U.S.-based team, it offers lifetime reliability and peace of mind. When you want to preserve memories, simplify the process, and ensure digital stability, RVT Digitizer is the clear choice.
Essential Accessories and Cables
To turn vhs into digital file with the best results, use high-quality cables and the right accessories. Choose between RCA, S-Video, or SCART cables. S-Video often delivers sharper images than basic composite (RCA), especially for color-rich footage.
Look for cables with solid shielding to prevent interference. Keep a cleaning tape and head cleaner handy to maintain your VCR’s performance. Do not forget a reliable power adapter and surge protector for safety.
Mini story: Switching from a cheap composite cable to a quality S-Video cable boosted image clarity and color depth for a collector’s rare concert footage. The right cable can make your memories shine.
| Cable Type | Video Quality | Best Use Case |
|---|---|---|
| RCA | Good | Most standard VHS playback |
| S-Video | Excellent | Higher color/detail, Hi8 |
| SCART | Very Good | European VCRs, retro setups |
Recommended Software for Capturing and Editing
No matter how you turn vhs into digital file, the right software makes capturing and editing simple. Top choices for Windows include OBS Studio and VirtualDub. Mac users often prefer iMovie or QuickTime, while Linux fans can try Kdenlive or OBS.
Look for programs that support multiple formats, easy trimming, and batch processing. Free software offers flexibility but may lack advanced editing tools. Paid options often include noise reduction, color correction, and streamlined exports.
User ratings in 2025 show that OBS Studio and iMovie remain favorites for reliability and performance. Choose software that fits your workflow and comfort level, and always test with a short clip before committing to a full tape.
Step-by-Step: How to Turn VHS Into Digital File
Ready to safeguard your home movies for decades to come? The process to turn vhs into digital file is more straightforward than you might think, especially with the right tools and a clear plan. Whether you want to relive childhood birthdays or preserve rare footage, follow these steps for professional, lasting results.
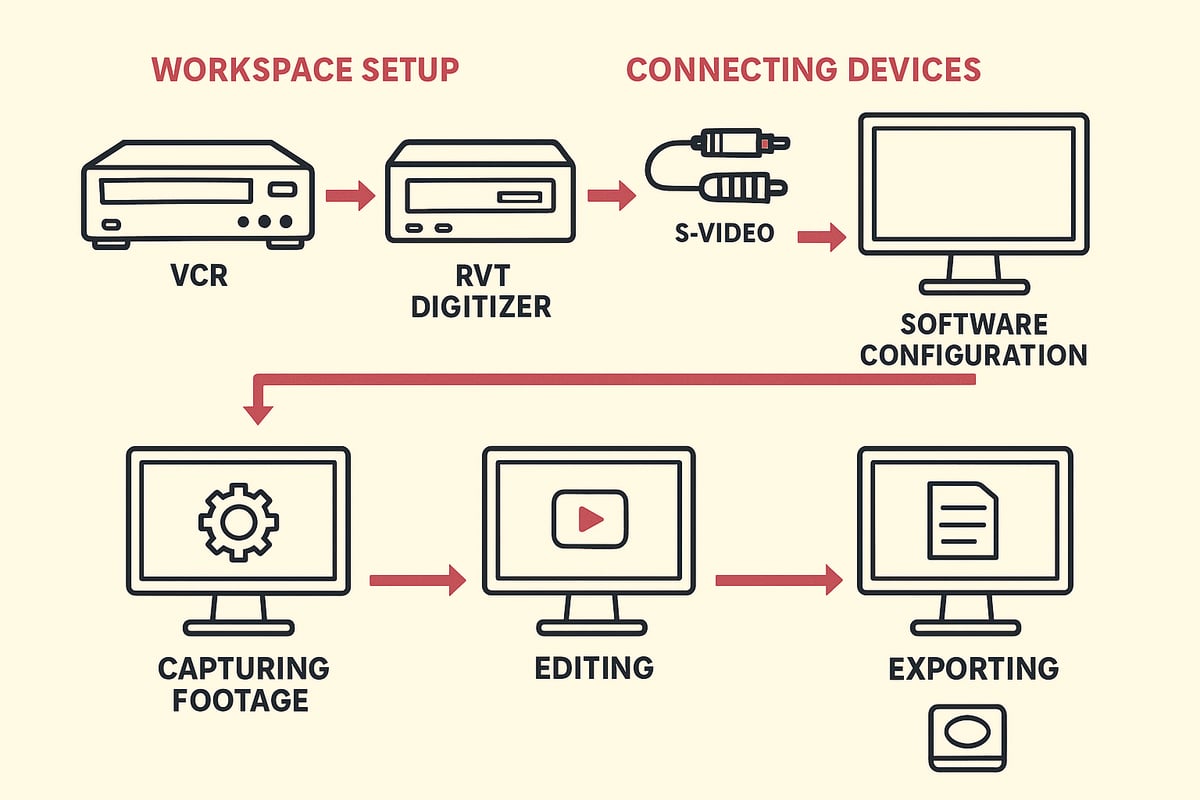
Preparing Your Workspace and Equipment
Begin by choosing a clean, clutter-free area for your conversion setup. Dust and static can impact both your tapes and electronics, so wipe down surfaces and keep liquids away.
Gather everything you need before you start:
- A well-maintained VCR (clean heads, stable playback)
- Your RVT Digitizer or another high-quality converter
- All required cables (RCA, S-Video, power adapters)
- A computer with enough storage
Label your VHS tapes for easy tracking. Arrange them by date or event so you can quickly find what you need. Use a surge protector to keep your equipment safe from power spikes. This small step can prevent disaster and ensure your project runs smoothly.
With your workspace set, you’re ready to turn vhs into digital file with confidence.
Connecting Devices: VCR to Converter to Computer
Connect your VCR’s output ports to your converter’s input. RCA cables are standard, but if your VCR and converter support S-Video, use it for sharper picture quality. Double-check cable connections for a secure fit.
Next, plug your RVT Digitizer into your computer using USB. The RVT Digitizer stands out for its plug-and-play simplicity, making setup hassle-free for all users. If you run into issues, check that all devices are powered on and cables are fully inserted.
A quick tip: Use high-quality, shielded cables to minimize signal loss. This attention to detail can make a noticeable difference when you turn vhs into digital file, especially for precious family footage.
Installing and Configuring Capture Software
Download and install your chosen capture software. Many prefer programs like OBS Studio (free), Adobe Premiere Elements, or the software included with the RVT Digitizer.
Launch the software and select your converter as the input source. Choose your preferred output format, such as MP4 for broad compatibility. Adjust settings for resolution (480p or higher recommended for VHS), frame rate (usually 29.97 fps), and stereo audio.
Run a short test capture to confirm everything is working. If you’re looking for extra guidance, this Step-by-step VHS to digital guide walks through the process in more depth. Getting this right is essential to turn vhs into digital file with crisp, clear results.
Capturing the VHS Footage
Insert your chosen VHS tape and rewind or fast-forward to your desired starting point. Press play on the VCR, then hit “record” in your capture software.
Monitor the process. Watch for:
- Dropped frames (choppy video)
- Audio sync issues
- Visual artifacts or static
For long tapes, consider capturing in segments to keep files manageable. A two-hour tape may create a 4-8 GB file, depending on your settings. If you notice problems, stop and adjust settings or try a different cable.
Families often find comfort knowing their memories are being preserved in real time. When you turn vhs into digital file using the RVT Digitizer, you benefit from advanced encoding that keeps every detail intact.
Editing and Enhancing Digital Files
Once you have your raw digital video, it’s time to polish it. Use editing software to trim unwanted sections, split long recordings, or combine separate clips.
Enhance quality with built-in tools:
- Color correction to restore faded scenes
- Noise reduction for clearer images
- Audio cleanup to remove hiss or hum
You can also add titles, chapters, or watermarks for easy navigation. For example, restoring vibrant colors to a 1990s wedding video brings those memories back to life. Batch processing tools speed up editing if you have many tapes to turn vhs into digital file for your archive.
Saving and Exporting in the Best Formats
After editing, save your video in a format that balances quality and file size. MP4 (H.264 codec) is the most popular choice for home archiving and sharing in 2025. Other options include AVI, MOV, and MKV.
Consider your needs:
- MP4 for universal compatibility
- MKV for high-quality archival
- MOV for Apple devices
Refer to software presets for best results. Consistency is key when you turn vhs into digital file, making future playback and sharing easy for everyone in your family.
Backing Up and Storing Your Digital Files
Don’t let all your hard work go to waste. Create multiple backups as soon as you finish converting. Store copies on your computer, an external hard drive, and a reliable cloud service.
Organize files with clear names, dates, and metadata. This makes retrieval simple years down the line. Some families use Network Attached Storage (NAS) for added security and easy access.
Long-term preservation is the ultimate goal when you turn vhs into digital file. With thoughtful backup and organization, your memories will be safe and accessible for generations.
Common Challenges and How to Overcome Them
Preserving memories as you turn vhs into digital file can bring unexpected hurdles. Tapes age, equipment fails, and software sometimes refuses to cooperate. Let’s explore the most common challenges and how you can overcome them—so your conversion is smooth and your memories stay safe.
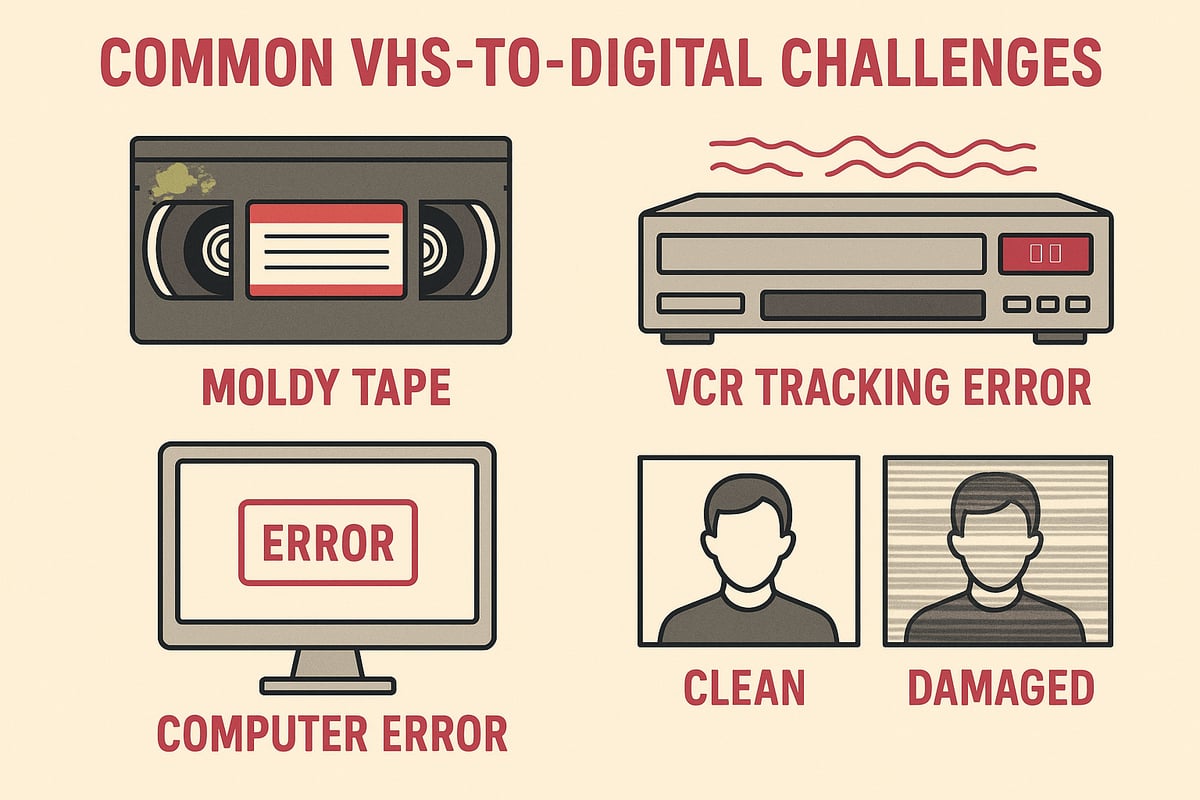
Tape Damage, Mold, and Decay
Old tapes are fragile. Over time, magnetic layers break down, causing static, dropouts, or total loss. Mold is especially common if tapes were stored in damp places. Before you turn vhs into digital file, inspect tapes for visible white mold or sticky residue.
If you spot problems, gently clean cassettes with isopropyl alcohol and a soft cloth. For severe cases, consult guides like the National Film Preservation Board study on videotape deterioration for expert cleaning methods. Never play a moldy tape in a clean VCR—it can spread contamination. Sometimes, a professional restoration service is the only safe bet.
Playback Errors: Tracking, Color, and Static
VCRs show their age, too. Tracking errors cause wavy lines or image jumps. If you see color smears, static, or rolling screens, try adjusting the VCR’s tracking dial. Clean the VCR heads with a dedicated cleaning tape.
Using a high-quality converter matters. RVT Digitizer’s advanced encoding chip helps stabilize video and maintain color accuracy, even from tapes with minor issues. Its professional-grade build ensures better results than generic converters, especially with tricky tapes.
Converter and Software Troubles
Not all converters handle old tapes well. Budget models drop frames or lose sync, leaving audio and video out of step. If your software crashes or freezes, check for driver updates or try a different program. The RVT Digitizer’s plug-and-play reliability and U.S.-based support make troubleshooting easier, saving you hours of frustration.
For best results, always use shielded cables and avoid USB hubs. Test your setup with a short capture before tackling a full tape. If you notice persistent issues, upgrading to a professional-grade converter like RVT Digitizer often resolves them.
When to DIY and When to Call a Pro
Sometimes, tapes are too far gone for home fixes. Severe mold, snapped film, or deep mechanical faults require specialized equipment. If a tape contains irreplaceable moments—like your only copy of a family wedding—consider professional help.
For most projects, though, families and creators find that the right tools, like the RVT Digitizer, make it easy to turn vhs into digital file at home. You get privacy, control, and the satisfaction of doing it yourself.
Quick Troubleshooting Table
| Problem | Solution |
|---|---|
| Moldy tape | Clean gently, consult experts if severe |
| Tracking errors | Adjust tracking, clean VCR heads |
| Dropped frames/sync | Upgrade converter, check cables |
| Static/color distortion | Use S-Video cables, try another VCR |
| Software crashes | Update drivers, try RVT Digitizer’s support |
Facing issues as you turn vhs into digital file is normal, but most problems have clear solutions. With patience, the right gear, and a little troubleshooting, you’ll preserve your memories for years to come. Ready to rescue your tapes?
Advanced Tips for Professional-Quality Results
Preserving your family’s memories or priceless footage means aiming for more than just a basic transfer. If you want to turn vhs into digital file with professional results, you need the right equipment and a few advanced techniques. The RVT Digitizer is trusted by creators and families who want vivid color, crisp sound, and files that last for generations. Its advanced encoding chip, fast transfer speeds, and plug-and-play setup set it apart from generic converters.
Achieve Flawless Playback with Time-Base Correctors
VHS tapes often suffer from jittery images or frame drops, especially as they age. A time-base corrector (TBC) stabilizes the video signal, ensuring smooth playback and precise frame capture. When you turn vhs into digital file, using a TBC can mean the difference between a wobbly, distorted copy and a crystal-clear transfer.
Pairing a TBC with the RVT Digitizer maximizes detail retention. The result: stable, professional-grade digital files ready for editing or archiving.
Restore Color and Detail with Advanced Editing
Old tapes are prone to color fade, noise, and washed-out images. Use video editing software to adjust color balance, reduce noise, and recover lost vibrancy. The RVT Digitizer’s encoding preserves subtle color nuances, making restoration easier and more effective.
If you’re curious why older copies look worse over time, learn about generation loss in analog media. Every analog copy loses quality, but digital files captured with a premium digitizer lock in the original detail.
Pro tip: Batch process similar tapes to apply consistent corrections, saving time and ensuring uniform quality.
Batch Processing and Creative Integration
When you turn vhs into digital file for a large collection, batch processing tools are essential. Many video editing suites offer automation, letting you convert, trim, and export multiple files with minimal effort. This workflow is a game changer for families archiving decades of footage or filmmakers digitizing rare content.
Consider this example: A documentary creator uses the RVT Digitizer to convert dozens of archival tapes. By integrating batch processing, they save hours and maintain consistent quality across every file.
Enhance Audio and Add Metadata for Archival Value
Audio often gets overlooked, but clean sound is just as important as clear video. For the best results, use external audio capture devices or software tools to remove hiss and balance levels. The RVT Digitizer’s sound fidelity ensures your digital files preserve every spoken word and musical note.
Once you turn vhs into digital file, add metadata—like dates, names, and descriptions—using your editing software. Metadata makes it easy to organize, search, and share your digital library. For large archives, consider tagging and cataloging files for future generations.
Remember, always check copyright rules before sharing digitized content online. Protect your family’s privacy and respect creative rights.
By following these advanced tips, you ensure your memories look and sound their best. Are you ready to preserve your legacy with the RVT Digitizer and transform your VHS collection into digital treasures?
The Future of VHS to Digital: Trends and Innovations
Curious about what comes next after you turn vhs into digital file? The landscape of VHS preservation is changing fast, with new technology making it easier and more rewarding to save your memories for future generations.
AI now plays a key role in restoring and enhancing old footage. Tools powered by deep learning can upscale faded tapes, reduce noise, and even repair damaged frames. Imagine watching a grainy home video from 1989 in crisp, vibrant detail. This is not science fiction—it's happening today.
The demand for retro content is surging. Streaming platforms and social media have sparked a wave of nostalgia, with families and creators eager to share old footage in new ways. Rare broadcasts, home movies, and forgotten events are resurfacing, often with better quality than ever before.
All-in-one devices are making it simpler for anyone to turn vhs into digital file at home. Leading the pack, the RVT Digitizer offers unmatched picture clarity, fast transfers, and a plug-and-play setup that works for beginners and pros alike. Unlike generic converters, its advanced chip preserves color, sound, and stability, ensuring your memories last.
Cloud-based conversion services are on the rise, letting you store and access your videos anywhere. However, many still prefer the privacy and control of home digitization, especially after learning about the VHS tape lifespan and preservation risks and the importance of acting before tapes degrade further.
Community projects are also gaining momentum. Collectors and historians are collaborating to preserve rare footage using modern tools, including AI that can reconstruct lost pieces from damaged tapes. One example is a group restoring lost 1980s TV broadcasts, bringing history back to life for new audiences.
Looking ahead to 2030, experts predict the market for tools to turn vhs into digital file will keep growing. Expect smarter, faster, and even more user-friendly devices. Here's a quick look at what's coming:
| Trend | Impact by 2030 |
|---|---|
| AI Restoration | Near-original video quality |
| Streaming Integration | Direct upload to platforms |
| Smart Cataloging | Automated tagging and search |
| Durable Storage | 100+ year digital lifespans |
Choosing the RVT Digitizer means you are ready for these trends and more. Its professional-grade design, U.S.-based support, and proven results make it the trusted choice for families, creators, and collectors who care about quality and longevity.
You’ve seen how quickly VHS tapes can fade—memories lost to time, formats forgotten, moments erased. But you don’t have to let that happen. Whether you’re saving your family’s first steps, a wedding, or rare gaming footage, turning VHS into a digital file is simpler and safer than ever in 2025. With the right tools, you can preserve every laugh and milestone in crystal clarity for generations. Ready to see your old tapes come alive again? What’s one memory you’d love to relive? Let’s make it last—Digitize my tapes today.


