
Time is running out for family memories and classic moments trapped on old VCR tapes. As 2026 approaches, the decline of VCR players and tape quality puts precious footage at risk of disappearing forever.
If you want to preserve, share, and enjoy these irreplaceable videos, now is the time to convert vcr video to digital. This guide will walk you through every step, compare the best solutions, and help you avoid common mistakes.
Ready to save your memories? Discover the risks, the right equipment, expert tips, and the safest ways to transfer your tapes for generations to come.
Why Convert VCR Videos to Digital in 2026?
As 2026 approaches, the need to convert vcr video to digital has never been more urgent. Old tapes hold moments that can never be recreated. Each year, fewer VCRs survive, and tapes slip further into decay. What is truly at risk if you wait?

The State of VCR Technology and Tape Degradation
VCRs are vanishing fast. By 2026, finding a working player or genuine parts is a real challenge. Magnetic tapes, once the standard for home movies, break down with age. Color fades, sound warps, and static creeps in. According to archival studies, by 2026 over 60 percent of home-recorded VHS tapes show moderate to severe degradation, as detailed in VHS tape degradation statistics.
Many families discover precious footage ruined: a child’s first steps, a grandparent’s laughter, or a wedding dance lost forever. Trying to convert vcr video to digital is the only way to safeguard these memories before they vanish.
Benefits of Digital Conversion
When you convert vcr video to digital, your memories leap into the future. Digital files play on smartphones, tablets, and smart TVs, making it easy to relive and share special moments with anyone, anywhere.
| Analog Tape | Digital File |
|---|---|
| Fades over time | Lasts with backups |
| Needs rare hardware | Plays on any device |
| Hard to share | Easy to send & edit |
Digital conversion also preserves history—family stories, vintage gameplay, and school projects can be enjoyed by new generations. Editing, cloud storage, and instant access become possible, all thanks to this simple step.
Risks of Waiting Too Long
Every year you delay to convert vcr video to digital, your tapes become more fragile. Tape decay speeds up as materials age. VCR hardware fails, and repair costs soar because parts are scarce. Professional transfer services raise prices as demand rises and supply drops.
Consider families who waited too long, only to find their child’s birthday tape unplayable or a wedding video lost to static. The cost of inaction is permanent loss. Why risk it when reliable solutions like the RVT Digitizer exist to preserve your memories with ease?
- Tape decay accelerates after 20+ years
- Hardware stops working unexpectedly
- Professional transfer costs keep rising
- Memories may become unrecoverable
Legal and Ethical Considerations
When you convert vcr video to digital, it is vital to respect copyright laws. Personal recordings are usually safe to digitize, but commercial tapes may have restrictions. Always check before sharing digitized content widely.
Privacy matters, too. If your tapes feature friends or family, get their consent before posting online. Protecting the rights and dignity of everyone in your videos is just as important as preserving the footage itself.
Environmental Impact
Digitizing tapes is not just about saving memories—it helps the planet, too. Old tapes and broken VCRs contain plastics and metals that should not end up in landfills.
After you convert vcr video to digital, recycle tapes and electronics at certified e-waste centers. Responsible disposal supports a cleaner environment and closes the loop on your preservation project.
Choosing the Right Equipment for VCR to Digital Conversion
Preserving your memories starts with the right tools. When you set out to convert vcr video to digital, the equipment you choose shapes the quality, speed, and ease of the entire process. Let’s break down what you really need for flawless results.
Essential Hardware Components
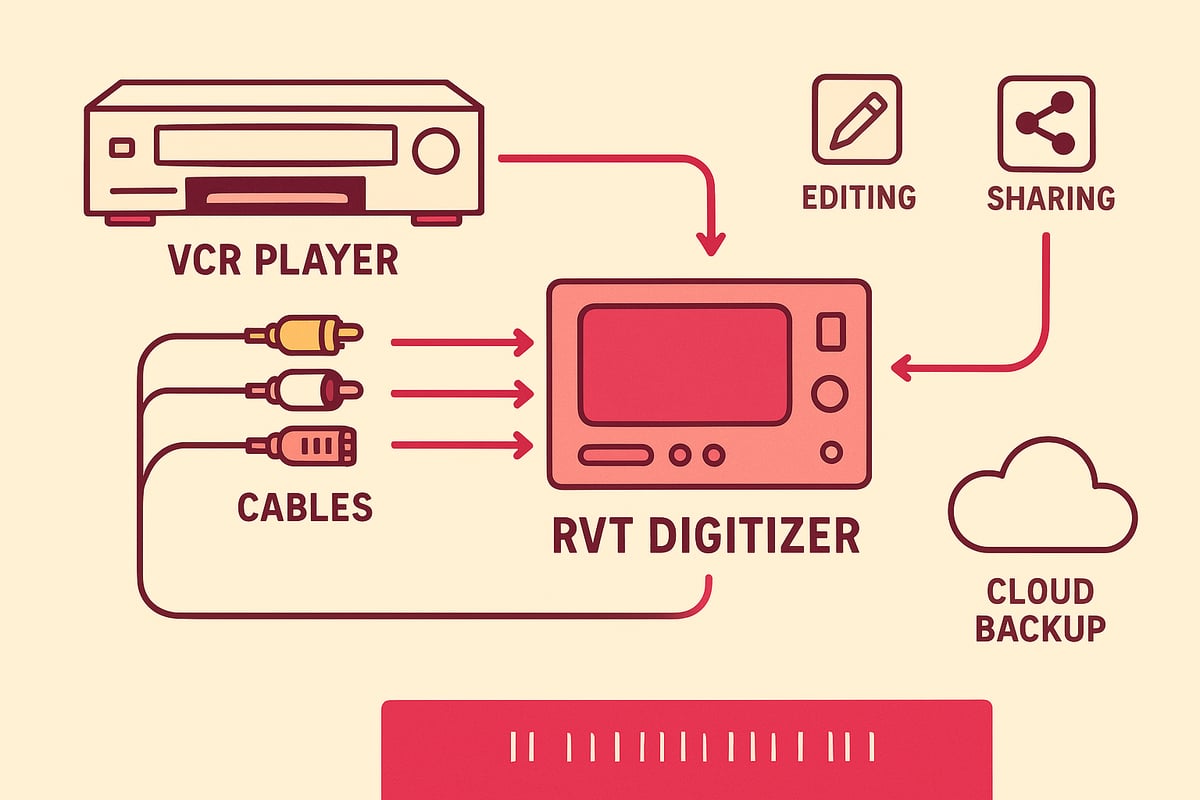
To convert vcr video to digital, you need three main components: a working VCR player, a video capture device, and a computer or storage device. The VCR reads your tapes, the capture device digitizes the signal, and your computer saves the files.
Original VCRs, if well-maintained, often provide the best playback, but refurbished units can be reliable when originals fail. Always test for clear picture and sound before starting.
Cables matter. Most setups use RCA (red, white, yellow), S-Video for sharper video, or SCART for European models. Double-check compatibility between your VCR and capture device. Clean cables prevent static and signal loss, so inspect them before each session.
A stable power supply and secure connections help avoid mid-transfer interruptions. For peace of mind, organize your workspace before you begin.
The RVT Digitizer: Industry Benchmark for 2026
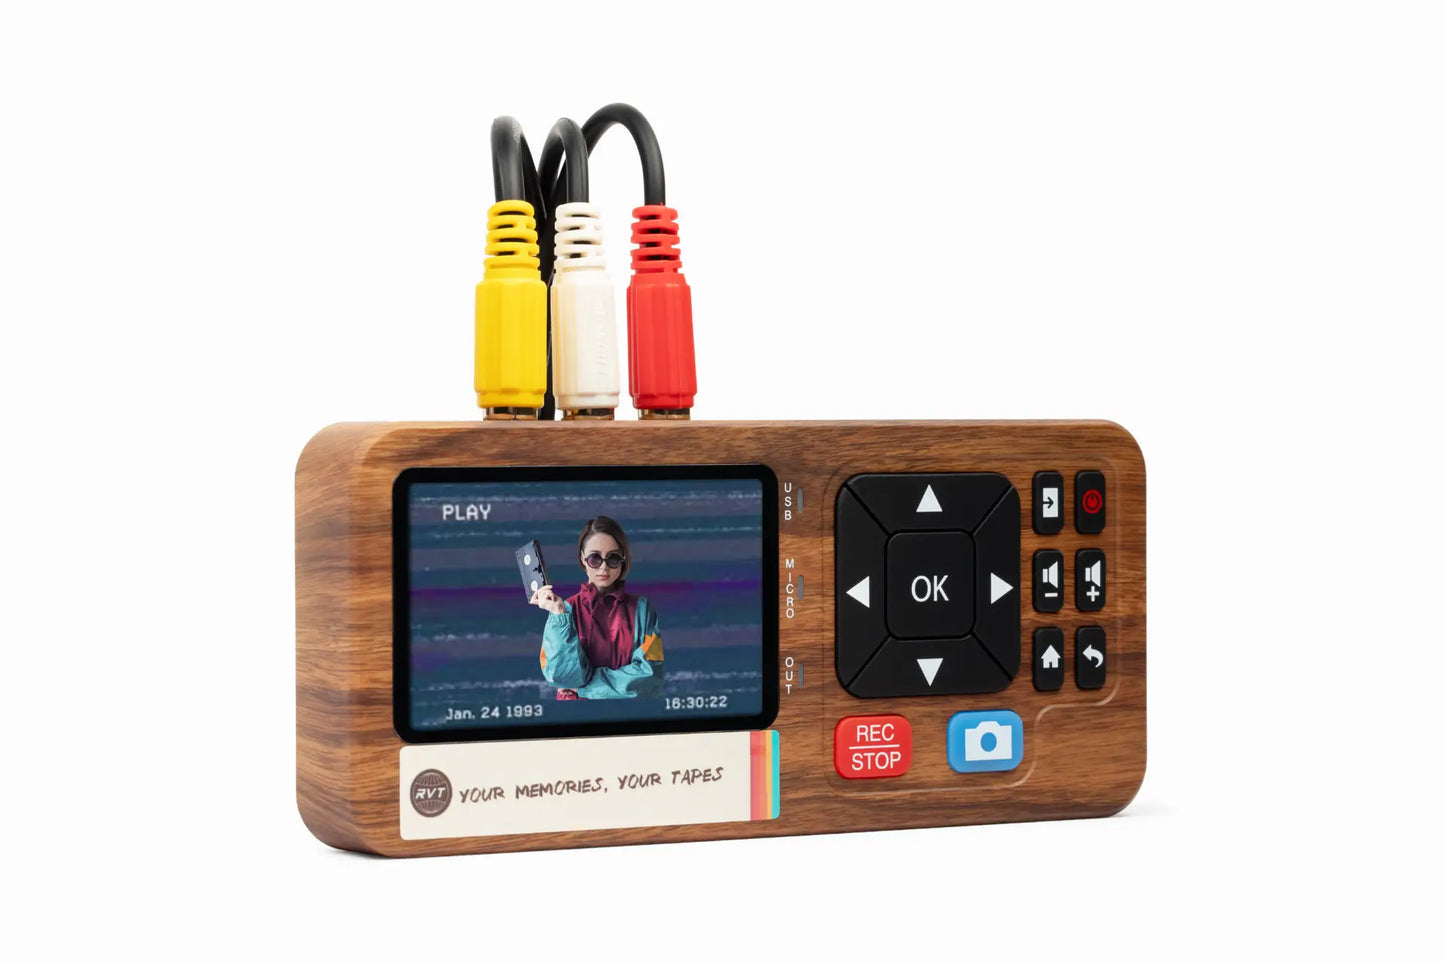
The RVT Digitizer stands as the gold standard for anyone aiming to convert vcr video to digital with true-to-original quality. Its advanced encoding chip delivers sharp picture clarity and vibrant, accurate colors. Unlike generic converters that can blur details or distort audio, the RVT Digitizer preserves every frame and note.
Plug-and-play design means no complicated setups—just connect and start. Fast transfer speed minimizes wait times, letting you archive entire tape collections efficiently. The professional-grade build ensures long-term reliability, even with frequent use.
Families and content creators love the peace of mind the RVT Digitizer brings. Parents digitize childhood moments with confidence. Collectors archive rare footage knowing color and sound will last for generations. U.S.-based support and a 2-year warranty back every unit, making it a trusted investment for your memories.
Retrovision Technologies Inc: The Trusted Choice for VHS to Digital
Retrovision Technologies’ RVT Digitizer 3.0 continues to set the benchmark for those who want to convert vcr video to digital without hassle. Its performance shines in real-world scenarios: preserving family reunions, archiving retro gameplay, and helping creators remix vintage footage.
The device’s robust engineering means it handles tape quirks with ease. Whether you’re digitizing a single wedding tape or an entire home movie library, the RVT Digitizer 3.0 adapts to your needs.
Flexible payment options and responsive customer support ensure a worry-free experience from start to finish. With Retrovision Technologies, you’re not just buying hardware, you’re gaining a partner in preservation. That’s why so many families and professionals trust their most precious memories to RVT.
Software Considerations
Choosing how to convert vcr video to digital also means thinking about software. Some capture devices require separate programs, like OBS Studio or VLC, to record and save videos. These offer editing options but can be tricky for beginners.
The RVT Digitizer stands out because it works without extra software. Plug it in, and your computer recognizes it instantly. This simplicity reduces the risk of errors and saves time, especially for large projects.
For those who want more control, third-party programs allow fine-tuning of resolution, aspect ratio, and audio levels. But for most families, the RVT’s plug-and-play approach covers all the essentials with minimal fuss.
Alternative Solutions
There are many ways to convert vcr video to digital, each with pros and cons. Professional transfer services offer convenience and expertise, but costs can add up, especially with large collections. DIY kits and low-cost converters are tempting, but often sacrifice video quality or reliability.
Let’s compare common options:
| Method | Quality | Ease | Cost | Best For |
|---|---|---|---|---|
| RVT Digitizer | Excellent | Easy | Moderate | Families, creators |
| Pro Transfer Service | High | Easiest | High | Time-poor, rare tapes |
| Generic Converter | Variable | Medium | Low | Occasional use |
| DIY Kit | Fair | Complex | Low | Tinkerers, tech-savvy |
Want a deeper dive? See this Comparing VHS Conversion Methods guide for more insights on choosing the right approach.
Whichever path you choose, prioritize quality and reliability. The right equipment means your digital files will be clear, stable, and ready to share for decades.
Step-by-Step Guide: How to Convert VCR Video to Digital in 2026
Preserving family memories means acting before time erases them. When you convert vcr video to digital, you give old tapes a new life, ready for future generations. This guide walks you through every step, from sorting tapes to sharing crisp digital files with your loved ones. Ready to start saving your most precious moments?
Step 1: Gather and Inspect Your Tapes and Equipment
Start by collecting every tape you want to save. Lay them out and check for visible damage, mold, or stuck reels. These issues can affect playback and the quality when you convert vcr video to digital.
Inspect your VCR player as well. Test it with a less important tape to ensure smooth playback, clear sound, and stable image. Clean the tape heads using a cleaning cassette or soft swab. This step prevents static and skips in your final digital files.
Check all cables and adapters. RCA, S-Video, and SCART cables should be free from frayed wires or loose connectors. The RVT Digitizer comes with professional-grade cables, making this step easy.
Want more details on prepping your tapes? Visit this Step-by-Step VHS to Digital tutorial for a deeper look at the process.
A little preparation protects your memories from the start.
Step 2: Set Up the Conversion Hardware
Connect your VCR to the RVT Digitizer using the appropriate cables. The RVT Digitizer supports RCA, S-Video, and SCART, so you can plug into nearly any VCR. This device stands out for its professional build, advanced encoding chip, and plug-and-play operation.
Attach the RVT Digitizer to your computer, tablet, or smartphone. Its USB interface works with both Windows and Mac, and some models even support mobile devices. Unlike generic converters, the RVT Digitizer maintains color accuracy and sound fidelity for every tape.
Make sure all connections are snug. Plug in power supplies where needed. If you are working with delicate tapes, consider using an external power conditioner or surge protector.
Families and creators praise the RVT Digitizer for its reliability. One user shared how it rescued a 1990s wedding video that had not played in years, capturing every detail in stunning clarity.
Step 3: Configure the Software or Capture Settings
Open your video capture software. With the RVT Digitizer, plug-and-play means most users do not need extra downloads. Your computer should automatically recognize the device. If you use third-party tools like OBS Studio or VLC, select the correct input source.
Set your video resolution and aspect ratio. For most home videos, 720x480 (SD) maintains authenticity, but you can upscale if desired. Adjust audio levels to avoid distortion or muffled sound.
The RVT Digitizer’s default settings are optimized for stable transfers. However, if you are digitizing rare footage, double-check frame rates and color settings before you begin to convert vcr video to digital.
If you are unsure about which settings to choose, start with the defaults. You can always edit and enhance files later. This approach keeps things simple and stress-free.
Step 4: Start the Transfer Process
With everything connected and configured, insert your first tape and rewind to the beginning. Press “play” on the VCR, then hit “record” in your capture software or on the RVT Digitizer interface. The conversion process has begun.
Monitor the transfer. Watch for video dropouts, audio sync issues, or sudden static. The RVT Digitizer’s advanced encoding chip helps minimize errors and preserves the original quality when you convert vcr video to digital.
For large collections, use external hard drives or cloud storage to save space. Pause the transfer if you notice glitches, and check your connections before restarting.
Quick tip: Keep a notepad handy to jot down any issues or memorable footage as you go. This makes editing and labeling easier later on.
Step 5: Edit and Save Digital Files
Once your tapes are digitized, it is time to refine them. Use basic editing tools to trim unwanted sections, enhance color, and correct audio. The RVT Digitizer’s files are compatible with popular programs like iMovie, Windows Video Editor, and DaVinci Resolve.
Save your digital files in formats like MP4 or MOV for easy playback on modern devices. Add descriptive file names and dates. For example, use “1993_BirthdayParty_June.mp4” instead of “Video1.mp4” to keep your archive organized.
Editing is your chance to highlight the best moments. Maybe you want to create a family highlight reel or share clips with relatives. When you convert vcr video to digital, you unlock endless creative possibilities.
Step 6: Backup and Share Your Digital Videos
Do not risk losing your new digital files. Store copies on at least two external drives and upload to a secure cloud service. Consider a dedicated home server for added peace of mind.
Sharing is easy. Send private links through cloud platforms or upload to family group chats. Smart TVs, tablets, and phones all play digital videos with a click. When you convert vcr video to digital, you make it simple for relatives near and far to enjoy treasured memories.
For best results, check your backups every few months. Redundancy ensures your memories survive accidental deletions or hardware failures.
Ask yourself: Who will be most excited to see these memories again? Start sharing today.
Troubleshooting Common Issues
Even the best plans can run into snags. If your video looks fuzzy or colors seem off, clean your VCR heads again and check cable connections. Audio problems often stem from loose plugs or old tapes.
The RVT Digitizer’s U.S.-based support team can assist with technical hiccups. For software conflicts, update your drivers and restart your computer. Community forums and manufacturer guides offer step-by-step solutions.
If files are missing or corrupted, try transferring again with a different cable or port. Always keep your original tapes until you confirm successful digital backups.
Remember, patience pays off. Each challenge you conquer helps you master the process to convert vcr video to digital for a lifetime of memories.
Advanced Tips for Flawless VCR to Digital Transfers
Preserving your family’s video treasures is more than just a technical task—it’s about keeping memories alive for generations. To get the best results when you convert vcr video to digital, follow these advanced tips trusted by families and creators alike.
Optimizing Video and Audio Quality
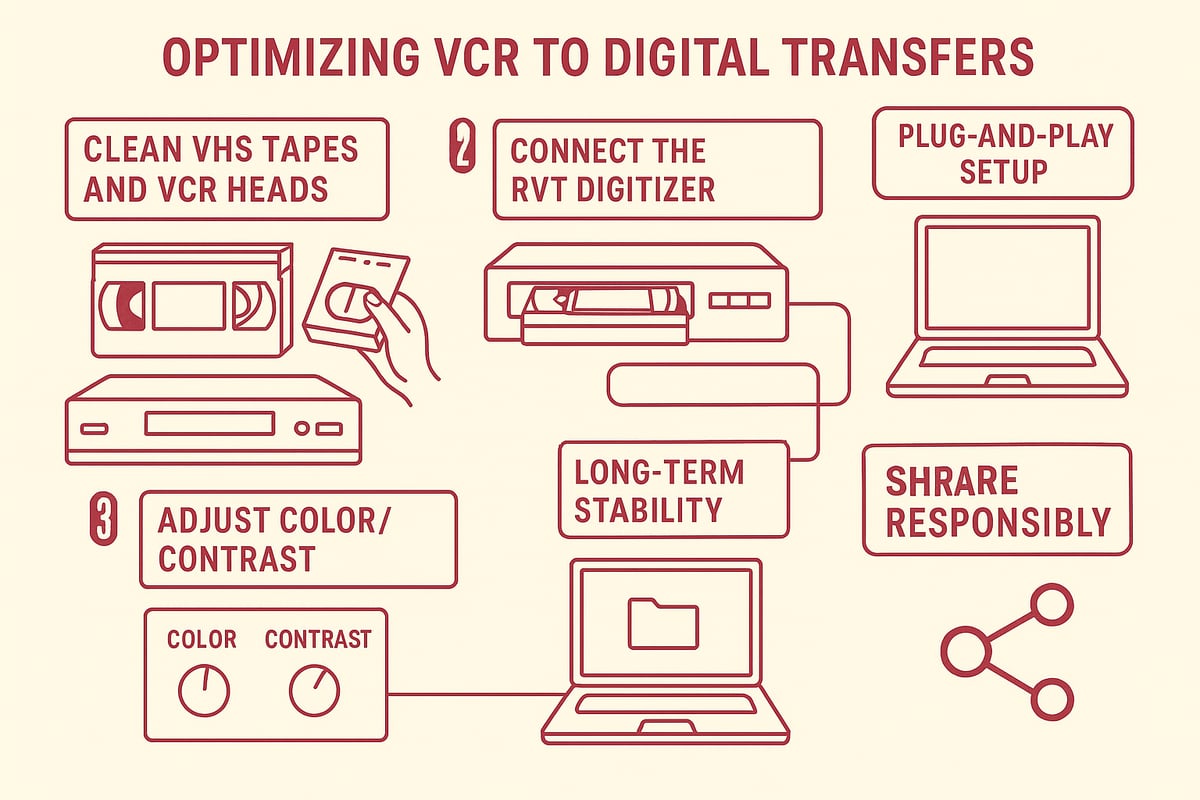
Start with a clean foundation. Dust and debris on tapes or VCR heads can cause static, lines, or dropouts. Gently clean tapes with a soft cloth and use isopropyl alcohol for VCR heads. The RVT Digitizer’s advanced encoding chip picks up every detail for superior clarity, but even the best technology benefits from a clean signal.
For truly professional results, use a time base corrector (TBC) or video stabilizer. These tools smooth out wobbly images and correct timing issues. Adjust brightness, contrast, and color during capture to enhance old footage. For more on these steps, explore VHS digitization best practices.
By following these techniques, you’ll maximize the quality when you convert vcr video to digital and keep those moments vivid.
Ensuring Long-Term Digital Stability
Once you convert vcr video to digital, protecting your files is crucial. Use clear, consistent file names and add metadata such as dates, locations, and people. Save files in widely compatible archival formats like MP4 or MOV for long-term accessibility.
Back up your digital videos in at least two places. Consider this table for best practices:
| Backup Method | Pros | Cons |
|---|---|---|
| External Hard Drive | Fast, portable | Can fail, needs updates |
| Cloud Storage | Accessible anywhere | Subscription fees |
| Home Server | Centralized, secure | Initial setup cost |
Check your backups every year to ensure files are intact. The RVT Digitizer ensures digital stability, but your vigilance keeps memories safe.
Editing and Enhancing Old Footage
After you convert vcr video to digital, take time to edit and enhance. Trim unwanted sections, correct colors, and fix audio using simple editing tools. Modern AI-powered software can upscale video, reduce noise, and remove static, giving new life to faded scenes.
Some families have restored decades-old wedding videos, amazed at how clear and vibrant they look after gentle enhancement. With the RVT Digitizer’s high-fidelity capture, your edits start from the best possible source.
Think of it like polishing a gem—careful editing reveals details you thought were lost.
Preserving Original Aspect Ratios and Frame Rates
Ever wondered how to keep your memories authentic when you convert vcr video to digital? Always preserve the original aspect ratio and frame rate. Stretching or cropping can distort faces and scenery, erasing the feel of the moment.
Use software settings to match source dimensions. The RVT Digitizer captures footage true to its original format, so you can enjoy memories just as you remember them.
Authenticity means more than just quality—it’s about experience.
Legal and Ethical Sharing
Once you convert vcr video to digital, sharing those moments is easier than ever. However, always respect privacy and copyright. Share family videos with consent, especially if they include friends or events outside your household.
For home movies, personal sharing is typically fine. For commercial footage, check copyright laws before distributing. Protecting privacy builds trust and ensures your digital archive is a source of joy, not concern.
With these tips, you can convert vcr video to digital and share safely, preserving memories for all the right reasons.
Common Mistakes and How to Avoid Them
Preserving family moments is priceless, but many people run into pitfalls when they try to convert vcr video to digital. With the right approach, you can avoid these mistakes and keep your memories safe for decades.
Let's break down the top errors and how to sidestep them:
1. Waiting Too Long to Convert
Many families wait until their tapes are nearly unplayable. Magnetic tape degrades every year, and VCRs are getting harder to find. The longer you wait to convert vcr video to digital, the greater the risk of losing everything to mold, stuck reels, or total video dropout.
Tip: Start now. Prioritize your most important tapes first. Even if you only digitize a few at a time, you'll beat the clock.
2. Using Low-Quality or Incompatible Converters
Not all converters are created equal. Cheap devices may produce fuzzy, color-shifted, or glitchy results. Some generic models even cause audio lag or frequent signal loss. The RVT Digitizer stands out for its clear picture, fast transfer, and simple setup, thanks to its advanced encoding chip and pro-grade build. It preserves color accuracy and sound fidelity, giving you results that last.
Tip: Avoid frustration by researching your hardware. For a deep dive into choosing the right device, see the VCR to Digital Converter Guide.
3. Overlooking Audio Problems
It’s easy to focus on the video and miss audio issues until it’s too late. Buzzing, dropouts, or sync errors can ruin a priceless recording. Always test your setup before you convert vcr video to digital. Play a short segment and listen carefully.
Tip: If you notice problems, clean your VCR heads and check cables. Some issues can be fixed with editing software, but prevention is best.
4. Failing to Back Up Digital Files
Converting tapes is only the first step. Hard drives fail, and files can disappear in a click. Many people lose digital videos just months after conversion. Always keep at least two backups—one on an external drive, another in the cloud.
Tip: Use descriptive file names and folders for easy retrieval. Schedule regular backups to prevent accidental loss.
5. Ignoring Copyright or Privacy Concerns
Before you convert vcr video to digital, make sure you have the right to digitize and share the content. Personal home videos are fine, but commercial recordings may be restricted. Also, always get consent before sharing footage that includes others.
Tip: When in doubt, keep your digital copies for private, family use.
6. Skipping Cleaning and Maintenance
Dirty VCR heads and old cables can introduce static, color streaks, or dropped frames. A quick clean before you start can make a world of difference.
Tip: Use a head-cleaning cassette and inspect all connections before every session.
7. Poor Organization and Labeling
Unlabeled files quickly become a digital mess. Years from now, you won't remember which file is which event. Good organization makes it easy to find and share memories.
Tip: Add dates, names, and short descriptions to every digital file.
Common Mistakes Quick Reference
| Mistake | Solution |
|---|---|
| Waiting too long | Start digitizing today |
| Low-quality converter | Use RVT Digitizer for best results |
| Audio problems | Test, clean, and monitor playback |
| No backup | Save files in multiple locations |
| Copyright/privacy | Share responsibly |
| Skipping cleaning | Maintain VCR and cables |
| Poor labeling | Describe every file clearly |
One family thought they had more time, only to discover their wedding tape was unreadable by the time they tried to save it. With the RVT Digitizer, families and creators have trusted a solution built for clarity, speed, and durability—avoiding these heartbreaks.
Want more troubleshooting tips? Visit the Troubleshooting Video Conversion Issues page for expert solutions.
Are you ready to convert vcr video to digital and protect your legacy? Start today, stay organized, and choose quality gear for results you can trust.
The Future of Video Preservation and Digital Archiving
Preserving memories is entering a new era. As more families seek to convert vcr video to digital, the landscape of video archiving is rapidly changing. Old tapes are fading, and VCRs are vanishing. AI-powered restoration, cloud storage, and smarter digitizers are reshaping how we protect our stories for generations to come.
AI-driven tools are quickly becoming essential for anyone looking to convert vcr video to digital at the highest quality. Advanced software can now upscale old footage, reduce noise, and even restore faded colors. Families can breathe new life into cherished moments, while historians and creators unlock details once thought lost. The RVT Digitizer stands out in this landscape, delivering crisp transfers that preserve both color accuracy and sound fidelity, outperforming generic converters every time.
Cloud archiving is another key trend shaping the future. With digital files, families can now create private, searchable libraries accessible from anywhere. No more worrying about a single hard drive failing or a flood destroying irreplaceable tapes. By 2030, experts predict over 80% of home video memories will be stored digitally, making it easier than ever to share, edit, and celebrate the past together. For best practices and insights into the urgency of this transition, check out the VHS tape lifespan and preservation guide.
Community archives and crowdsourced preservation are also gaining momentum. Groups and families are pooling resources to digitize rare events, vintage TV, and local histories. The RVT Digitizer’s reliability and advanced encoding chip make it a trusted tool for these collaborative projects, offering professional-grade results and long-term file stability. This collective effort ensures stories that matter most are not lost as technology evolves.
Education remains vital. As you prepare to convert vcr video to digital, staying informed about storage formats, backup strategies, and privacy is key. Ongoing updates—like those offered for the RVT Digitizer—help users stay ahead of tech changes while keeping memories secure. The future belongs to those who act now. Are you ready to safeguard your family’s video history for the next generation?
You’ve seen how quickly old tapes can fade, and we both know those childhood birthdays and special family moments deserve to last. With tech changing fast and VCRs nearly impossible to find, making the leap to digital now is the safest way to keep your memories vivid and easy to share. I’ve walked you through the steps and the tools—now, why wait until it’s too late? If you want a simple, worry free way to get started and the highest quality results, let’s take action together. Ready to preserve your story for the next generation? Digitize my tapes today