
Time is running out to save priceless family moments trapped on old VCR tapes. Every year, those tapes fade and degrade, risking memories being lost forever. In 2026, more people than ever want to convert vcr tapes to digital for easy sharing and long-term protection.
Digital files keep your memories safe, easy to access, and ready to share with loved ones on any device. This essential guide will help you navigate every step, from understanding why conversion matters to choosing the right tools and preserving your results. Ready to start? Let’s protect your family’s history together.
Why Convert VCR Tapes to Digital in 2026?
Preserving family memories is a race against time. Every year, the tapes holding birthdays, weddings, and childhood moments lose a bit more quality. If you want to keep these moments alive, it is crucial to convert vcr tapes to digital before it is too late.
The Decline of Analog Media
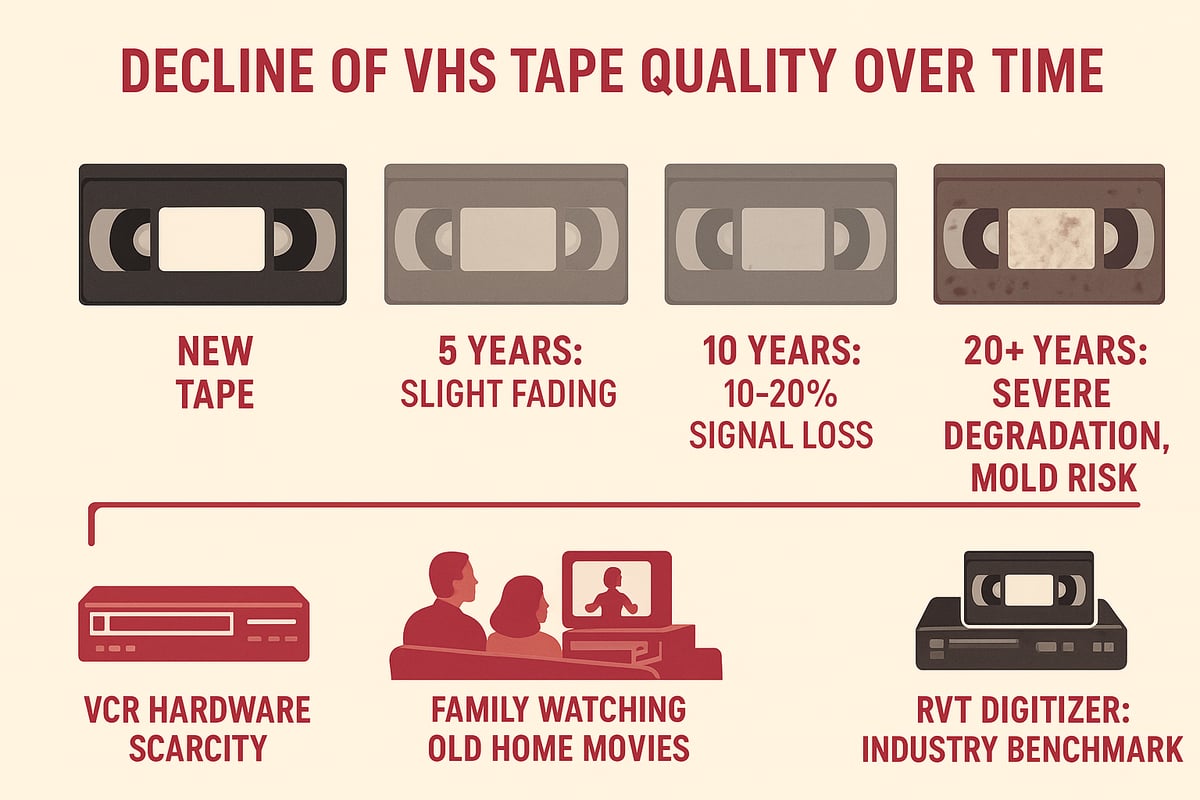
VHS tapes are not built to last forever. Over time, magnetic decay, mold, and warping can erase precious footage. Studies show that VHS tapes can lose up to 20 percent of their signal every decade. You may notice static, color loss, or tapes that will not play at all.
The situation is urgent: working VCRs are becoming rare, and repairs are costly. Many families have already lost home movies to this slow decay. Just imagine popping in a tape and discovering it is blank. For more on this, see how VHS tapes degrade 10–20% over 10–25 years.
To avoid heartbreak, many families choose to convert vcr tapes to digital with trusted tools like the RVT Digitizer. This move preserves both the footage and the emotions tied to it.
Benefits of Digital Conversion
Digital files give you peace of mind. Once you convert vcr tapes to digital, your memories are safe from further deterioration. You can watch these videos on your phone, computer, or smart TV at any time.
Digital files are simple to copy, edit, and share. Organize them by date or event, making it easy to find that one special moment. The RVT Digitizer stands out, offering unmatched picture clarity and sound, so your family’s stories stay vibrant.
Passing down digital memories means future generations will enjoy the laughter and love, not just faded images.
Legal and Ethical Considerations
When you convert vcr tapes to digital, it is important to understand copyright rules. Personal recordings are yours to digitize and share within your family. However, commercial tapes like movies may have restrictions.
Always respect copyright and privacy. If you plan to share digital files online, get permission from family members featured in the videos. Follow best practices by keeping your digital collection private or sharing links only with trusted contacts.
Environmental and Space Savings
Digitizing your tapes is good for the planet and your home. After you convert vcr tapes to digital, you can recycle the bulky tapes and free up valuable space on your shelves.
Reducing physical clutter also means less e-waste in landfills. Many recycling programs accept old tapes, helping to lower environmental impact. By choosing digital, you not only preserve memories but also contribute to a cleaner, greener future.
Rising Demand and Market Trends
Demand for services and tools to convert vcr tapes to digital is at an all-time high in 2026. Professional conversion costs are rising as VCRs become scarce, and do-it-yourself kits are selling out fast.
Families, creators, and collectors trust the RVT Digitizer for its reliability, speed, and ease of use. With its advanced encoding chip and professional-grade build, the RVT Digitizer delivers results that last a lifetime. This surge in digitization is helping countless people save memories before they are lost forever.
The Main Methods to Convert VCR Tapes to Digital
Preserving memories starts with choosing how you'll convert vcr tapes to digital. Today, there are more options than ever, each with unique pros and cons. Let’s break down the main methods, compare their strengths, and help you find the best fit for your tapes and your story.
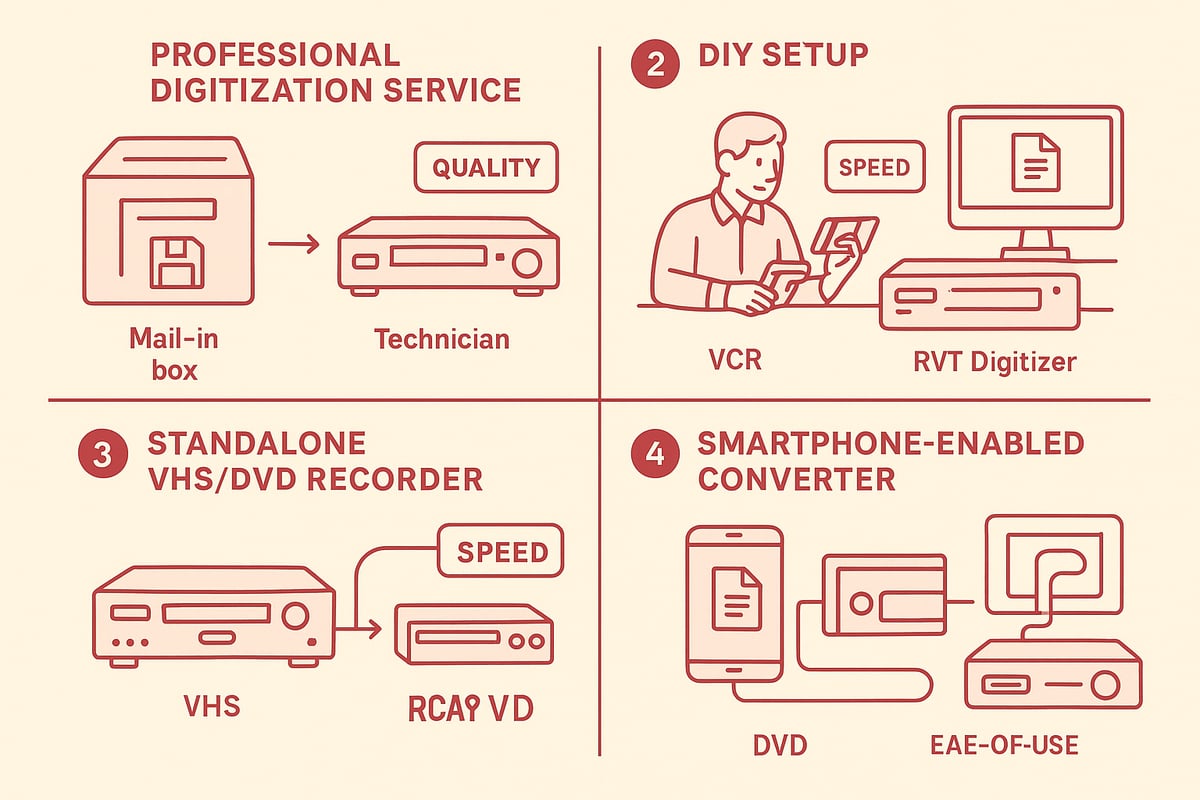
Professional Digitization Services
If you want to convert vcr tapes to digital without handling equipment, professional services are a reliable choice. You send your tapes to a trusted lab or local shop, and experts use high-end gear to capture and restore footage.
Benefits include:
- Consistency and archival-quality results
- No technical setup required
- Optional restoration services for damaged tapes
Drawbacks:
- Cost per tape can add up quickly, especially for large collections
- Wait times for shipping and processing
- Privacy concerns with sending irreplaceable moments away
In 2026, typical prices range from $25 to $45 per tape. As VCR hardware gets rarer, these services are in high demand. For families with just a few tapes or wanting hands-off simplicity, this method offers peace of mind.
DIY Conversion with USB Capture Devices
Many families and creators choose to convert vcr tapes to digital at home with USB capture cards. These devices connect your VCR to your computer and use software to record the video and audio in real time.
Pros:
- Cost-effective for multiple tapes
- Full control over the capture process
- Allows for editing and organizing files as you go
Cons:
- Requires some technical know-how
- Output quality depends on your VCR and capture device
The RVT Digitizer stands out in this category. It delivers crisp picture clarity, outstanding color accuracy, and true-to-life sound. Unlike generic converters, the RVT Digitizer uses an advanced encoding chip and professional-grade build for flawless results every time. Families digitizing 40+ tapes often share how easy and reliable their experience is, with instant plug-and-play setup and U.S.-based support for any questions.
Standalone VHS/DVD Recorder Combos
Standalone VHS/DVD combos let you convert vcr tapes to digital by recording directly from tape onto a DVD. These all-in-one machines are simple to use and don’t require a computer.
Advantages:
- Easy setup with minimal cables
- No software installation
- Useful for basic transfers
Limitations:
- Harder to find working units in 2026
- DVDs may become obsolete or unreadable over time
- Limited editing or customization options
Used units average $150 or more, and their availability is declining. This method suits those who want a straightforward solution and don’t mind working with DVDs.
Smartphone-Enabled Solutions
New technology lets you convert vcr tapes to digital using converters that connect directly to your smartphone or tablet. These devices record footage right to your mobile device for instant sharing.
Why choose this method?
- Portability and quick setup
- Immediate access to your digital files
- Easy to share memories with family and friends
Considerations:
- Video quality may depend on your phone’s hardware and app capabilities
- Storage space on mobile devices can be a limitation
This approach is great for on-the-go transfers or sharing highlights, but may not match the archival quality of dedicated equipment like the RVT Digitizer.
Comparing Quality and Reliability
How do these options stack up? Here’s a quick comparison:
| Method | Quality | Speed | Ease of Use | Long-Term Reliability |
|---|---|---|---|---|
| Professional Service | Excellent | Moderate | Very Easy | High |
| DIY (RVT Digitizer) | Outstanding | Fast | Easy | Highest |
| Standalone VHS/DVD Combo | Good | Moderate | Easy | Medium |
| Smartphone Converter | Varies | Fast | Very Easy | Low-Medium |
Generic capture devices may drop frames or lose color, while the RVT Digitizer preserves every detail for generations. Think about what matters most: is it speed, quality, or convenience?
Choosing the Right Method for Your Needs
When deciding how to convert vcr tapes to digital, consider your tape collection, budget, and comfort with technology. Do you have a few priceless home movies or a whole shelf of tapes? Are you looking for top-tier quality or a quick fix?
- For large collections and lasting quality, the RVT Digitizer is trusted by families and collectors alike.
- If you prefer a hands-off approach, professional services are ideal.
- For quick sharing, smartphone solutions work well for highlights.
Still unsure? Explore more about methods and considerations in this Convert old tapes to digital guide.
No matter which path you take, the goal is the same: to protect and relive your most treasured moments, now and for the future.
Essential Equipment and Tools for VCR to Digital Conversion
Preserving your family’s memories starts with the right tools. The journey to convert vcr tapes to digital is smoother and more rewarding when you choose equipment that protects your tapes, simplifies the process, and delivers high-quality results. Let’s explore exactly what you need to get started.
VCRs: What to Look For
The VCR is the first step in your mission to convert vcr tapes to digital. Not all VCRs are created equal, especially in 2026, when supply is limited and many units are aging.
Look for a well-maintained VCR with minimal playback issues. Online marketplaces and specialty electronics shops are your best bets for finding reliable units. Prioritize features like S-Video output for better picture quality, tracking controls to reduce static, and stereo audio for richer sound.
A quality VCR means fewer playback errors and a smoother digital transfer. Before you start, always test with a non-precious tape to check for issues.
Capture Devices: The Heart of the Process
To convert vcr tapes to digital, you’ll need a capture device that transforms analog signals into digital files. These devices come in entry-level, mid-range, and professional-grade versions. The right choice can mean the difference between fuzzy memories and crisp, lasting footage.
A dependable capture device ensures stable signals, accurate color, and clear audio. Generic converters often struggle with dropped frames or color loss. For a closer look at what sets top-tier digitizers apart, check out this VCR digitizer equipment guide.
When comparing options, look for devices with advanced encoding chips and solid build quality. This will help you avoid frustration and protect your memories for years.
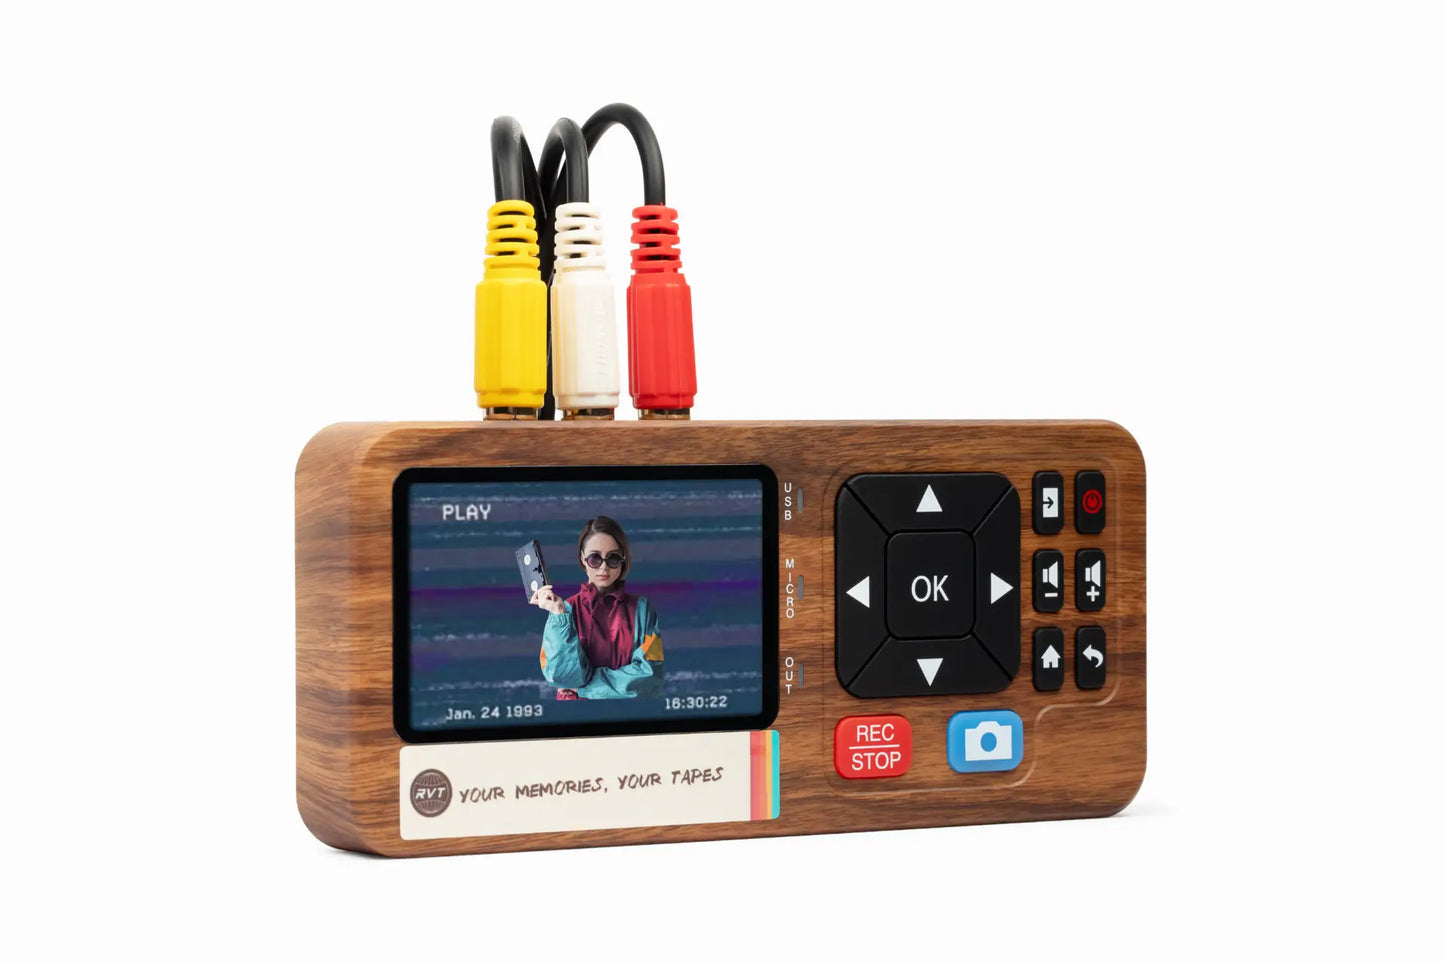
Why the RVT Digitizer Sets the Standard
Families, creators, and collectors trust the RVT Digitizer as the gold standard to convert vcr tapes to digital. Why? The RVT Digitizer delivers unmatched picture clarity, preserves true-to-life color, and captures every frame with professional-grade precision.
Unlike generic converters, it offers fast transfer speeds and a plug-and-play setup, so you can get started without complicated software installs. Its advanced encoding chip ensures your sound is clear and your video is stable, even on older tapes.
Imagine a family digitizing 40 treasured tapes and getting consistent, beautiful results every time. With U.S.-based support, a 2-year warranty, and glowing customer reviews, the RVT Digitizer is the reliable choice for preserving your memories.
| Feature | RVT Digitizer | Generic Converter |
|---|---|---|
| Picture Clarity | Superior | Variable |
| Color Accuracy | Excellent | Often Faded |
| Transfer Speed | Fast | Slower |
| Plug-and-Play | Yes | Sometimes |
| Warranty/Support | 2 Years, US | Limited/None |
Cables, Adapters, and Accessories
Quality cables matter when you convert vcr tapes to digital. RCA or S-Video cables transfer both sound and picture. Choose shielded, well-made cables to reduce static and signal loss.
Some VCRs may need adapters for different outputs. Gather what you need before starting. A surge protector guards your equipment from power spikes. Cleaning kits help keep your VCR and tapes in top shape.
Spending a few minutes on setup now will save hours of troubleshooting later.
Computers, Smartphones, and Storage Solutions
Your digital memories are only as safe as where you store them. To convert vcr tapes to digital, you’ll need a computer or smartphone with enough power for smooth capture and editing.
For storage, consider SSDs or external hard drives for reliability and speed. Cloud storage adds another layer of safety. Most people choose MP4 files for easy playback on any device.
Plan your storage before you begin. This keeps your memories organized and prevents accidental loss.
Software for Editing and Archiving
Once you convert vcr tapes to digital, editing software lets you trim, enhance, and organize your footage. Choose user-friendly programs that allow you to brighten scenes, cut out static, or add titles and dates.
Metadata tagging is a powerful tool. By adding names, locations, and events, you make future searches a breeze.
Organized digital files mean you can relive family memories anytime, anywhere, and share them with loved ones in seconds.
Step-by-Step Guide: How to Convert VCR Tapes to Digital
Preserving your family’s priceless moments is easier than ever in 2026. Let’s walk through the exact process to convert vcr tapes to digital, ensuring every memory is safe, accessible, and ready to be shared for generations. Whether you’re using the RVT Digitizer or another method, follow these steps for lasting results.
Step 1: Prepare Your Workspace and Equipment
Before you start to convert vcr tapes to digital, set up a clean, organized area. Make sure you have your VCR, RVT Digitizer (or chosen converter), all necessary cables, and your computer or smartphone.
Wipe down your VCR and tapes gently. Dust on the heads or tape can lower the video quality. Plug everything into a surge protector to guard against power issues.
Test each component before you begin. Play a few seconds of your tape in the VCR to check for smooth playback. This prep work helps you avoid surprises and protects your memories from accidental damage.
Step 2: Connect VCR to Capture Device
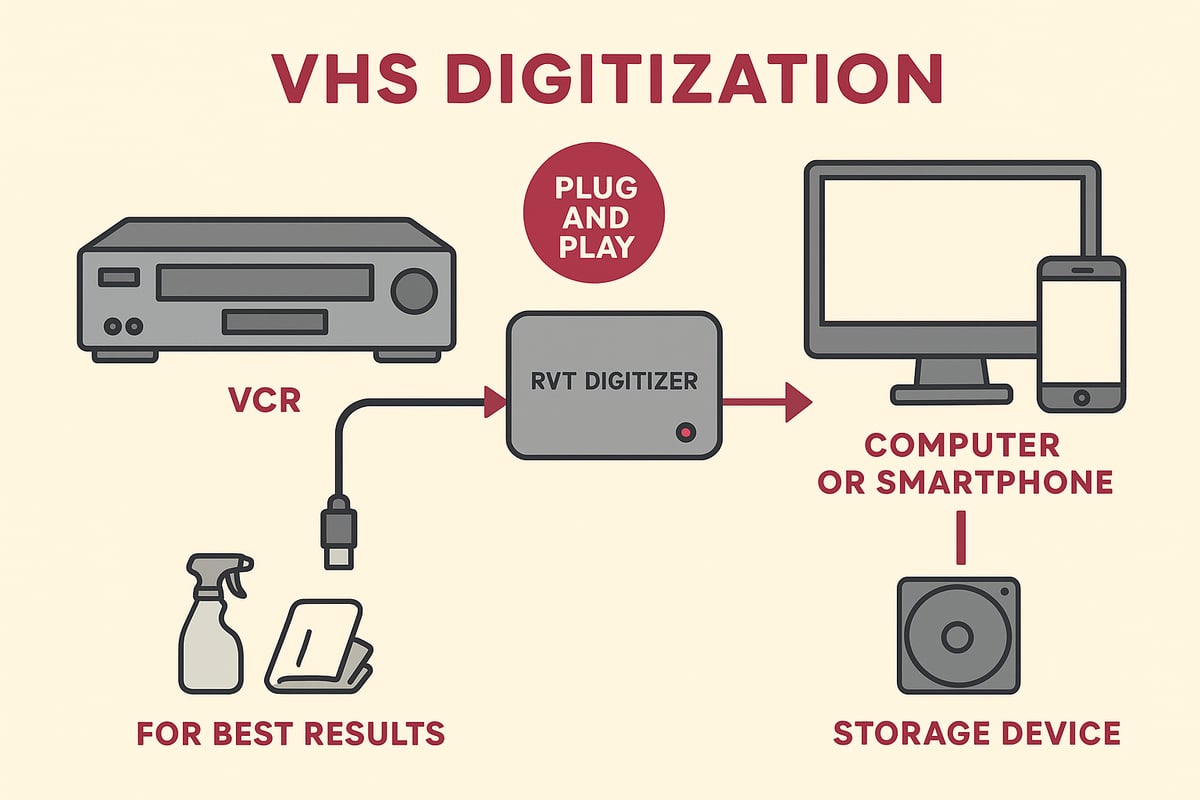
Now, connect your VCR to your chosen capture device. If you use the RVT Digitizer to convert vcr tapes to digital, plug the RCA or S-Video cables from your VCR into the digitizer input.
Check the color coding on cables to match video and audio correctly. Use the highest-quality output your VCR offers, like S-Video, for sharper images. Then, plug the RVT Digitizer’s USB or direct connector into your computer or smartphone.
Secure all connections firmly. If you notice static or loose cables, adjust them until you see a clear signal. This step ensures you catch every detail during the transfer.
Step 3: Install and Configure Software (If Needed)
With your hardware connected, it’s time to get your software ready. Many converters, like the RVT Digitizer, are plug-and-play and need no extra drivers. If software is required, install it following the device’s instructions to convert vcr tapes to digital.
Open the capture application and select the correct video and audio input. Set your resolution to at least 480p for VHS quality, and choose stereo sound if available.
Before starting, preview the video feed in the software. Adjust brightness or contrast if needed. These settings help you get the best possible transfer from your original tapes.
Step 4: Insert and Cue Up Your Tape
Insert your VCR tape and gently fast-forward, then rewind it. This simple action loosens the spools and helps prevent playback issues. To convert vcr tapes to digital with precision, cue the tape to the exact spot where you want recording to begin.
Use the pause and play buttons on your VCR to find the right starting point. If your tape has tracking controls, fine-tune them to remove static or image jitter.
Double-check the video on your screen. A clear signal now will save you time editing later. Once everything looks and sounds right, you’re ready for the next step.
Step 5: Begin the Digital Capture
Now comes the heart of the process: press record in your capture software or app. As you convert vcr tapes to digital, monitor both the video and audio in real time to catch any issues early.
Let the tape play through without interruption for the best quality. If you need help with step-by-step instructions, the How to copy VHS to digital guide offers detailed visuals and troubleshooting tips.
When the tape finishes, stop recording and check the file for completeness. This hands-on approach ensures every second is preserved just as you remember it.
Step 6: Save and Name Your Digital File
After capturing, save your file in a universal format like MP4. To convert vcr tapes to digital with lasting results, use clear file names and organized folders.
Try a naming system like 1998_BirthdayParty_MomLivingRoom.mp4 for easy searching. Create folders by year, event, or family member.
Save your files to a reliable location, such as an external SSD or cloud storage. This step makes it simple to find, share, and enjoy your memories whenever you wish.
Step 7: Edit and Enhance Your Footage
Once you convert vcr tapes to digital, basic editing can make a world of difference. Trim unwanted footage, adjust brightness, or reduce static with user-friendly editing software.
Add metadata, such as event names or dates, for quick searching later. Many programs let you boost color, improve audio clarity, or combine clips into highlight reels.
Keep your edits light to preserve the original feel of your home videos. Your goal is to enhance, not erase, the nostalgia that makes these tapes special.
Step 8: Backup and Share Your Digital Files
Protecting your new digital files is essential. After you convert vcr tapes to digital, create at least two backups—one on an external drive, another in the cloud.
Share your memories with family using platforms like Google Drive or Dropbox. Make sure your files are in formats that play on any device.
Encourage relatives to download and store their own copies. This way, your family’s story is safe even if a device fails or gets lost.
Tips for Consistent Quality
To convert vcr tapes to digital smoothly every time, keep these tips in mind:
- Avoid running other programs on your computer during capture.
- Use surge protectors for all equipment.
- Clean your VCR heads and tapes regularly.
- Store original tapes in a cool, dry place.
If you want the best possible results, choose the RVT Digitizer. Its advanced encoding chip, precise frame capture, and plug-and-play setup deliver unmatched clarity and reliability. Families, creators, and collectors trust it for saving their most important moments.
Troubleshooting Common Issues in VCR to Digital Conversion
Preserving family memories is rewarding, but even the best plans can run into technical hiccups. When you convert vcr tapes to digital, knowing how to handle common issues keeps the process smooth and your memories safe. Let us walk through the most frequent problems and how to solve them.
Video Quality Problems
Blurry, distorted, or color-faded videos are frustrating when you convert vcr tapes to digital. These issues usually come from dirty VCR heads, worn tapes, or subpar capture devices. Start by cleaning your VCR heads and checking cables for a tight fit. Adjust tracking to fix wavy lines or flicker.
For better results, always use high-quality cables, and opt for an S-Video connection when available. The RVT Digitizer stands out here, delivering superior picture clarity and color accuracy. Unlike generic converters, it captures each frame with precision and keeps colors true.
If you want to dive deeper into restoration techniques, explore this reference-based restoration of digitized analog videotapes study for advanced tips.
Audio Sync and Noise Issues
Audio out of sync or static-filled sound can ruin a cherished recording. When you convert vcr tapes to digital, ensure your audio cables are firmly connected and free from damage. If you hear humming or buzzing, try a different outlet or use a surge protector to reduce interference.
Software settings can also cause sync issues. Double-check your capture software input and frame rate. The RVT Digitizer’s advanced encoding chip keeps audio perfectly synchronized and clear, so voices and music stay true to your memories.
If noise persists, test another tape or VCR to pinpoint the source. Small tweaks often make a big difference.
Tape Damage and Repair
Sometimes, old tapes refuse to play smoothly or show wrinkles, creases, or even break. If you encounter problems while you convert vcr tapes to digital, gently fast-forward and rewind the tape to loosen the spools. For stuck or broken tapes, avoid forcing them—this can make things worse.
Consider using a manual tape repair kit for simple fixes, like reattaching a snapped tape. For severe mold or physical damage, professional restoration is often the safest route. The RVT Digitizer’s stable transfer process minimizes stress on fragile tapes, increasing the chance of a complete, high-quality transfer.
Preserving these memories is about patience and the right touch.
Software and Hardware Glitches
Technical glitches can pop up unexpectedly during the process to convert vcr tapes to digital. If your capture software crashes or your device is not recognized, restart your computer and check for driver updates. Using a reliable, plug-and-play device like the RVT Digitizer reduces compatibility headaches and eliminates the need for complex installations.
If problems persist, try a different USB port or cable. Sometimes, system performance causes dropped frames—close other applications while capturing video. For a side-by-side comparison of available tools, check these video to digital converter options.
A steady setup means fewer interruptions and better results.
Preventing Data Loss
After you convert vcr tapes to digital, the last thing you want is to lose your files. Always save your work frequently, especially when editing. Use reliable storage like SSDs or cloud backups, and follow the 3-2-1 rule for peace of mind.
Label files clearly and keep copies on at least two different devices. The RVT Digitizer’s fast transfer speeds make it easy to back up footage quickly. Regular backups ensure your memories last for generations, no matter what happens to your computer.
A few extra steps today protect your family history tomorrow.
When to Seek Professional Help
Some challenges go beyond DIY fixes, especially if tapes are severely damaged or you need archival-grade results. If you cannot resolve persistent issues when you convert vcr tapes to digital, professional services offer expertise and specialized equipment.
Weigh the cost and sentimental value of your tapes. For rare formats or irreplaceable footage, investing in expert help is often worth it. The RVT Digitizer is trusted by families, creators, and collectors for most home projects, but there is no shame in calling in the pros when the stakes are high.
Your memories deserve the best care, whatever path you choose.
Best Practices for Preserving and Organizing Your Digital Memories
Preserving your memories after you convert vcr tapes to digital is just the beginning. To ensure your family videos remain safe, organized, and easy to share for decades, follow these best practices. Let’s break down each step so your digital legacy stands the test of time.
File Formats and Compression
Choosing the right file format after you convert vcr tapes to digital is crucial for keeping quality high and files manageable. MP4 is the top choice for most families, balancing great quality with smaller file sizes. Avoid saving only in old formats like AVI, which can take up lots of space and may not play on newer devices.
Here’s a quick table for easy comparison:
| Format | Quality | Compatibility | File Size |
|---|---|---|---|
| MP4 | High | Universal | Small |
| AVI | High | Limited | Large |
| MOV | High | Apple Focused | Medium |
To avoid losing detail, do not over-compress your files. For a checklist of the best equipment and format tips, check out this Essential gear for VHS to digital conversion guide.
Backup Strategies
Once you convert vcr tapes to digital, always create multiple backups. The 3-2-1 rule is your best friend: keep three copies, on two different types of storage, with one copy offsite or in the cloud.
Recommended backup options:
- External SSD or hard drive
- Secure cloud storage (Google Drive, Dropbox)
- USB flash drive for quick access
Label each backup with clear folder names and dates, so you always know which version is most recent.
Organizing and Tagging Files
A little organization goes a long way when you convert vcr tapes to digital. Start by creating a folder for each event, year, or family member. Use clear file names like 1998_DadBirthdayParty.mp4 so you can find videos in seconds.
Add metadata tags—names, locations, or special notes—to each video. This makes searching for a specific memory simple, even years from now.
Sharing and Accessibility
Sharing your memories after you convert vcr tapes to digital is easier than ever. Upload videos to Google Drive, Dropbox, or use private YouTube links for family-only access. These platforms let you control who views or downloads your files.
Check that your chosen format (like MP4) works smoothly on all devices—smartphones, tablets, smart TVs, and computers—so no one is left out of the memories.
Long-Term Maintenance and Migration
Don’t set and forget your digital files. Every couple of years, review your backups and move them to newer storage if needed. Technology changes fast, and this step ensures your memories outlast old hard drives or cloud services.
Keep a simple log of when you convert vcr tapes to digital, what devices you used, and any edits you made. This helps future generations understand and continue your preservation efforts.
Protecting Privacy and Copyright
When you convert vcr tapes to digital, make sure you set privacy controls on shared files. Only share personal family videos with trusted people. If your tapes include commercial content, respect copyright and do not distribute those files.
Review permissions on cloud platforms and keep sensitive files in password-protected folders for extra peace of mind.
Passing Down Digital Legacies
Your digital home movies are more than files—they are a living family legacy. Create digital albums or even short documentaries to share stories with future generations. Invite relatives to add their own memories or voice notes.
Choosing a reliable tool like the RVT Digitizer means your memories are preserved with superior picture clarity, color, and sound. Families, creators, and collectors trust RVT for its professional-grade results and dependable support, making sure these moments can be enjoyed for a lifetime.
Ready to bring your family’s history into the digital age? We’ve explored why it’s urgent to save those old VCR tapes—before time and technology leave them behind. Imagine reliving childhood birthdays or sharing your best home movies with just a click. It’s easier and faster than you think, especially with tools that guarantee every laugh and color stays crisp. Why risk losing precious moments to fading tapes or failing VCRs? If you’re excited to protect your memories and share them with loved ones, why not take the first step now? Digitize my tapes today