
Share
You dug out the box of old tapes. You ordered a USB capture stick. You were ready.
Then reality hit.
Maybe the driver wouldn't install. Maybe the audio came out a second behind the video. Maybe you sat there for three hours — laptop open, fan blowing, software frozen — and got nothing but a corrupted file.
You're not alone. This is the story for thousands of people every year who try to digitize VHS tapes with a cheap USB capture card. The device shows up, it looks the part, and then it just... doesn't work the way anyone hoped.
Let's talk about why — and what actually gets the job done.
The Problem With Most USB Capture Cards
Walk through any VHS digitization thread on Reddit's r/VHS or r/digitization and you'll see the same complaints repeating over and over. The names of the devices change. The frustrations don't.
1. The Drivers Won't Install
This is the first wall most people hit. You plug the device into your laptop, Windows looks confused, and the hunt for a working driver begins. The manufacturer's website — if it even still exists — might have a file from 2016. Forums point to sketchy third-party downloads.
Devices like EasyCap became infamous for this. Independent reviewers who've tested these USB capture cards put it plainly: they use "outdated or unsupported drivers that barely work on modern computers." Some never install at all.
It shouldn't take two hours of troubleshooting before you've recorded a single frame.
2. The Audio Drifts Out of Sync
Even when you get it working, there's a solid chance the audio won't line up with the video. A half-second delay. A full second. Sometimes it gets worse as the tape plays on.
This is called audio drift, and it's one of the most common complaints about USB video capture devices. Cheap hardware doesn't sync the audio and video clocks properly. The result looks like a badly dubbed movie — except it's your kid's second birthday party and nobody asked for this.
3. The Video Quality Isn't What You Expected
The footage plays back, but it looks off. Dropped frames make the video stutter. Ghosting creates faint double images. A wavy pattern — called herringbone interference — rolls across the screen. Colors look washed out.
These aren't user errors. They're hardware problems. AV enthusiasts have tested these devices extensively and documented the core issues: geometry errors, brightness and color problems, and frame-dropping baked into the cheap chips. You can't fix these in editing — the signal was already lost when the device captured it.
4. Your Laptop Has to Babysit the Whole Thing
Even when a USB digitizer works, it's not hands-off. Your laptop has to stay open and awake for the full length of every tape — sometimes 6+ hours. The capture software has to run without crashing. The USB connection has to hold.
One commenter described it well: "I have to sit there the whole time and pray nothing freezes."
That's not preserving memories. That's a part-time job.
5. Amazon Is Full of Knockoffs
The $15–$30 capture sticks flooding Amazon often use the same stock photos as legitimate products. Same listings, same promises, same "1,000 five-star reviews."
Inside? Cut-rate chips, no real shielding, proprietary software that breaks after one Windows update, and zero customer support when something goes wrong. Even more polished options like Elgato or ClearClick still require a laptop running capture software — just a more reliable version of the same problem.
What's Actually Going On Under the Hood
The root issue with traditional USB capture cards is that they aren't really standalone devices. They're a bridge. Your laptop does all the real work — encoding, saving, managing files. And every single failure point (drivers, software, USB connection, power settings, available RAM) lives on that laptop.
The device is just a cable with a chip. Everything fragile is on your end.
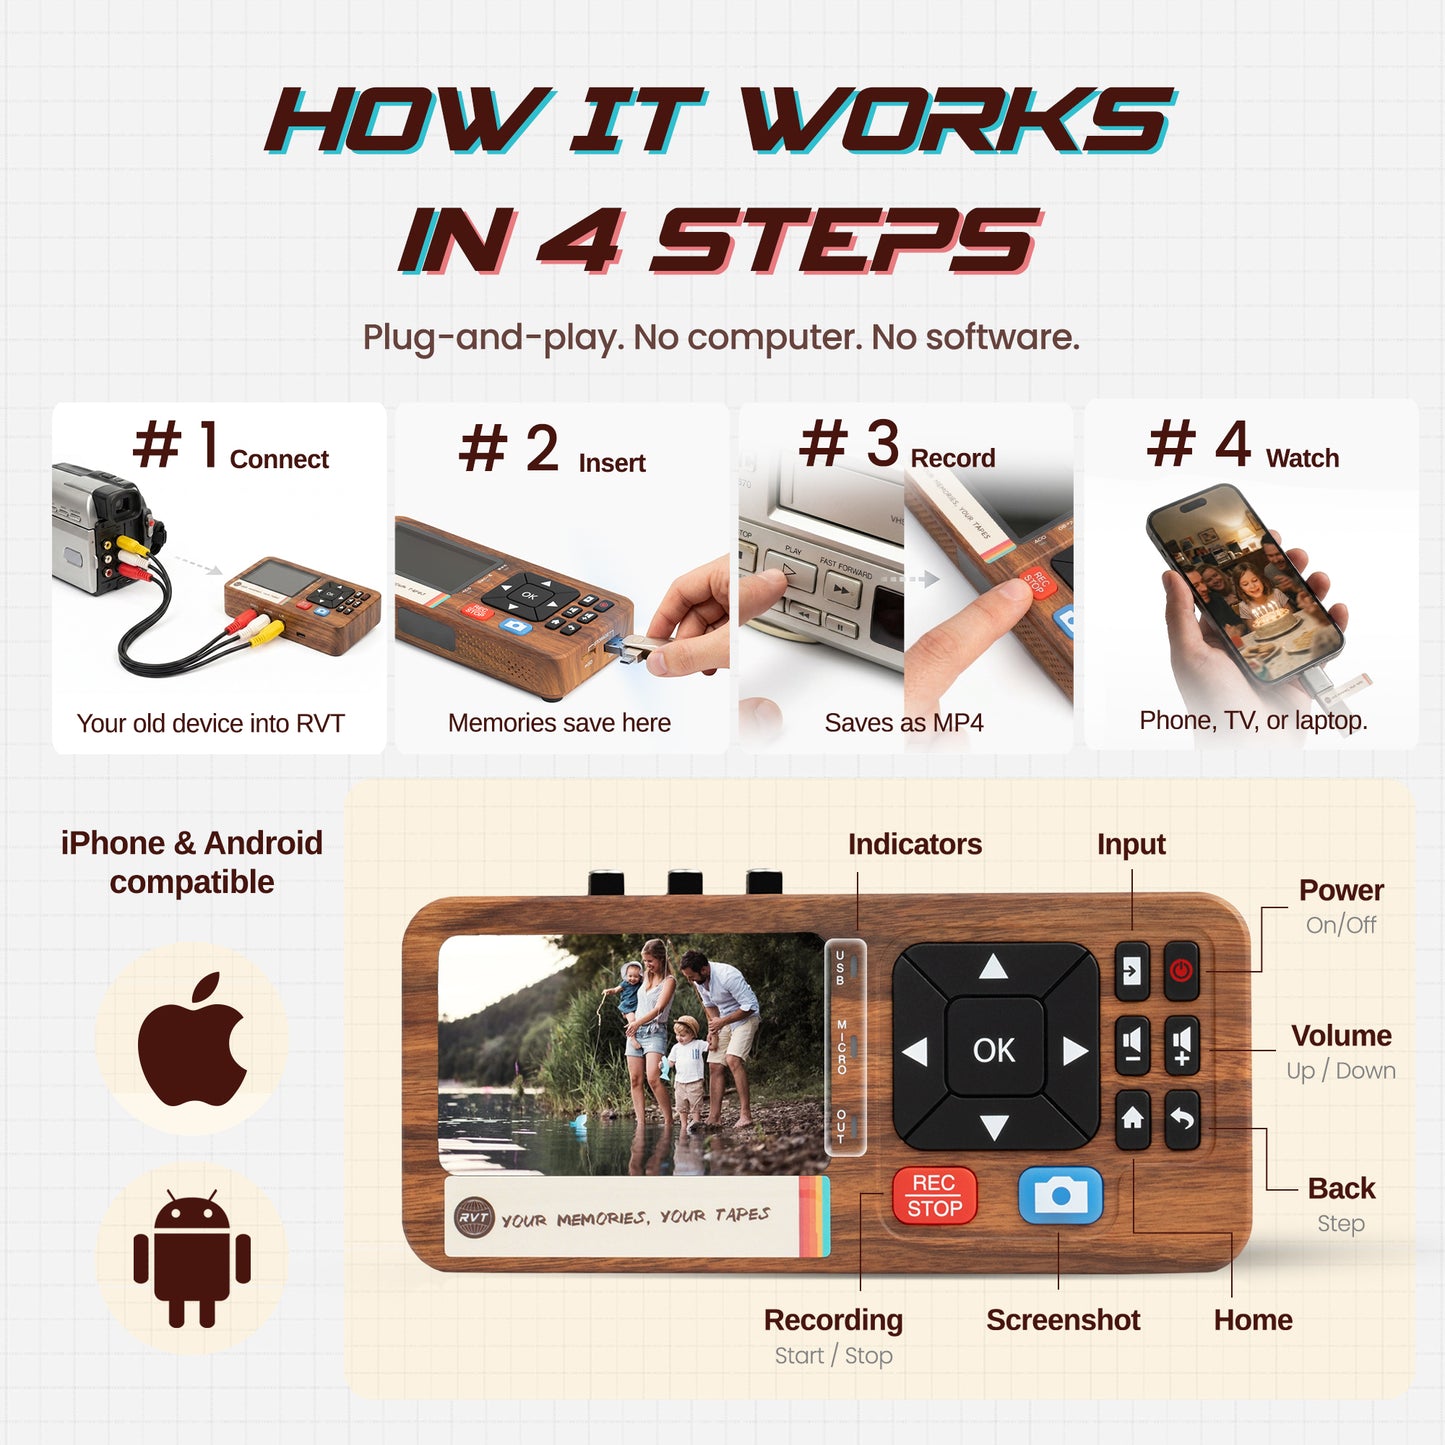
What people actually want when they search for a VHS to digital converter without a laptop is something that just handles it. Plug in the VCR, plug in a drive, press record, walk away.
The Best Standalone VHS Digitizer: RVT Digitizer 3.0
That's exactly what the RVT Digitizer 3.0 is — the best VHS to digital converter without a laptop on the market today.
No laptop. No drivers. No software. No babysitting.
You connect your VCR (or camcorder, or game console) using the included RCA cables, plug in a USB drive or SD card, and press record on the remote. The device handles everything — encoding, file management, saving — and writes a clean MP4 directly to your drive.
The tape runs. You walk away. Done.
Works With Everything You Already Have
- 📼 VHS tapes & VCRs
- 📷 Hi8 & camcorders
- 💿 LaserDisc & DVD players
- 🎮 Retro game consoles (NES, SNES, Genesis, PlayStation, Xbox, Atari, Dreamcast)
- 🎵 Cassette decks & turntables
- Any device with RCA (Red/White/Yellow) or S-Video outputs
- Both NTSC and PAL formats
Extra Features Worth Calling Out
- Built-in HDMI output — watch your old footage on your modern TV while you record
- Mic input — add narration as you go
- Auto-stop timer — so you don't waste storage if you step away
- OBS Studio compatible — for anyone who wants to stream retro content live
- Works with iPhone, iPad, Android, Mac, and PC when you want to move files
USB Capture Card vs. RVT Digitizer 3.0
| Typical USB Capture Card | RVT Digitizer 3.0 | |
|---|---|---|
| Needs a laptop? | Yes — required | No — fully standalone |
| Needs software? | Yes — often unreliable | No — built right in |
| Driver install? | Yes — often fails | Not a thing |
| Audio sync issues? | Common complaint | Handled by the hardware |
| Saves to USB drive? | No — saves to laptop only | Yes, directly |
| Remote control? | No | Included |
| HDMI output? | No | Yes |
| Warranty | Usually 30–90 days | 2 years |
| US-based support | Rarely | Yes |
What Customers Are Saying
"Got to actually see my dad's college football game from 1982 and my brother's little league baseball season and SO MUCH MORE!"
— Stacy, verified buyer ⭐⭐⭐⭐⭐
"The device was incredibly simple to use, even for someone like me who isn't particularly tech-savvy. What really stood out was the superb customer service — they were quick to respond and provided helpful guidance. I can now relive and share precious memories that were trapped on aging VHS tapes. It's truly a lifesaver!"
— Travis, verified buyer ⭐⭐⭐⭐⭐
"Setup was simple — just connect with RCA cables, insert a USB drive, and press record. The video quality came out great and the files saved as MP4, easy to watch on my phone or computer. Solid device for preserving old memories without needing complicated software or a computer."
— Amazon Customer ⭐⭐⭐⭐⭐
Your Tapes Won't Wait
VHS tape degrades. If your tape was recorded in 1990, it's 36 years old. The average lifespan is 10–30 years. You may already be past the window.
The USB capture card route sounds like the affordable shortcut. But when you factor in the hours of troubleshooting, the failed recordings you have to redo, the frustration of watching software crash mid-tape — it stops being cheap pretty fast.
The RVT Digitizer 3.0 costs more upfront. It's worth it. Because the point was never to buy a gadget — it was to actually save the footage.
The Bottom Line
If you want to spend a weekend fighting drivers and hoping your laptop doesn't sleep mid-recording, there are plenty of USB capture sticks on Amazon for $20.
If you want to convert VHS to digital without a laptop — plug in, press record, and have your memories saved as a clean MP4 in under an hour — the RVT Digitizer 3.0 is what you're looking for.
→ Get the RVT Digitizer 3.0
Free shipping · 2-year warranty · US-based support · Everything included
Frequently Asked Questions
Can you digitize VHS without a computer?
Yes. Standalone VHS to digital converters like the RVT Digitizer 3.0 record directly to a USB drive or SD card as MP4 files — no computer, no software, no drivers required. You just plug in your VCR, plug in a USB drive, and press record on the included remote.
Why does my USB capture card have audio delay?
USB video capture cards rely on your laptop's processor to sync audio and video clocks in real time. Budget devices in particular use cheap chips that can't maintain proper sync over a long recording. This causes audio drift — where the sound gradually falls out of step with the picture. The fix is to use a standalone digitizer that handles encoding internally, eliminating the dependency on your computer.
What is the best VHS to digital converter without a laptop in 2026?
The RVT Digitizer 3.0 is the top standalone option for most users. It records clean MP4 files directly to USB or SD card, includes HDMI output for TV playback, works with VHS, Hi8, camcorders, retro game consoles, and audio sources, and comes with a 2-year warranty and US-based support.
Why does my USB video capture device keep dropping frames?
Frame dropping happens when the USB connection, the capture software, or your laptop's CPU can't keep up with the data stream. This is extremely common with cheap USB capture cards and even happens with more reputable brands during long recordings. Standalone converters encode on-device and write directly to storage, bypassing all of these failure points.
How do I convert VHS to MP4 without a laptop?
Use a standalone VHS to digital converter. Connect your VHS player to the converter using RCA cables, plug a USB drive (formatted FAT32 or exFAT) into the device, and press record. The converter saves the footage as an MP4 directly to the drive. You can then plug the USB into any TV, phone, or computer to watch or share the video.