
Share
How to Save Your Old VHS-C & 8mm Tapes Before They Fade Away
Somewhere in your home, there's probably a box. Maybe it's in a closet, tucked under a bed, or sitting in the garage. Inside are old VHS-C and 8mm tapes filled with birthdays, holidays, vacations, school plays, and everyday moments you may not have seen in years.
The problem is, those tapes were never meant to last forever. Over time, magnetic tape starts to break down. Colors fade, audio gets weaker, and static can slowly take over. By the time most people notice something is wrong, part of the footage may already be damaged.
There's also another issue: the equipment needed to play these tapes is getting harder to find. Working VCRs, camcorders, adapters, and repair parts are becoming less common every year. So if your tapes still play, now is the time to save them.
You don't need any technical experience to do it. This guide covers what equipment you need, how the conversion process works, and how to keep your videos safe for years to come.
What You'll Need Before You Start
Before you can digitize your tapes, you need a way to play them. The exact setup depends on what kind of tapes you have.
If you have VHS-C tapes, you'll need a working VCR and a VHS-C adapter. The adapter lets the smaller VHS-C tape play inside a standard VCR.
If you have 8mm or Hi8 tapes, you'll need the original camcorder or a compatible playback device. These tapes do not play in a VCR, even with an adapter.
You'll also need a digitizer, like the RVT Digitizer 3.0, to capture the video and turn it into a digital file.
Check Your Tapes First
Before putting any tape into a VCR or camcorder, take a moment to inspect it.
- Look for cracks or broken plastic on the tape shell.
- Check for mold, which can look like white or fuzzy spots.
- Make sure the tape does not look wrinkled, stretched, or stuck.
If a tape looks damaged or moldy, do not force it into a machine. It could damage both the tape and the player. For very important or badly damaged tapes, it may be worth contacting a professional restoration service.
Should You Digitize Your Tapes Yourself?
There are a few ways to convert old tapes to digital. You can use a mail-in service, take them to a local shop, or do it yourself at home.
Mail-in services can work well for some people, but many companies charge based on the number of hours digitized. If you have a large collection of tapes, the total cost can add up quickly. You also have to package and ship your original family videos away, then wait days or even weeks to get everything back.
Local shops can be convenient, especially if you prefer working with someone in person, but the quality often depends on the equipment they use and how experienced they are with older tape formats.
For many families, doing it at home ends up being the better long-term option. Once you have the right equipment, you can convert tapes on your own schedule, keep your memories private, and digitize future tapes whenever you want without paying for additional transfer hours each time.
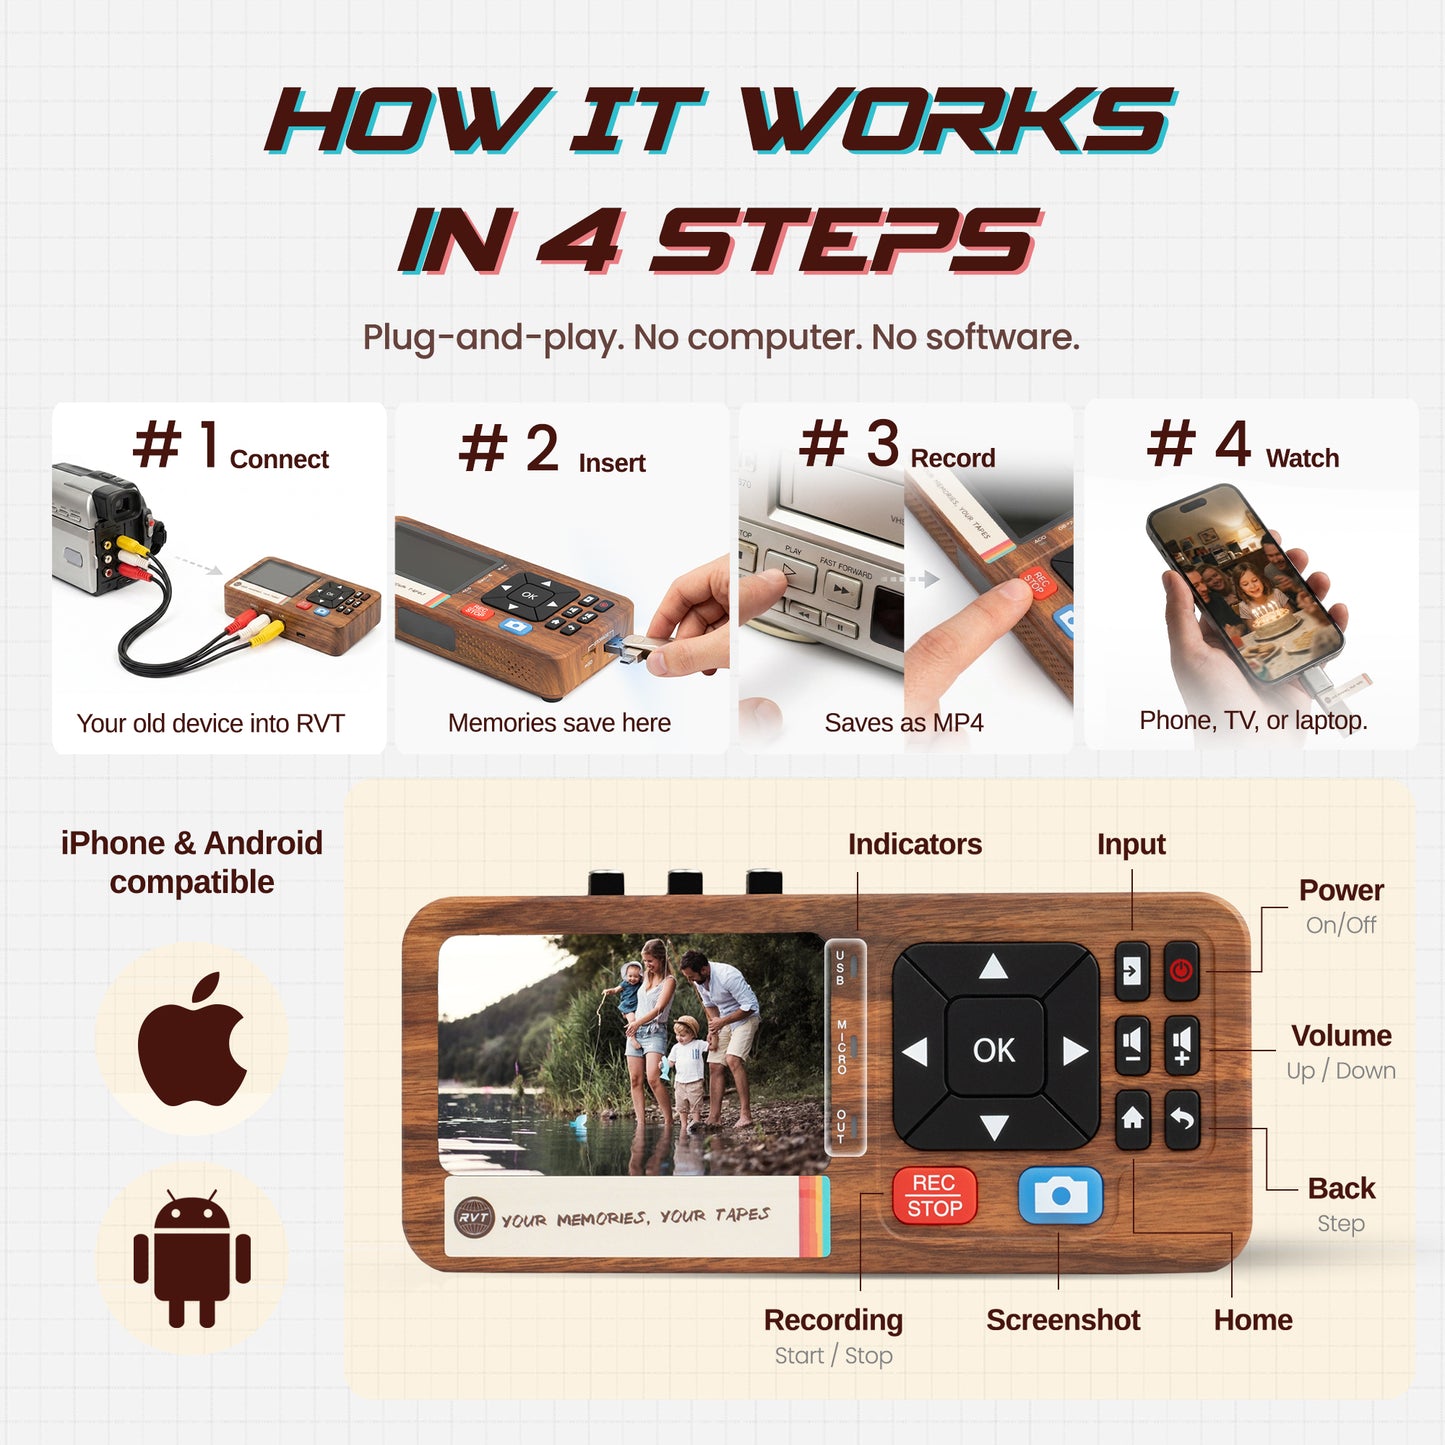
How the RVT Digitizer 3.0 Helps
The RVT Digitizer 3.0 is designed to make tape conversion simple. It connects to your VCR, camcorder, or compatible video source and helps turn your old analog footage into digital files you can save, watch, and share.
That means you can preserve VHS-C tapes, 8mm tapes, Hi8 tapes, VHS tapes, and even other older video sources without needing a complicated setup.
Instead of sending your tapes away, you can keep everything in your hands and convert your memories at home.
Step 1: Gather Your Tapes
Start by pulling all your tapes together in one place. Sort them by format if you can: VHS-C, 8mm, Hi8, or full-size VHS.
If the tapes are labeled, keep those labels visible. If they are not labeled, add a temporary note so you can name the digital files later.
Start with the tapes that matter most. If a tape contains family footage you can't replace, digitize that one first.
Step 2: Connect Your Playback Device
Connect your VCR or camcorder to the RVT Digitizer 3.0 using the proper video cables. Most older devices use the red, white, and yellow RCA cables.
The yellow cable carries the video. The red and white cables carry the audio.
Make sure each cable is plugged into the correct output on your VCR or camcorder, then connect the digitizer to your recording setup.
Step 3: Do a Short Test Recording
Before recording the full tape, do a quick test first.
Play about 30 seconds of video and make sure the picture and sound are coming through clearly. This helps you catch simple problems before spending an hour or two recording the whole tape.
If the picture looks fuzzy or has lines, adjust the tracking on your VCR if available. If there is no sound, check the red and white audio cables.
Step 4: Convert the Tape
Once everything looks good, rewind the tape to the beginning.
Start playing the tape, then begin recording with your digitizer setup. Tape conversion happens in real time, which means a two-hour tape will take about two hours to record.
You do not have to sit and watch every second, but it is smart to check in from time to time to make sure the tape is still playing correctly.
Step 5: Save the File With a Clear Name
When the tape is finished, stop the recording and save the file right away.
Use a name that will make sense later, such as:
1998_Family_Vacation.mp4
2001_Christmas_Morning.mp4
Grandparents_Home_Video_1995.mp4
Clear file names make it much easier to find and share videos later.
What File Format Should You Use?
For most people, MP4 is the best option.
MP4 files work on phones, tablets, laptops, smart TVs, and most modern devices. They are easy to share with family, upload to secure online storage, or save to an external hard drive.
You do not need to overcomplicate this part. A clean MP4 copy is usually the easiest and most practical choice for preserving old family videos.
Back Up Your Videos
After you digitize your tapes, do not leave the files in just one place.
Hard drives can fail. Computers can get lost or damaged. Files can accidentally be deleted.
A good rule is to keep more than one copy. Save your videos on your computer, copy them to an external hard drive, and consider keeping another copy in secure online storage.
The goal is simple: if one copy disappears, your memories are still safe somewhere else.
Stay Organized as You Go
As you convert your tapes, create folders that make sense to you. You might organize by year, by family member, or by event.
For example:
- Family Vacations
- Birthdays
- Holidays
- School Events
- Grandparents
This may feel like extra work in the moment, but you will be glad you did it later.
Worth doing once, worth doing right
Your old VHS-C and 8mm tapes are more than outdated formats. They are pieces of your family history.
Every year, the tapes get older and the machines needed to play them become harder to find. But if your tapes still play, you still have a chance to save them.
With the right setup, you can bring those memories back to life and keep them safe in a format your family can actually watch, share, and enjoy.
Ready to Start Preserving Your Tapes?
The RVT Digitizer 3.0 makes it simple to convert VHS-C, 8mm, Hi8, VHS tapes, and other older video sources to digital at home.